I put the 2" front hockey pucks in yesterday. Took just 3 hours.
Most time consuming part was disconnecting the E brake cable
to fit it into the new bracket. The equalizer thing would only allow me
to turn it's nut a few degrees so it took a LOT of scraped knuckles,
over and over again.
Did the rear shackles today. It was a bit easier than the front.
Total time, also about 3 hours. Had to remove the wheels and
unbolt the tail pipe, but didn't have to remove the bumper.
This lift is the standard $160 package from Overland. Front pucks, rear shackles.
It's done on my stock composite rear springs. I didn't change to steel.
I'll probably do that in the future but dropping my gas tank in the Arizona summer
is not something I want to do.
So here it is. The 2" lift. I didn't take pics of the working steps,
there are plenty of really good how-to's posted already.
Instead of taking the xtra time for photos, I flew through the installation.
Here's pics of the finished product with some measurements.
Tires are stock 215s on stock wheels.
Descriptions of the photos are ABOVE the images.
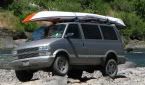
Side view, zero lift. Here's the reference photo for comparison with the lift photos to follow.
Disregard the jackstands you see in this photo, they are not engaged.
The van is resting in it's natural state, on it's stock composite springs, tires and shocks -

Same side view, after the 2 inch hockey pucks installed FRONT ONLY. Rear still stock, zero lift -

Same side view, after both FRONT and REAR 2 inch lift installed -

Front bumper, zero lift. In the subsequent pictures I've removed the plastic air dam
and the front lic plate holder for more ground clearance. So I took this measurement
from the bottom of the real bumper, not the plastic thingie. The tape measure is
3 inches square. So the total clearance in this STOCK configuration
is about 12 1/4 inch, ground to bumper -

Same front bumper side view, now with the 2 inch pucks installed.
clearance now 13 3/4 inch. gained about 1 1/2 inches. Haven't relocated
the bumper so I'm not really sure why I've gained ANY bumper clearance.
It theoretically should still be in the zero lift spot -

Front wheel, zero lift. Total vertical opening 27 1/4.
I think a more important measurement is the axle to fender measurement.
In this stock form, it's 14 1/2 inches from center of axle to top of wheel well -

Same place, now with the 2 inch lift installed.
Total opening 29 3/4. Axle to top of wheel well 17 1/4 -

Now BEHIND the front wheel, zero lift. Again, disregard the jack stands,
they are not engaged. Stock condition, zero lift, clearance 10 inches -

Same shot, behind FRONT wheel, now with the 2 inch lift installed.
Clearance 12 1/2 inch -

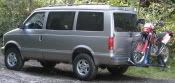
Behind REAR wheel, stock condition, zero lift. Disregard the floor jack, not engaged.
Clearance 13 1/4 inch -

Same shot, behind rear wheel, now with the 2 inch lift installed.
Clearance 14 3/4 inch -

Overall, a pretty darn simple job. You can do it with simple hand wrenches
and sockets. I don't have any impact tools. Sprayed PBBlaster a couple days
prior. The stock body bushings were in good shape, haven't disentegrated.
The steel washers in/on the bushings were a bit rusty but they cleaned
up well. I reused all the stock hardware except (obviously) for the longer
bolts through the front end pucks. Overland supplied those longer bolts.
Ride is great! Being 2 inches taller just serves to remind me why I like
driving a van in the first place. That great view of the road, compared
to the little sedans and other short cars, is now just 2 inches greater.
Rancho 9000s go in next.
Lumpy
You sang all those car commercials?
You got it, Toyota.
http://www.LumpyMusic.com