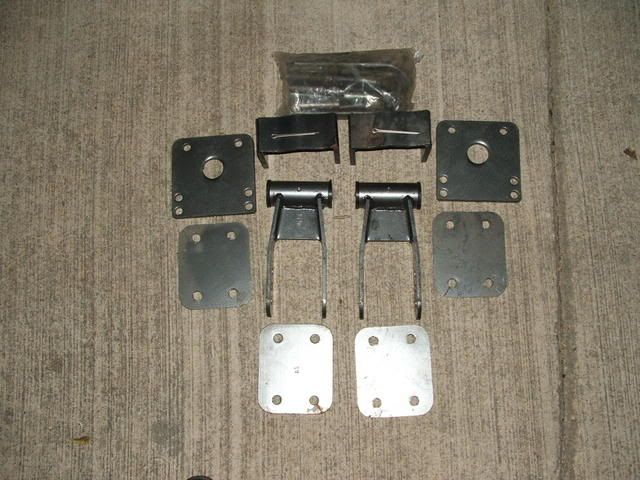
Ok guys,,need some help on flip kit install on composite spring. Here's a pic of the kit I sold. There were no directions with these parts. I've never installed one so I'm no help at all on this. Can anyone who has installed one gives us a step by step of install ?
Any help is appreciated.
89 Astro, 350 V-8, Shaved doors, Filled Slider, Corvette IRS, 94 Mustang GT Rack & Pinion(Thanks to Skip), Cad Tail lights from SoCalliV8 ( RIP) Miss you my friend.
VIDEO
If you drive illegally, they take your driver's license. If you're here illegally, they want to give you one
and here's the one from DJM:( what is this???)
1986-1994 ASTRO\SAFARI VAN REAR AXLE FLIP KIT WITH
COMPOSITE REAR LEAF SPRINGS ONLY!!
Please take the time to read these INSTALLATION INSTRUCTIONS and check the
Hardware Parts List to be sure you have all the listed parts, and the tools necessary
to safely complete the installation! Please read the warranty information (blue
page enclosed). Complete your Product Warranty Card and mail it to DJM
Suspension.
Please take a few minutes to fill out your installation helper (back side of warranty).
Accurate measurements BEFORE BEGINNING INSTALLATION will show any
irregularities from side to side of your vehicle.
NEVER WORK UNDER TRUCK SUPPORTED BY A JACK ONLY !!!
USE QUALITY JACK STANDS WHICH HAVE A RATING ADEQUATE FOR YOUR TRUCKS
WEIGHT!!!
NEW SHOCKS DJM PART #ARS01 ARE REQUIRED. FACTORY SHOCKS WILL BE TOO
LONG.
Hardware Parts List:
Rear Axle Kit Spring Hanger Kit
2- Axle Locator Brackets 4- Spring Eye Lowering Plates (4 Hole)
2- Spring Plates (5 Hole) 4- .62” x 4.8” Spacer Tubes
2- 1\2” x 20 U-Bolts 4- 9\16” x 12 x 6.5” Bolts
4- 1\2” x 13 x 3.5” Bolts 4- 9\16” x 12 Nylock Nuts
4- 1\2” x 13 Nylock Nuts 8- 9\16” SAE Flat Washers
4- 1\2” x 20 Nylock Nuts
8- 1\2” SAE Flat Washers Shackle Kit
4- 9-16”X 1.625” Spacer Tubes 2- Spring Shackles w\bushings
2- Tall Bump Stops
1) Park your van on flat level surface. Chock the front wheels. Loosen lug nuts. Raise the rear with a floor jack in
the center of the rear axle. Support the frame with jack stands. Lower axle to release the tension on the rea
springs. Make sure axle is supported by floor jack .
NOTE : ALWAYS USE JACK STANDS - NEVER RELY ON JACKS ONLY!!
2) After removing rear wheels, remove U-bolts and hardware attaching the rear axle to the leaf springs.
3) Remove the ground cable from the battery. Loosen the screw clamp on the fill tube going into gas tank.
Disconnect the gas tank by loosening the mounting straps and removing the screws attaching the filler tube to
the body. The tank must be moved towards the center of the vehicle to remove the spring eye mounting bolts.
(drivers side). CAUTION - BE EXTRA CAREFUL WITH
GAS TANK. NO SMOKING. WORK IN WELL VENTALATED AREA.
4) Remove the two bolts holding front spring eyes to mount. These bolts will be reused when you reassemble the
spring to mount.
5) Remove the bottom bolts on the rear shackles. Lower floor jack slightly so the rear spring eye will slide out of the
shackle. Remove the upper bolts from the shackles, and remove the shackles from the van. Save the hardwar , you
will need them to install your new DJM shackles.
6) Remove the two bolts from each spring eye hanger. Install the front spring plate (4 hole) in factory holes,
using the 9/16“ x 6 ½” bolts and long spacer tubes provided. Slide the spacer tubes between the spring plates.
Note - snug these bolts only, you will tighten later.
7) Remove the rear axle mounting brackets from the rear axle. DO NOT modify or remove the rubber isolators
bonded to the rear leaf springs.
8) Slide the rear springs under the rear axle, you will need to raise the axle housing.
9) Install the front spring eye hanger between the eye hanger plates using original hardware. Attach front spring eye
to hanger with factory bolts.
10) Install your new DJM shackle to the frame using original hardware, bushing end up. Lift the spring into the
bottom portion of the new shackles an insert factory bolts. Note - snug these bolts only, you will tighten later.
11) Install axle locators on top of the rubber isolators on rear spring. Note - the rubber ribs will fit into the recess
of the axle locator brackets.
12) Lower the rear axle assembly into place on top of the axle locator being careful the steel brake lines are clear.
The axle locator brackets vertical tabs should rest in the bracket welded to the axle. Note - be sure the
vertical tabs are seated inside the axle bracket.
13) Install your new U-bolts over the axle and through the new axle locator brackets. Place the new spring retaine
plate (5 hole) under the spring , the U-bolt will go through holes in plate and secure with ½” x 20 nuts (DO
NOT TIGHTEN). Insert 9/16”X 1.625” spacer tubes between factory axle bracket and DJM axle locators and
install ½” x 3.5” bolts through the axle support bracket, spacer and spring plate and secure with ½” x 13 nuts.
(DO NOT TIGHTEN).
14) Lower the floor jack completely so the axle assembly is in it’s correct position. Re-check the axle
Location, be sure the brake line clearance is sufficient.
15) If you are satisfied with the installation and step 14 is complete, tighten all nuts and bolts at the spring hanger,
spring shackle, and axle locator brackets. Now double check! Don’t miss any!.
16) Reinstall the gas tank straps, screws for filler tube and battery ground. Install and torque wheel lug nuts and
your ready to roll. After a few hundred miles, check all the bolts to be sure they are tightened properly . I hope this helps ya!
Rebel wrote:Ok guys,,need some help on flip kit install on composite spring. Here's a pic of the kit I sold. There were no directions with these parts. I've never installed one so I'm no help at all on this. Can anyone who has installed one gives us a step by step of install ?
Any help is appreciated.
ok the two plates that have the big holes in the middle go under the leaf after flipping the axle onto the top of the leaf then there should be 4 total plates (if this is the belltech kit) that will move the stock leaf spring shackle down (the Two Front shackles and the gas tank needs removed to do the driver side one) then theres the two shackles that go in the back. I eventually took the front brackets out and just use the rear ones since the djm ones are adjustable but i had to notch the frame for this i can try to get pic of mine and how the axle sits on top of the leaves since now my drop kit is gone except for the flip part since i now bagged it
Hey SS, I am the guy that bought the kit. I would like to see a pic of your set up please. I planed on notching. If I noch the frame I can leave the stock perches and schakles in right? Just do the flip and leave everything else alone?
yes but i would still use the rear shackles b/c after i did that the driveshaft started to rub on the crossbar where the gas tank strap closest to the rear end bolts in at b/c it had more room to travel with the notch