Page 2 of 7
Re: Tips on Changing Spark Plugs & Wires
Posted: Thu Apr 10, 2008 6:34 pm
by Tobaloba
Found it. Don't know how I did this, but I didn't get the #1 wire on the plug. It was tucked between the spark plug and whatever kind of metal heat shield is there.
](./images/smilies/eusa_wall.gif "Banging my head")
Can't believe it. Couldn't help but say a prayer and thank the Lord for making it so easy on me. It's stupid stuff like that that makes me really wonder if I've got what it takes to do this stuff. But I'm really wanting to learn.
She runs as smooth as anything ever did. Next I'm going to change the transmission fluid. I'm about find out where the most appropriate forum to discuss jacking the van and placing it on jackstands. I'm scared as hell of this process. Won't let my wife or kids in the garage when I'm doing that. Any my jack acts kinda funny. Anyway, I too took a ton of photos of this process. But one last question. What's the deal with the 2 wires that have the straight boot? Are those supposed to be for any special plug? The ones I took off were numbered and the straight ones were on #6 and #1. Turns out those are the plugs the similarly-shaped new ones are on. Not because I checked, but just because I was putting the longest wire to the furthest plug.
Re: Tips on Changing Spark Plugs & Wires
Posted: Thu Apr 10, 2008 7:00 pm
by ihatemybike
The ones with the straight boot both sit where the heat shield only goes around one plug, just easier to grab.
Re: Tips on Changing Spark Plugs & Wires
Posted: Thu Apr 10, 2008 7:04 pm
by ihatemybike
Oh, I did Green's trans fluid and filter with all four wheels on the ground. It's a little tight but doable. You'll be wishing that it came from the factory with a trans drain plug regardless.
Re: Tips on Changing Spark Plugs & Wires
Posted: Thu Apr 10, 2008 7:53 pm
by ihatemybike
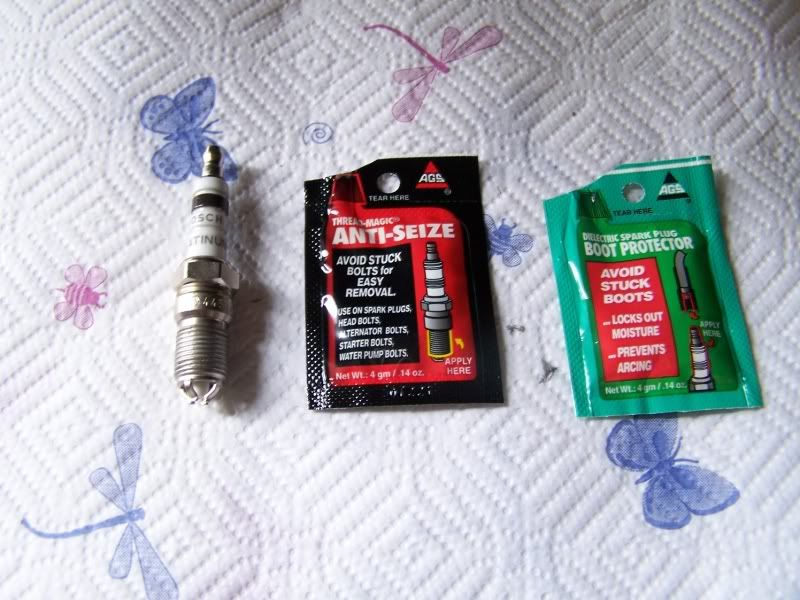
Tools used: Floor Jack, stock lug nut wrench, one jack stand, body panel puller, 5/8" spark plug socket, u-joint, 3", 8", and 10" extentions, ratchet, light, anti-seize, boot grease, partitioned box.
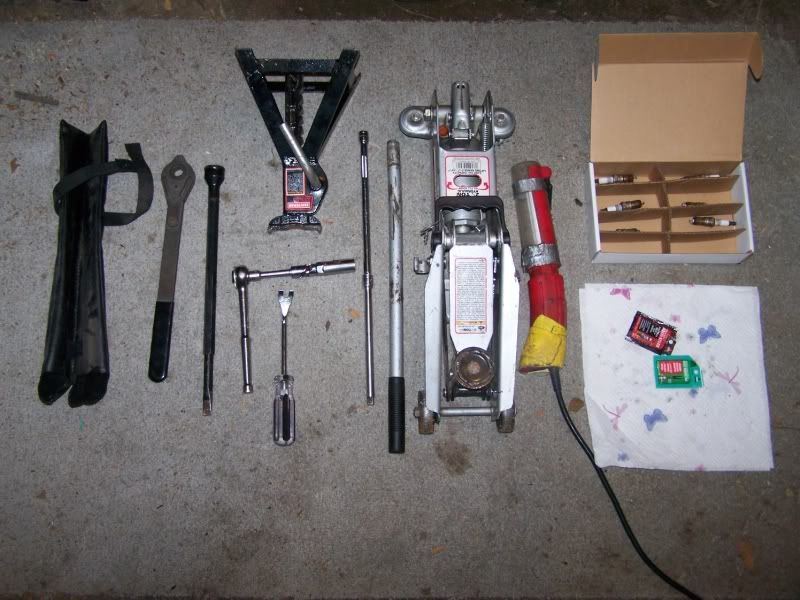
Plug Prep
Passenger side:
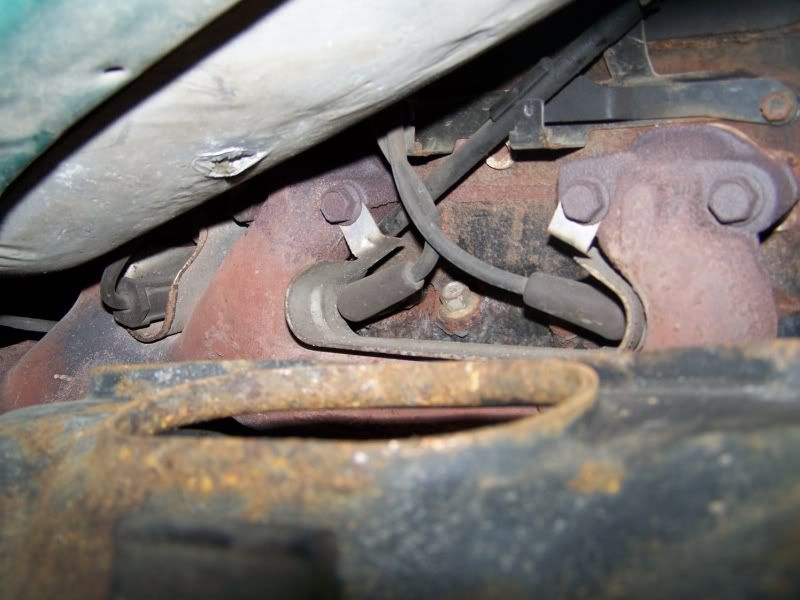
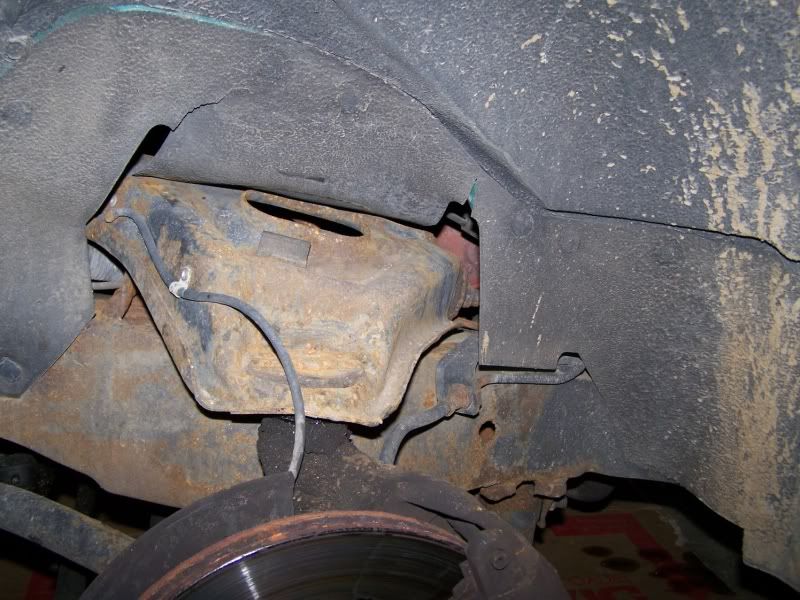
Front wheel removed, view of shielding
Shielding moved to expose plugs.
Drivers Side
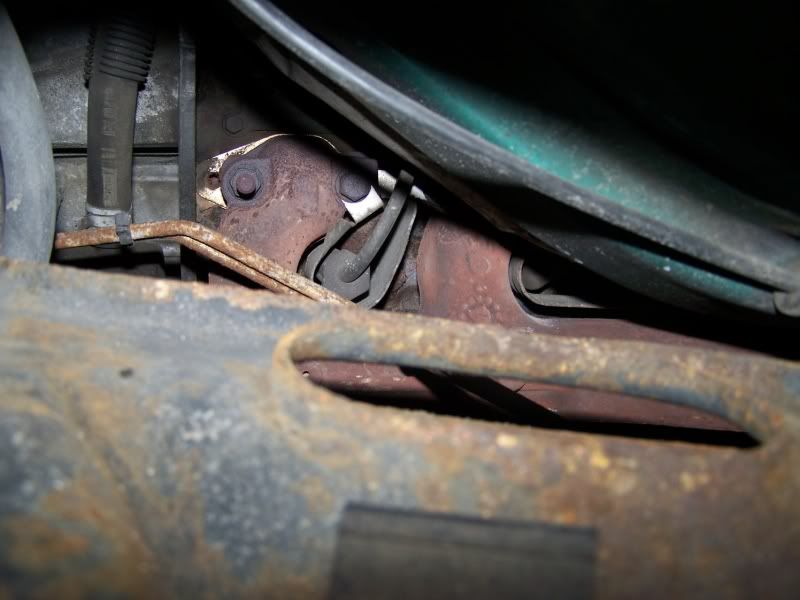
Front wheel removed, view of shielding
Shielding moved, exposing front two plugs.
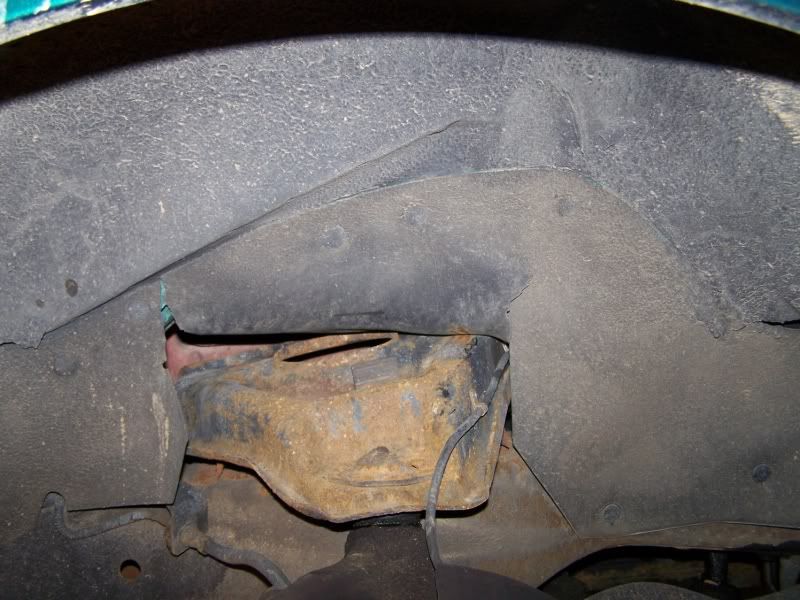
Rear plug from side
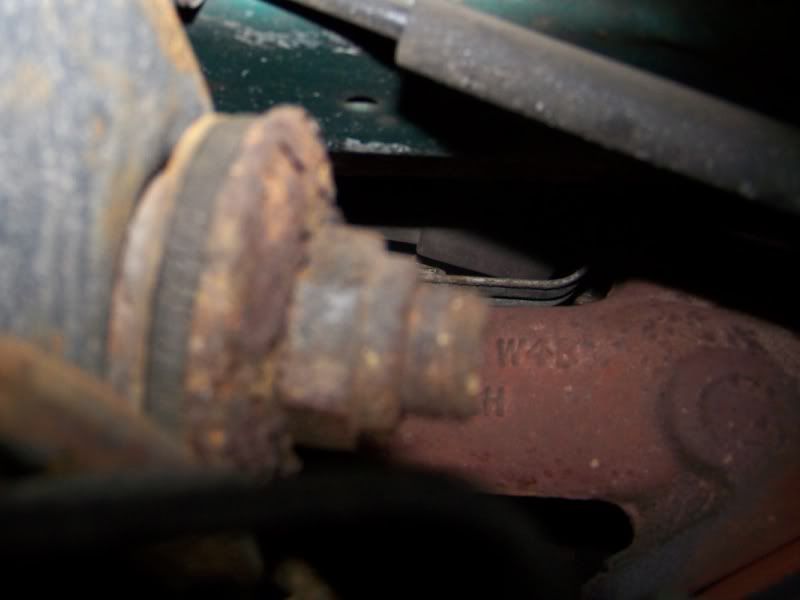
Rear plug location from underneath
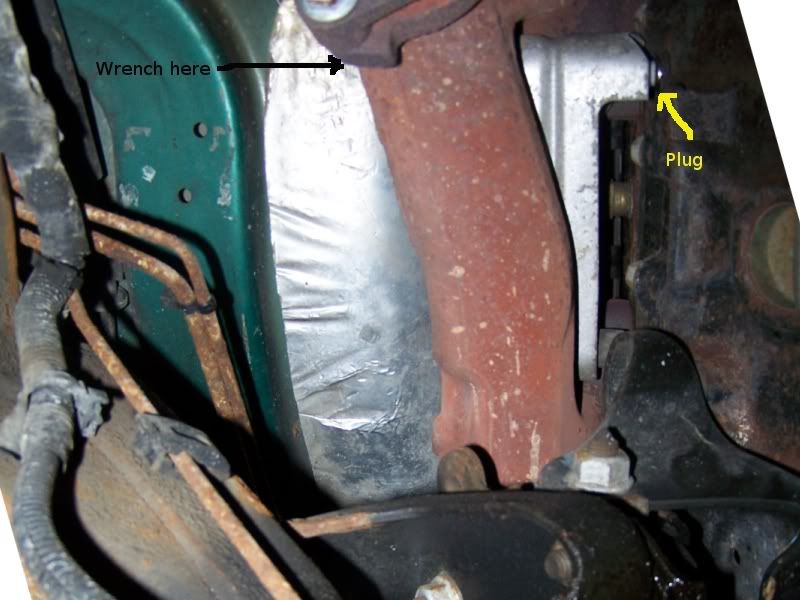
3" extension showing where wrench goes
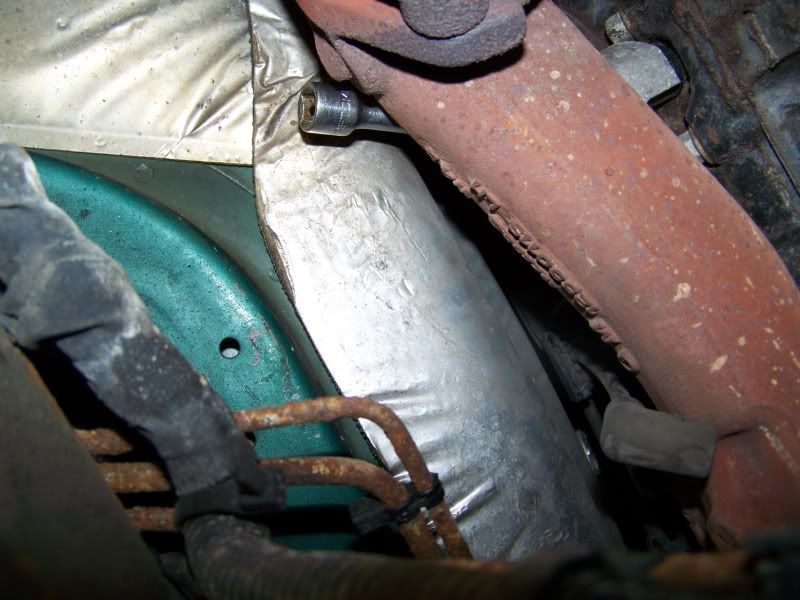
I used the u-joint behind the socket for every plug, this makes matching the angle of the spark plug hole much easier. On the plugs that were accessed from the wheel wells the 8" and 10" extension were used in tandem to bring the ratchet out to a better location. On the drivers rear plug the 3" extension was used. Engine cover was not removed, hood was opened only to disconnect/reconnect the battery.
Re: Tips on Changing Spark Plugs & Wires
Posted: Fri Apr 11, 2008 6:31 am
by Water Boy
Did your wife get mad for placing all our your project tools on her dining room carpet just for a pic?
Why did you disconnect/re-disconnect the battery?
Re: Tips on Changing Spark Plugs & Wires
Posted: Fri Apr 11, 2008 6:46 am
by ihatemybike
Water Boy wrote:Did your wife get mad for placing all our your project tools on her dining room carpet just for a pic?
That carpet is on the garage floor, I have a little ghetto lounge area towards the back of my garage when no vehicle is inside.
Water Boy wrote:Why did you disconnect/re-disconnect the battery?
I didn't re-disconnect. But the battery thing is a wrenching habit.
Re: Tips on Changing Spark Plugs & Wires
Posted: Sat Apr 12, 2008 9:16 am
by Jboy2
Excellent Post Aaron

Re: Tips on Changing Spark Plugs & Wires
Posted: Sat Apr 12, 2008 10:24 am
by Water Boy
Re: Tips on Changing Spark Plugs & Wires
Posted: Sat Apr 12, 2008 10:51 am
by BLAZER
The 2" body lift makes it easy as pie!!!!! If you think these are bad, try changing number 5 plug on a 97 4x4 S10 blazer...that one plug takes me longer than all the rest combined, the steering shaft goes right by it.
Re: Tips on Changing Spark Plugs & Wires
Posted: Sun Apr 13, 2008 1:05 pm
by phr1$k37
I will echo on the body lift hah ha. Now I remember when I did not have the lift yet, yes, it took me a record time of 5 hours because two plugs did not want to come out and the "arm position" is hard to get.
How many of you guys run without the shield? I go 4x4 and yet I have mine off ... am I really introducing a lot of dirt in there? 
Re: Tips on Changing Spark Plugs & Wires
Posted: Sun Apr 13, 2008 5:52 pm
by ihatemybike
Took me less than 2 hours including all the fussing with the camera. Think I spent more time using the camera than turning wrenches.
Re: Tips on Changing Spark Plugs & Wires
Posted: Mon May 12, 2008 4:06 pm
by TheChopFather
I just read this topic and never realized it took so long to change plugs on a stock stro! it took me 15 min to change the plugs on TW saturday I guess it helps having 5 inches of lift. (leave it alone Petey)
Re: Tips on Changing Spark Plugs & Wires
Posted: Mon May 12, 2008 4:18 pm
by ihatemybike
It really doesn't take that long on a stock Astro. I could've done it much quicker, but I spent a lot of time playing with my camera.
Re: Tips on Changing Spark Plugs & Wires
Posted: Mon May 12, 2008 4:38 pm
by safariobsession
Tobaloba wrote:Found it. Don't know how I did this, but I didn't get the #1 wire on the plug. It was tucked between the spark plug and whatever kind of metal heat shield is there.
Can't believe it. Couldn't help but say a prayer and thank the Lord for making it so easy on me. It's stupid stuff like that that makes me really wonder if I've got what it takes to do this stuff. But I'm really wanting to learn.
I did the exact same thing! I did this though after i put the "re-sealed" heads, intake and everything back on....and cranked it for the first time. Thought i screwed up one of the valves! Had me scared, but was an easy wire fix.
Re: Tips on Changing Spark Plugs & Wires
Posted: Mon May 12, 2008 10:53 pm
by Astrophysics
Tool hints:
take a look at the new extensions availabale at Sears! the male end has a pseudo ball effect so each socket can swivel a bit to line up hard to reach bolts. this is less swivel than a full U joint but more secure and usally enough range of motion. the extensions are sold under the Sears Companion rather than Crafsman since they are made in Taiwan but very handy...also it pays to get a 5/8 inch spark plug socket with its own built in U joints.
the other trick for finger tight starting of the threads on the new spark plug is to put the spark plug electrode in a piece of rubber fuel line or vinyl tubing and use that as the extenion to get the plug started (ie finger tight.) then use socket and metal extension etc.