Homebrew Con-Ferr Style Porthole Roof Rack Build

FROM BUFFING YOUR PAINT, TO REPLACING CRINKLED FENDERS TO SWAPPING A NEWER FRONT END ON, TO SHAVING DOOR HANDLES. TO REPLACING DOOR HANDLES OR INSTALLING CUSTOM TAIL LIGHTS, POST THEM HERE.
Post Reply

Topic author
97CargoCrawler
I sleep in my van
Posts: 754
Joined: Thu Jan 24, 2008 11:50 pm
Location: Near Los Angeles, CA
Contact:

Re: Homebrew Con-Ferr Style Porthole Roof Rack Build

Post by 97CargoCrawler »

I got everything done that I had planned for this weekend! That never happens.

I finished drilling the last 20 holes, everything came out perfect. Then I just set the feet on top and slid the bolts in to hold them well enough for me to get up on a ladder and tack weld the rail:

Image

Image

Image

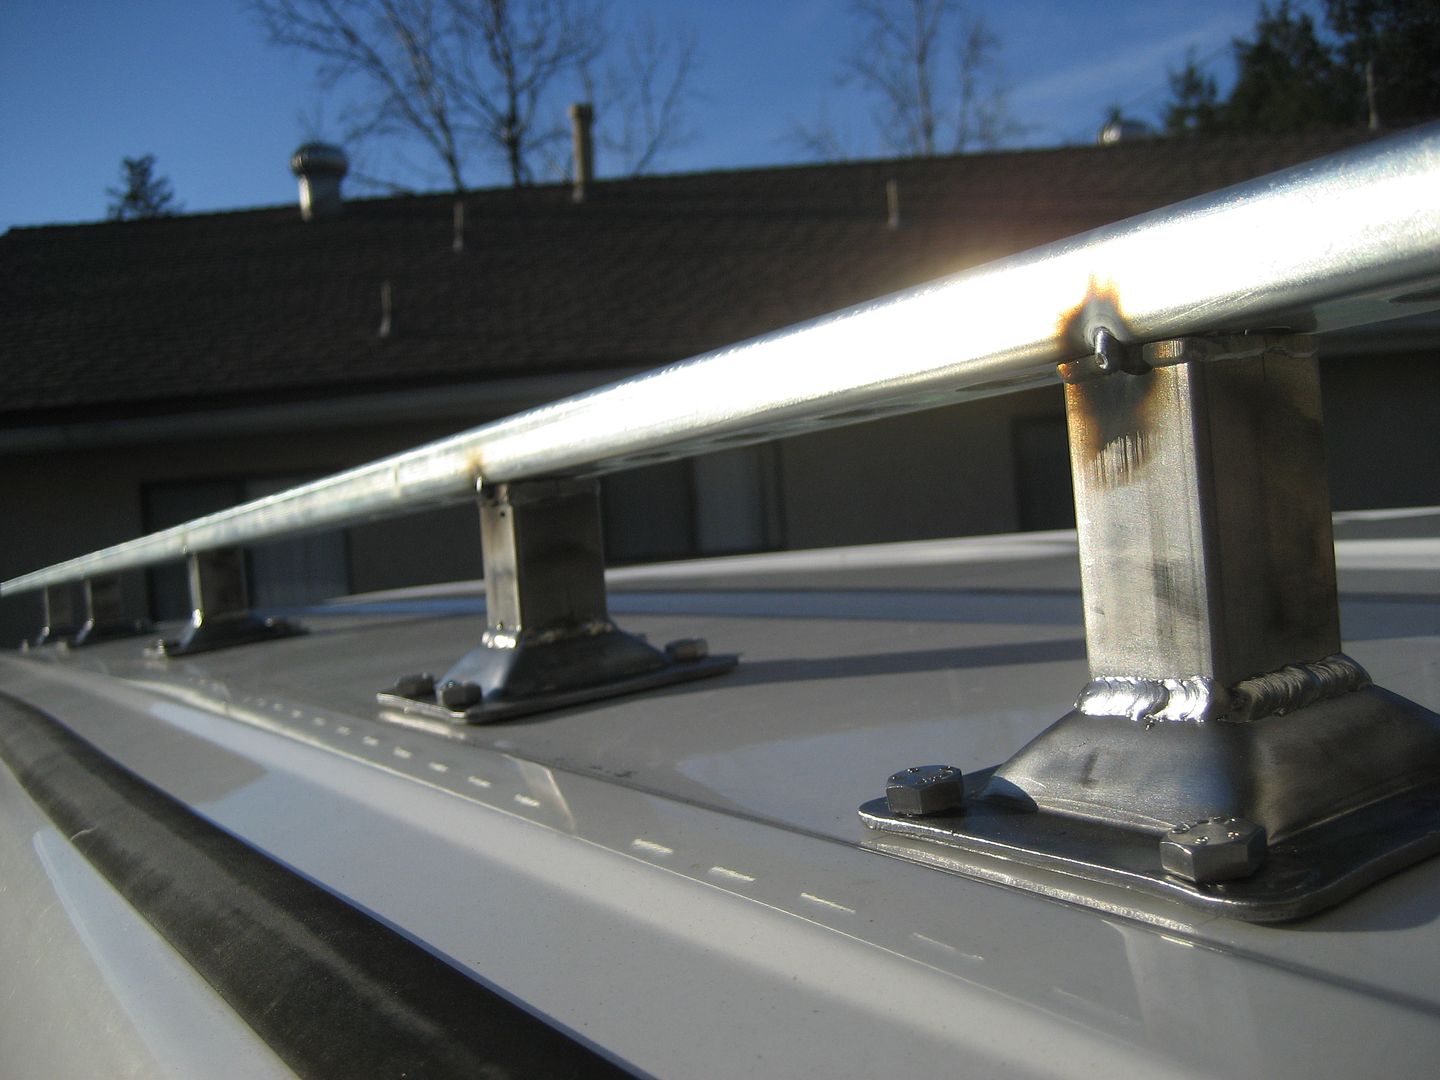
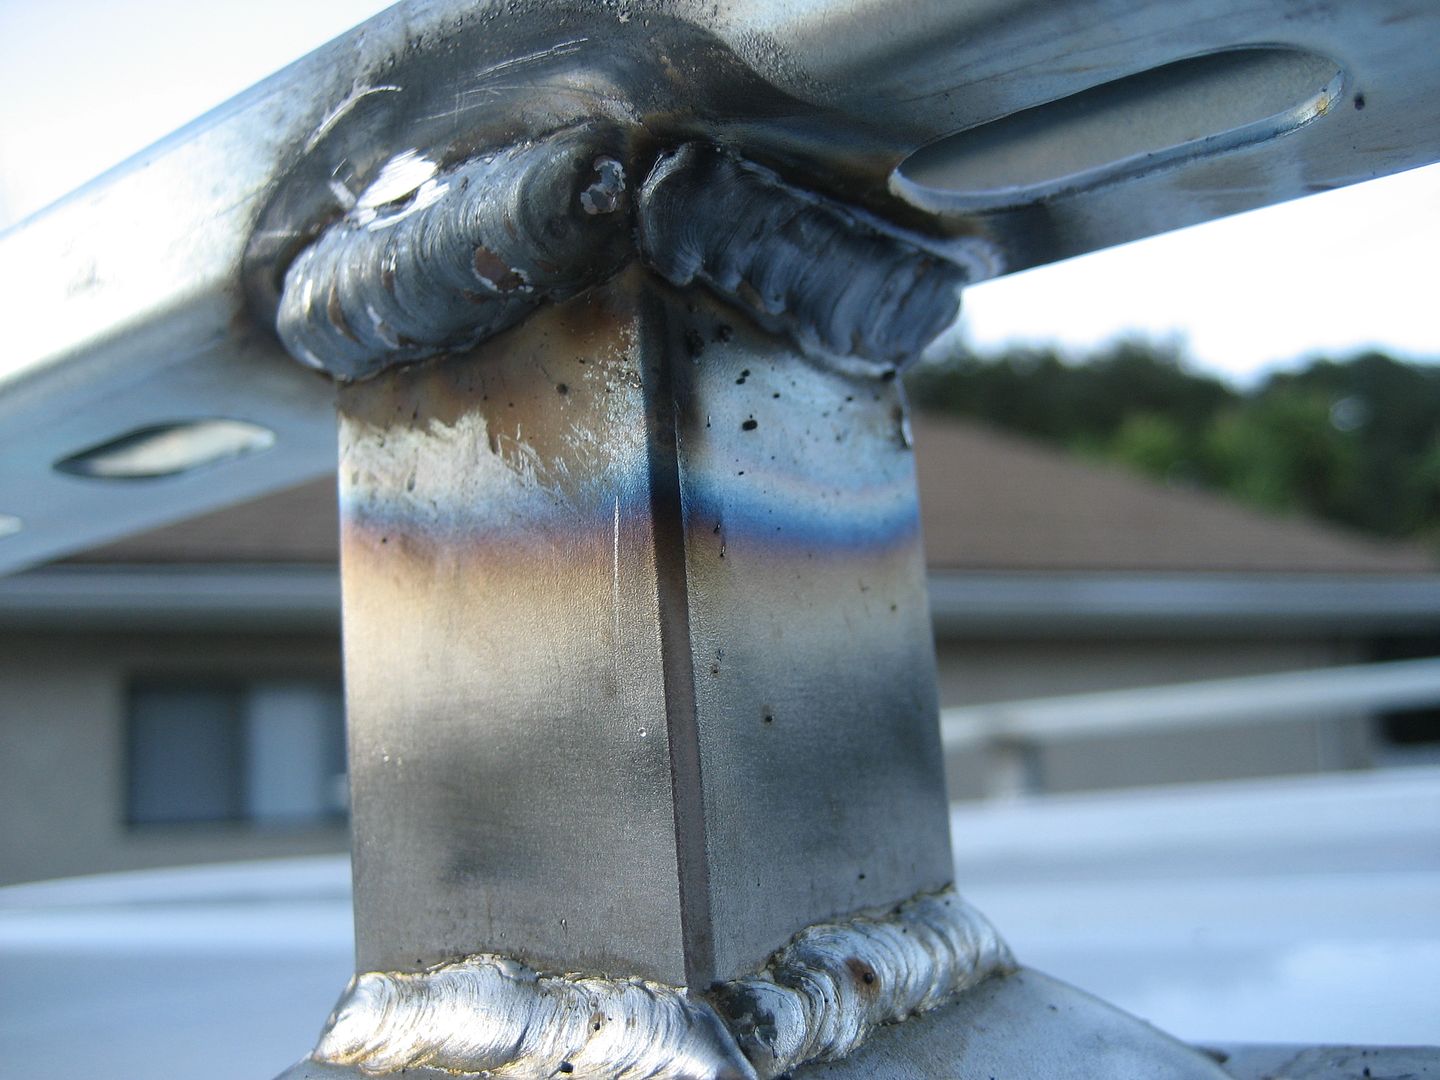
After everything was tacked down I pulled the rail off and finished the welds all the way around the leg. A few of my welds came out like crap because I kept hitting the duty cycle of the welder. When that happens the wire feeds sporadically and the current fades. But I managed. The heat warped the rail a little bit but at least it warped in the direction of the roofs curvature:

Image

Pressing down on the rail a bit flattened it out so I'm not concerned. With the bolts in everything will look just right:

Image

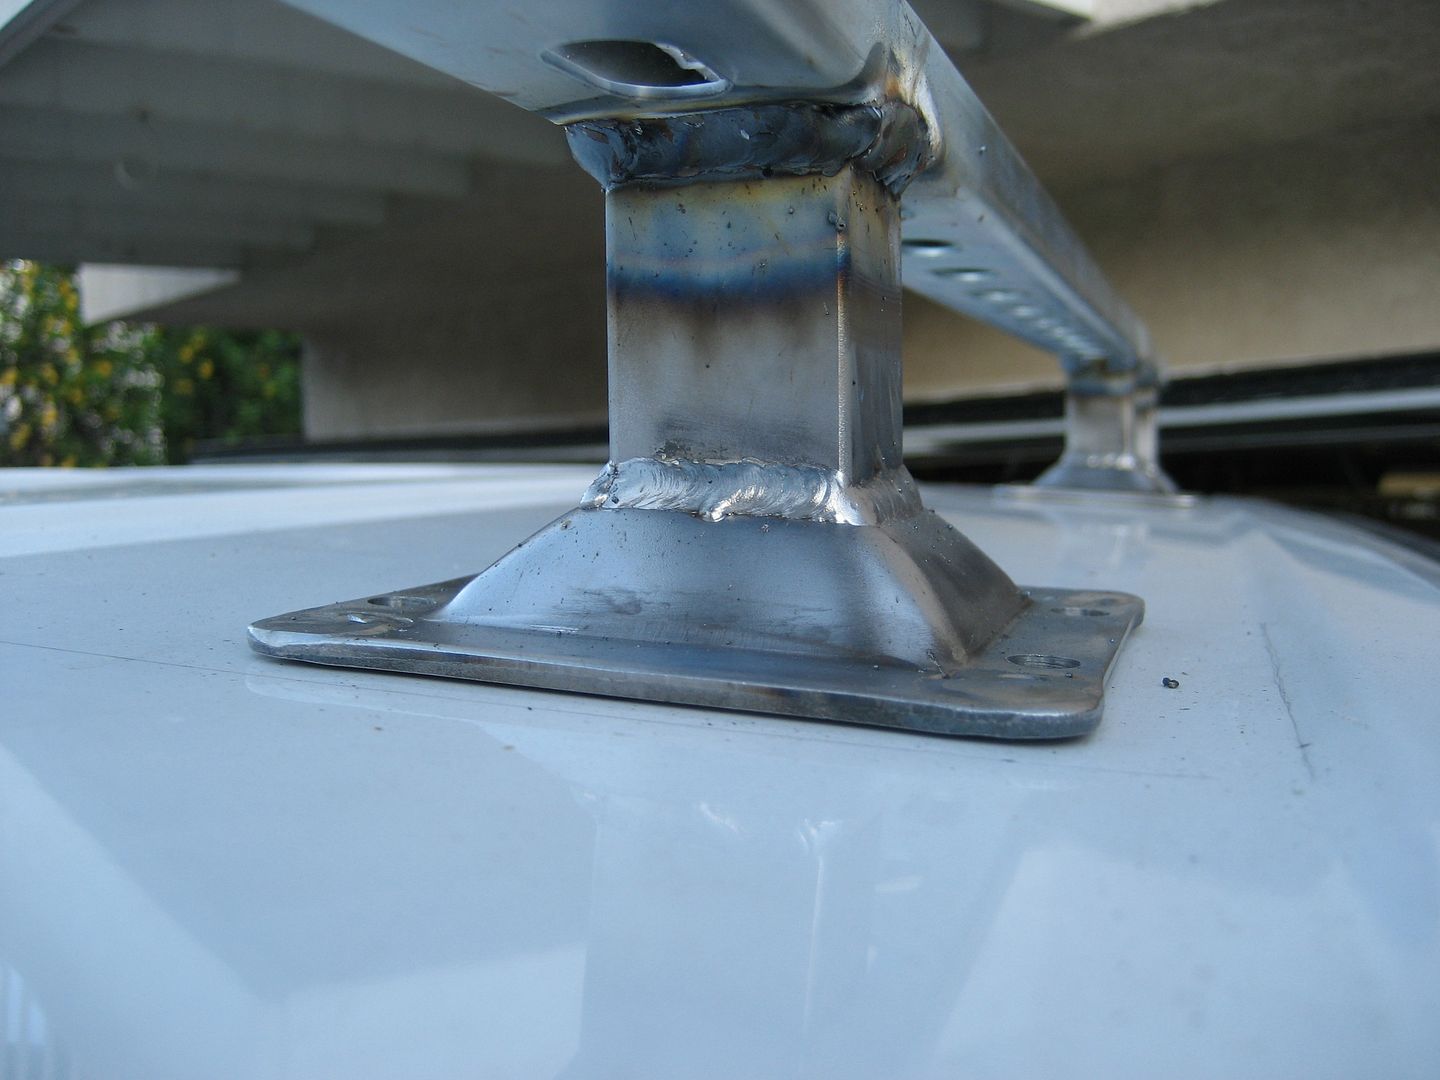
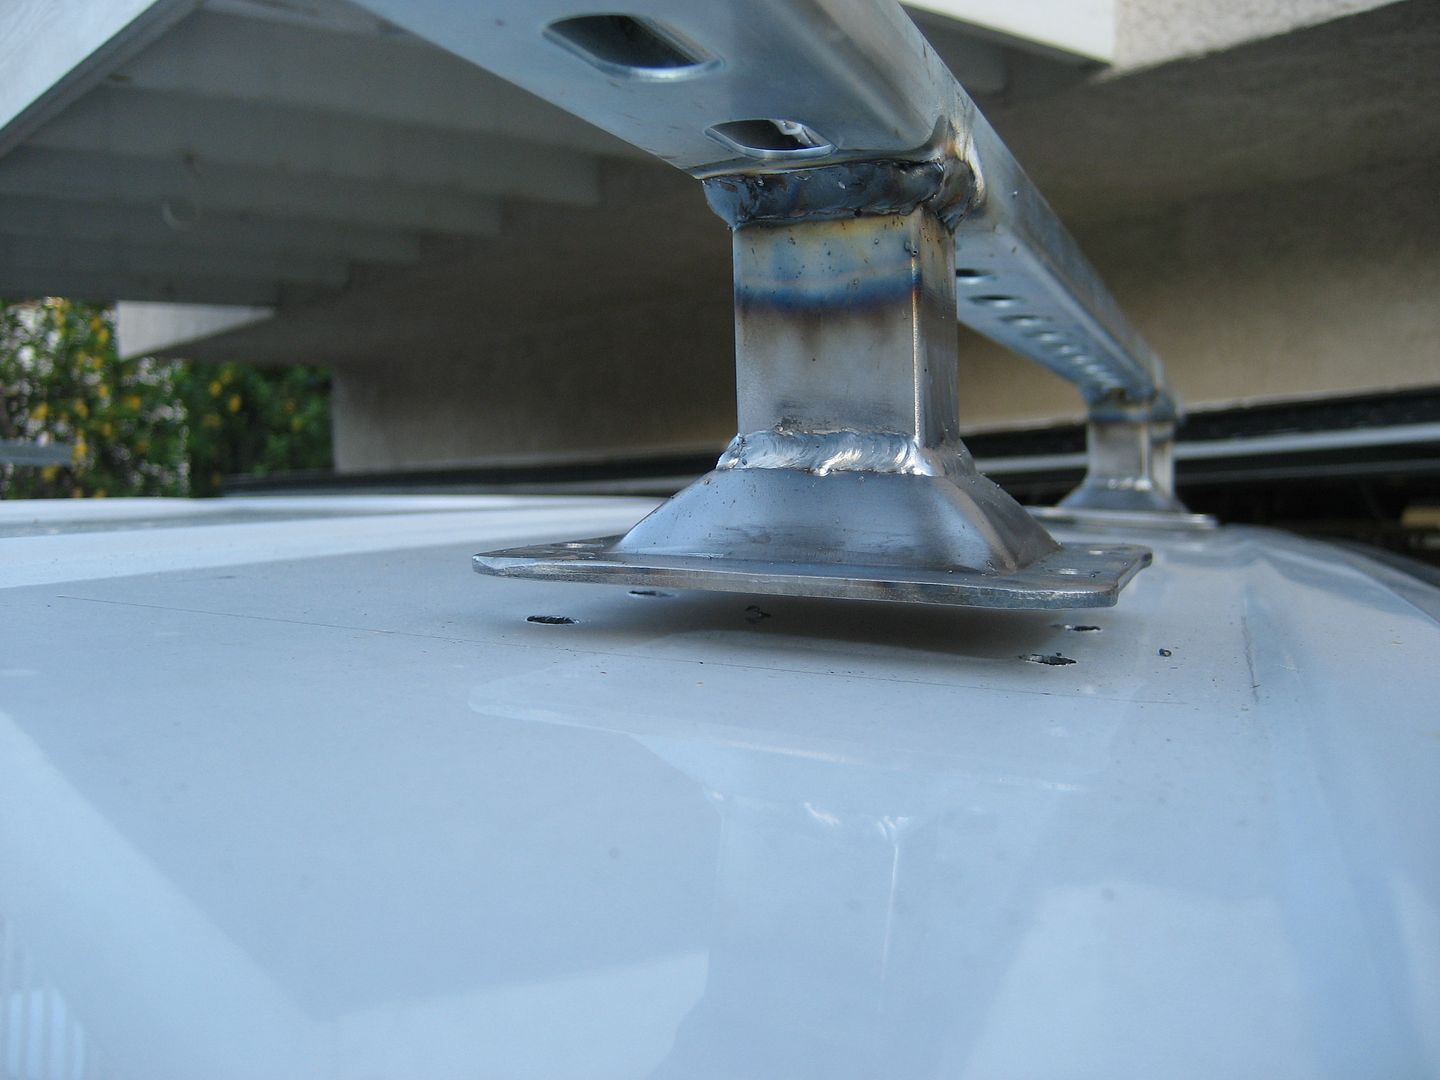
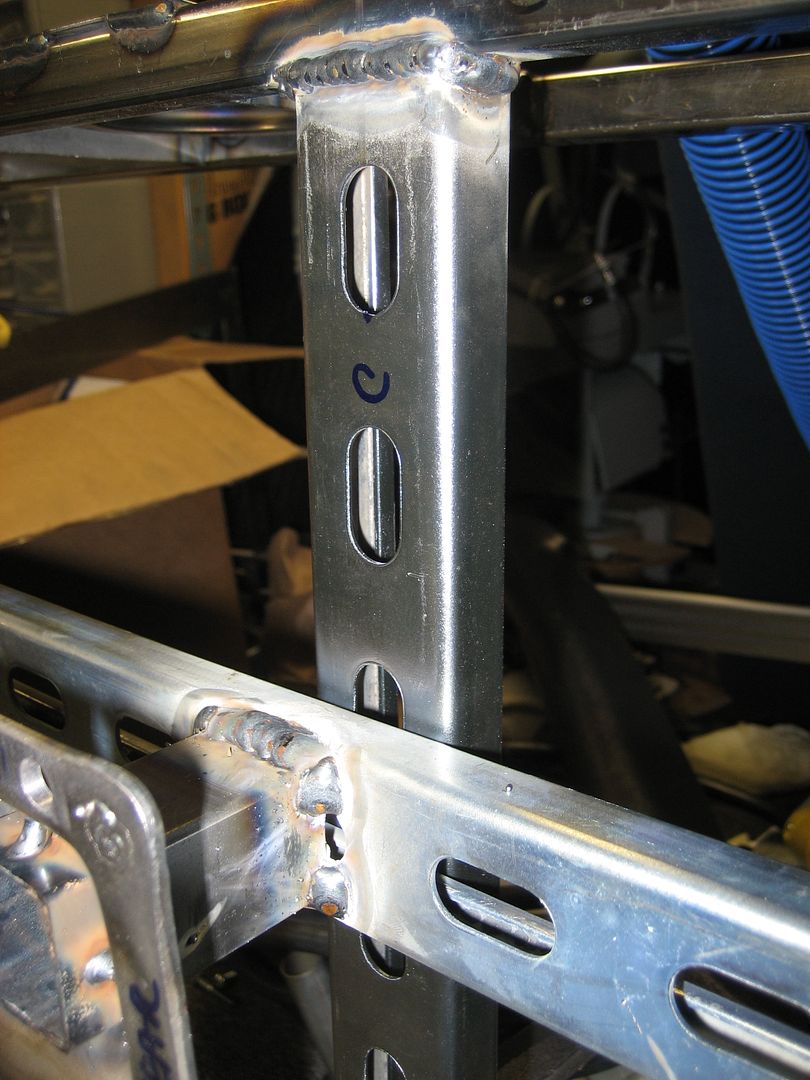
I cranked up the wire feed speed so I could get good penetration and a wide weld. I wanted to spread the new bead from the square tubing across the bead that was there from welding the caps on and then to the strut rail:

Image

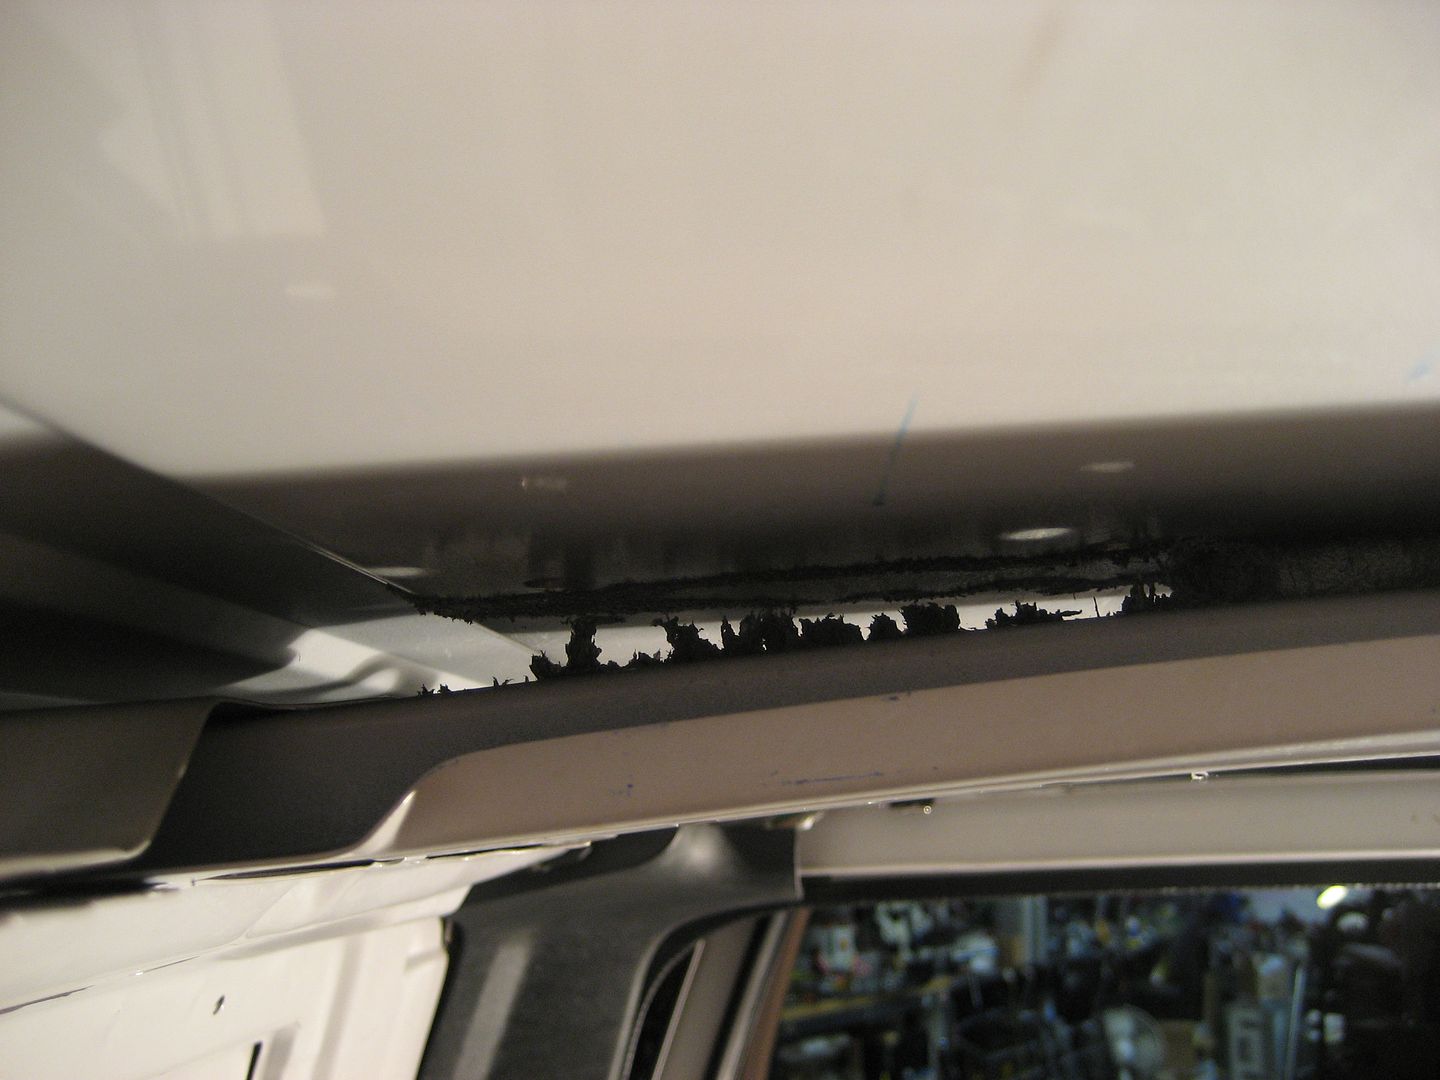
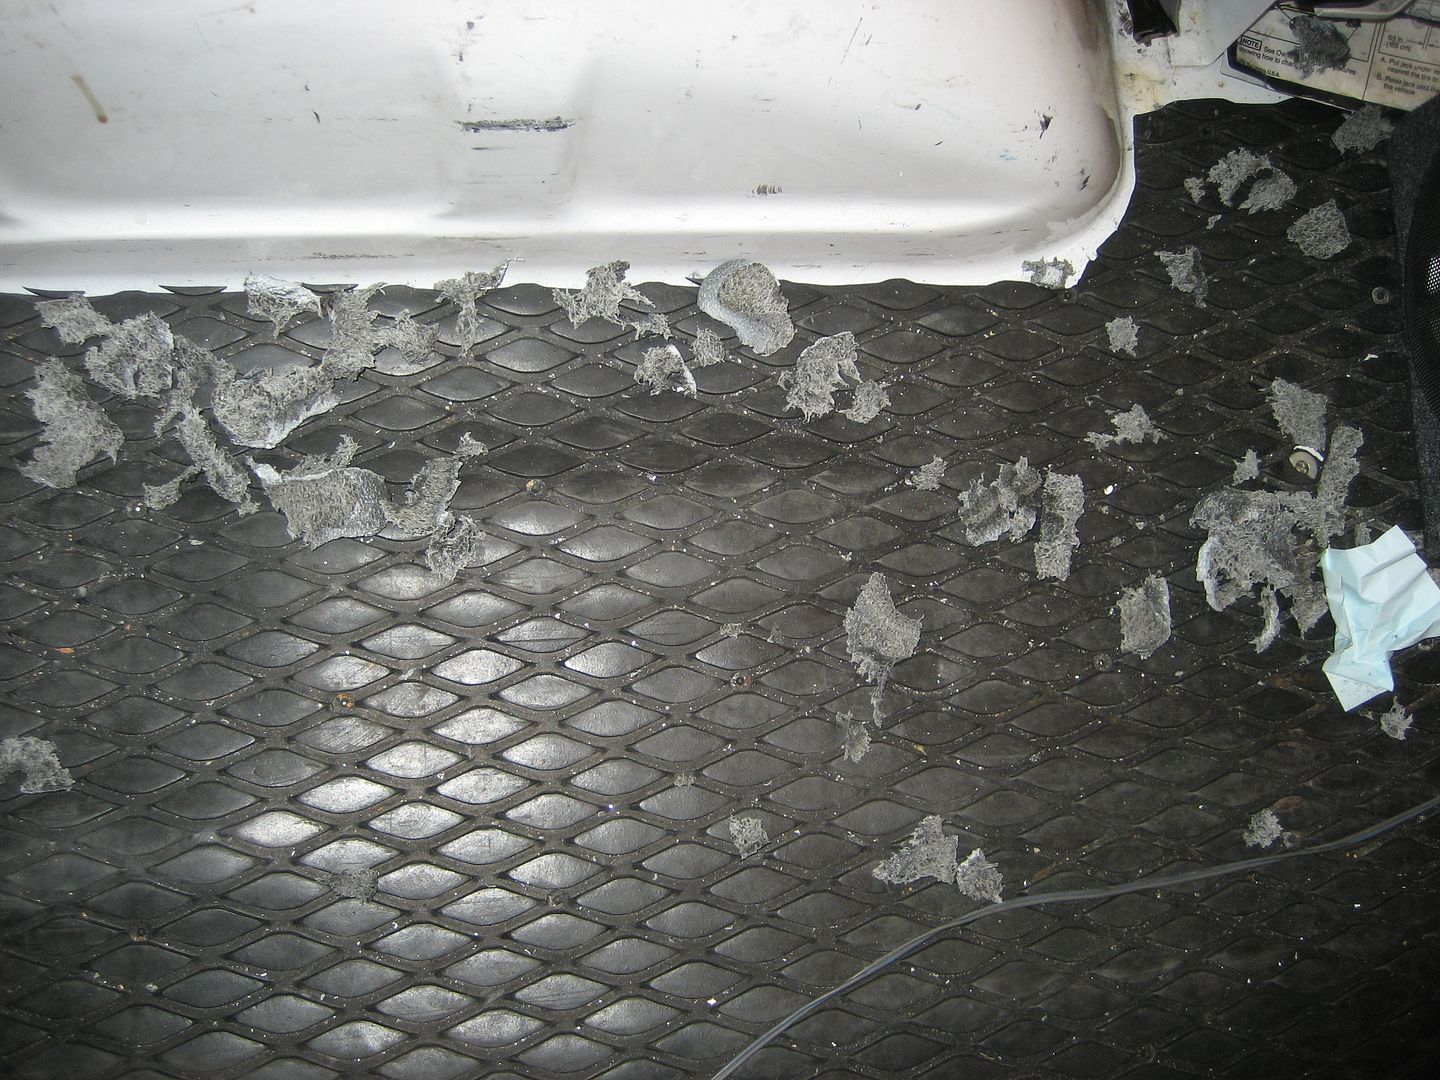
All welded up. I still need to chop about a foot off the front end of the rails. Then clean off the zinc oxide poison and get them ready for paint.

Image

Image

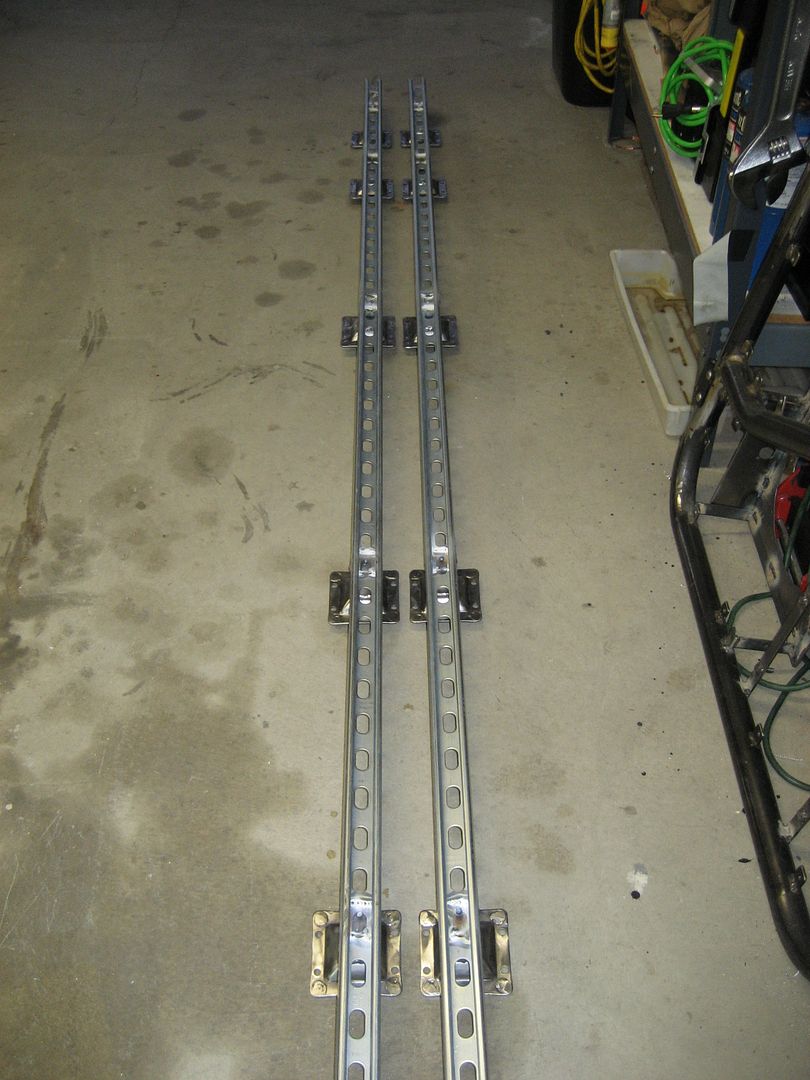
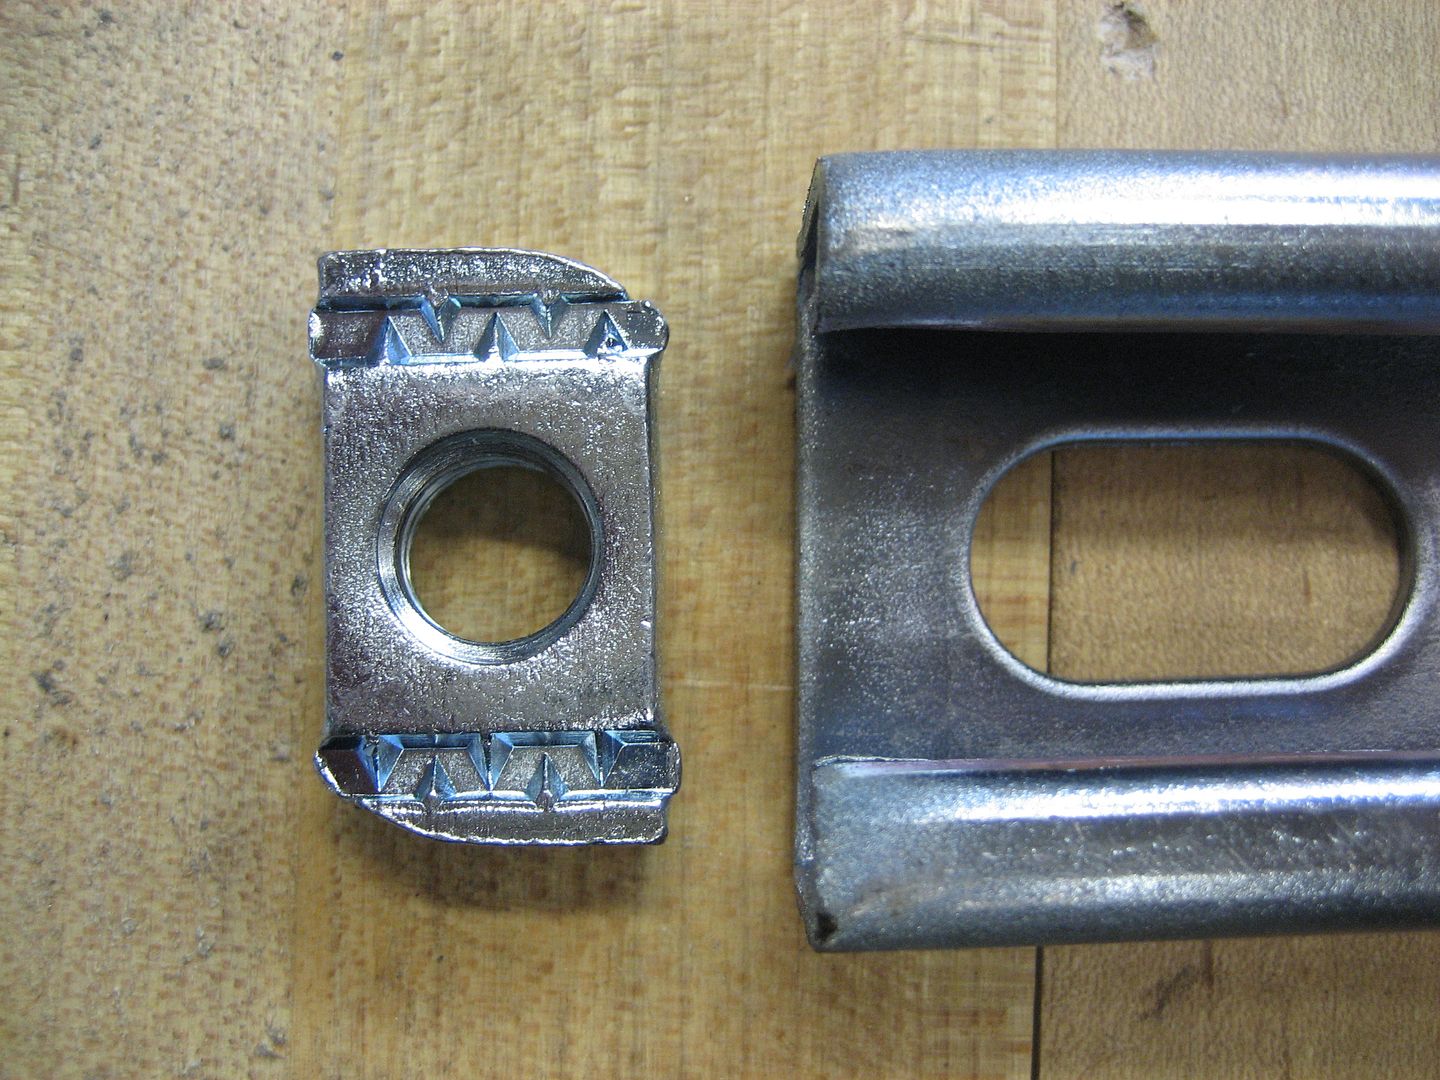
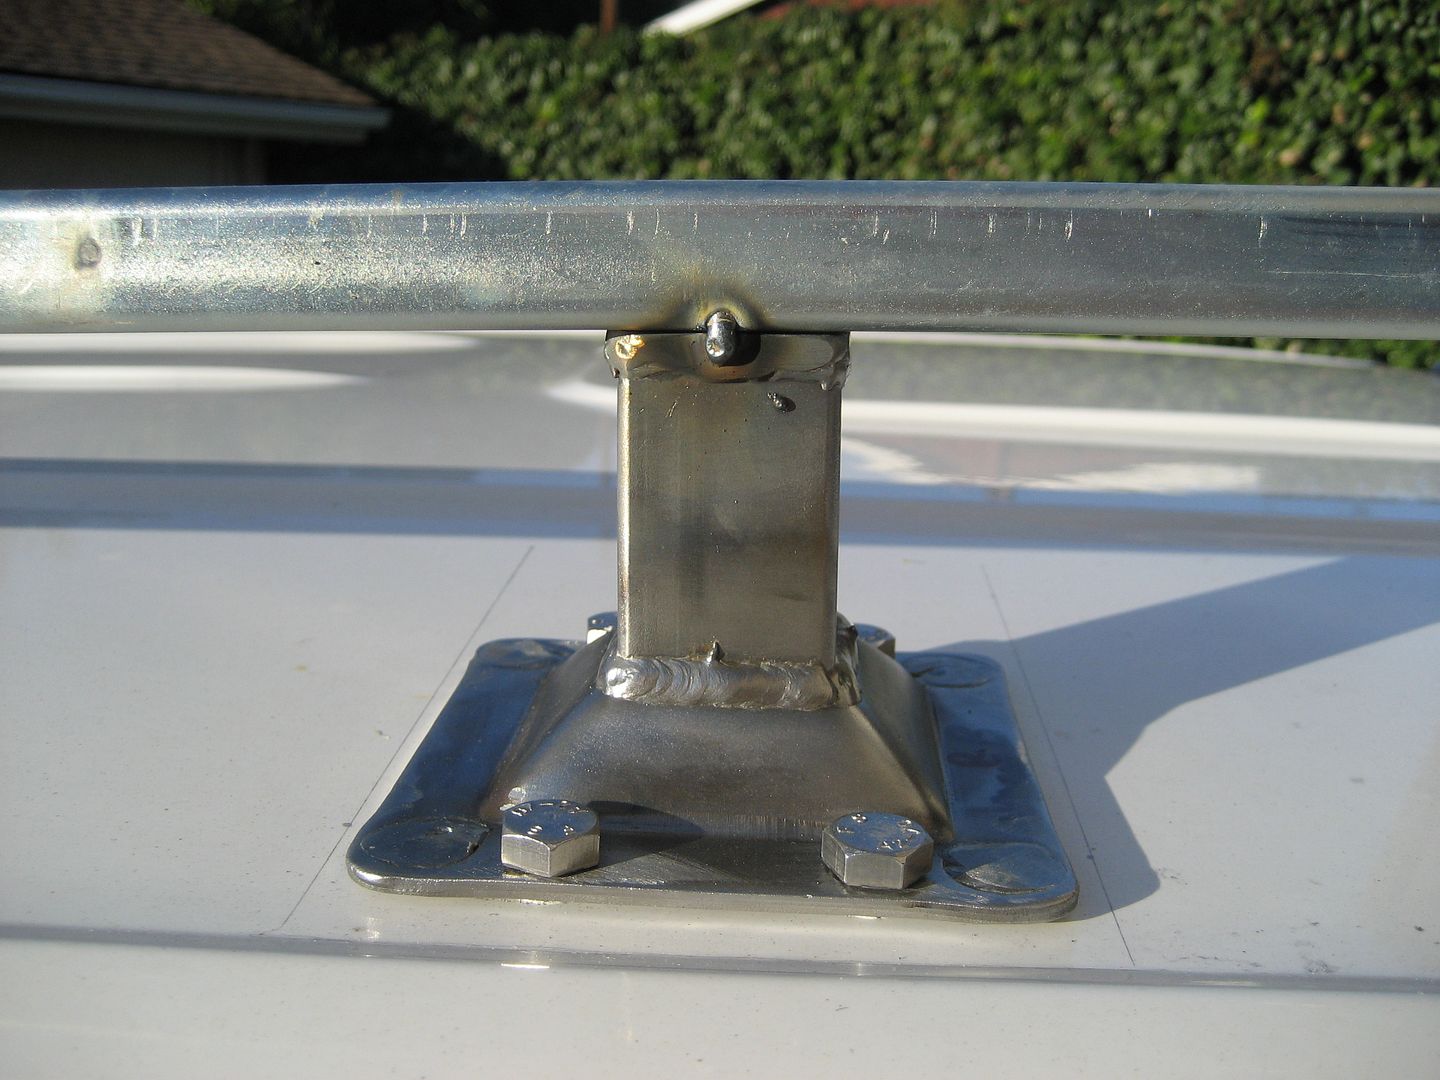
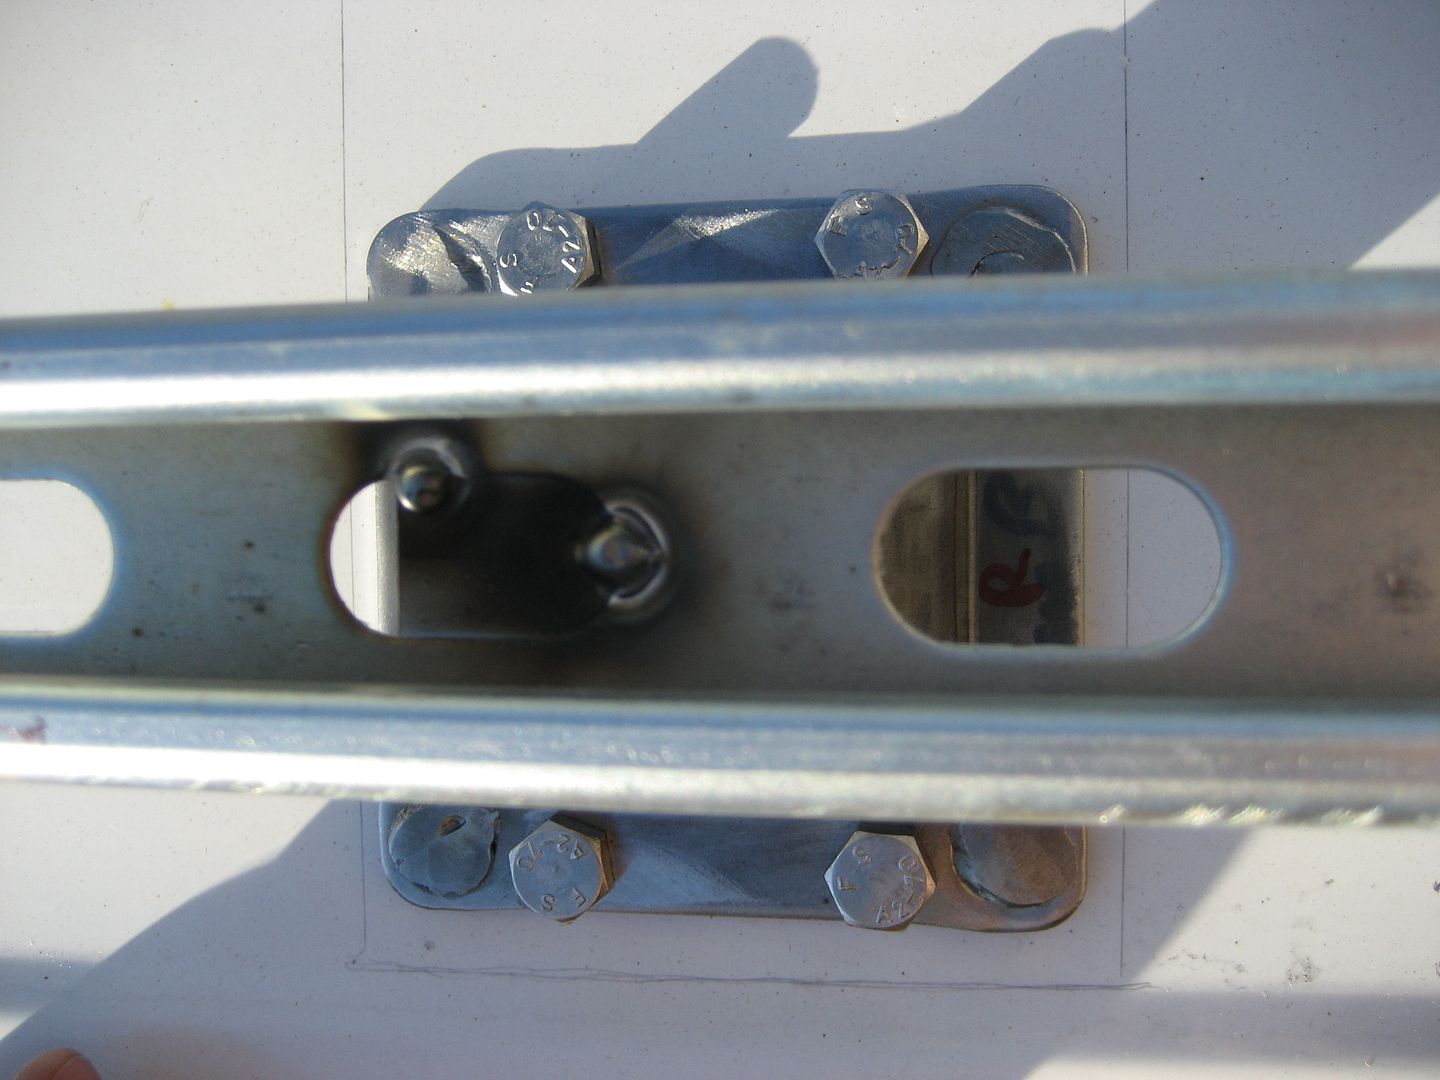
The way the spacing worked out I will only be able to use 6 bolts with nylon lock nuts. The other two bolts will have to go into strut nuts that will sit inside the channel. That's fine, I still have 8 bolts securing the rack only now two of them will have to be coated in Locktite to keep them from rattling loose.

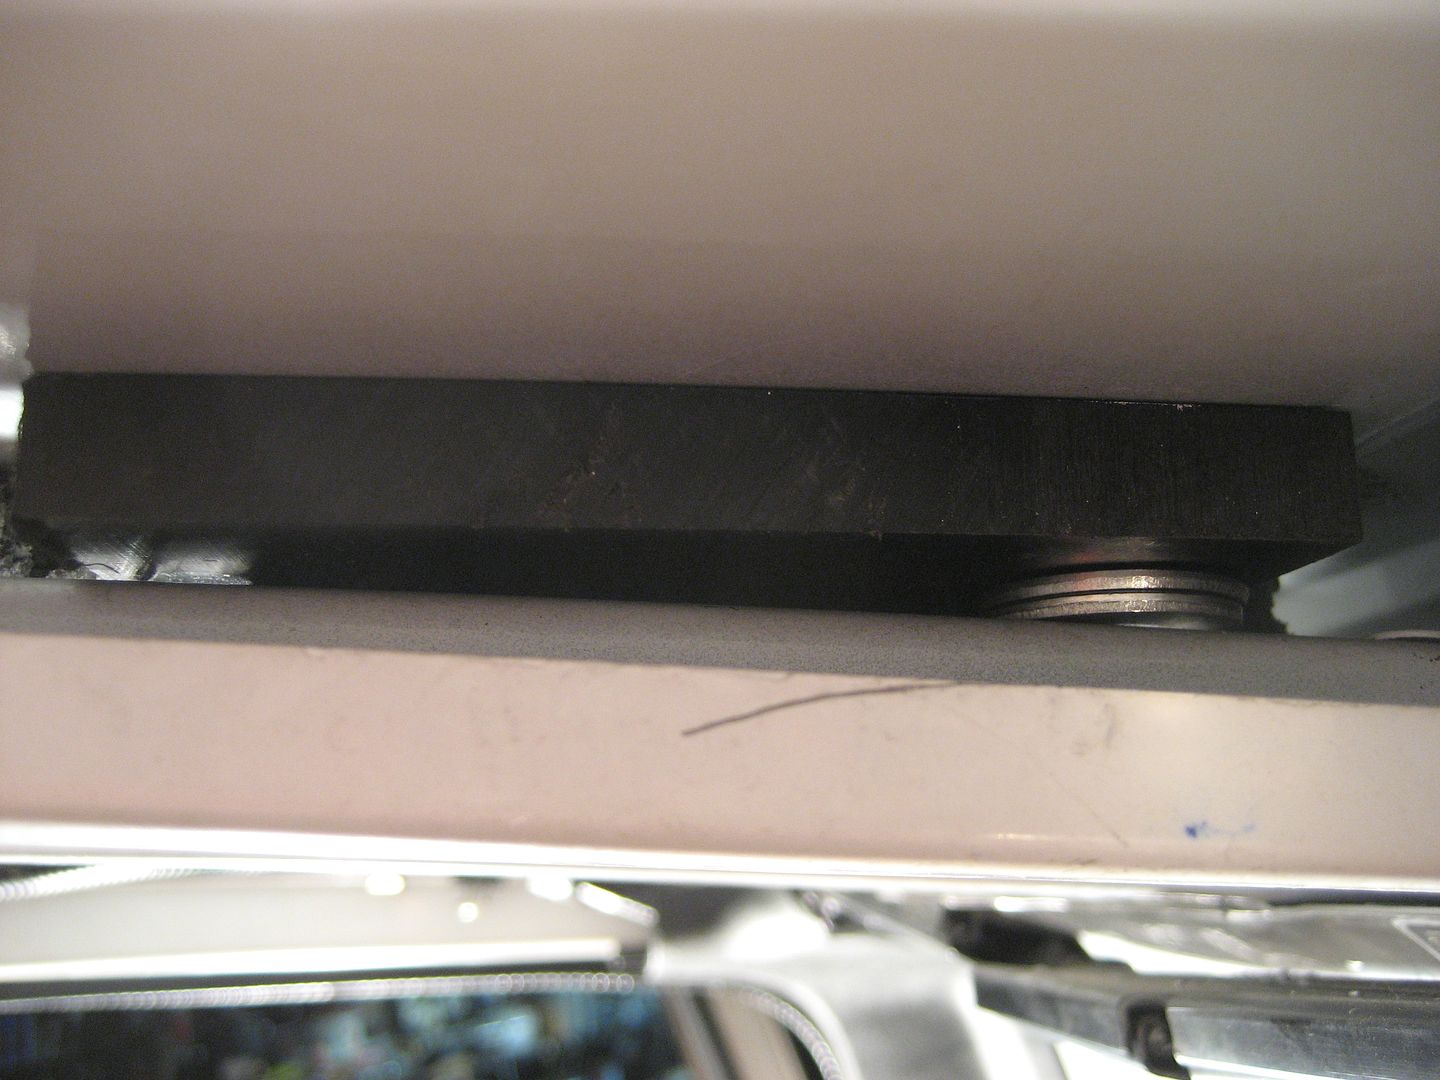
6 bolts are unobstructed:

Image

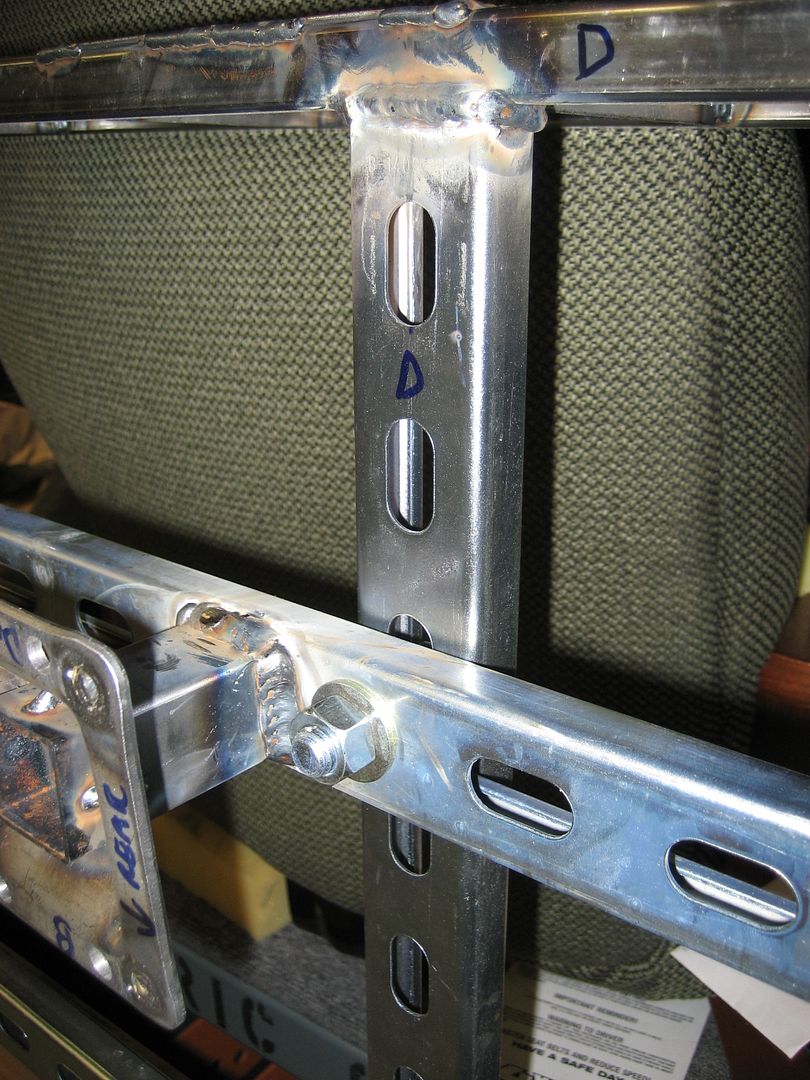
2 bolt locations fall directly above the leg, so these bolts will tighten down into a strut nut that secures within the channel:

Image

That's it! Doesn't look like much but there was a lot of measuring and aligning that went into this weekends results. In the coming days I will be fitting my spacers.
1997 SAFARI 2WD CARGO
Image
"I do not think there is any thrill that can go through the human heart like that felt by the inventor as he sees some creation of the brain unfolding to success... Such emotions make a man forget food, sleep, friends, love, everything." Nikola Tesla
User avatar

MountainManJoe
I have my van tatooed on my cheeks
Posts: 3145
Joined: Fri Aug 08, 2008 12:55 pm
Location: The Pacific North Wet
Has thanked: 48 times
Been thanked: 25 times

Re: Homebrew Con-Ferr Style Porthole Roof Rack Build

Post by MountainManJoe »

Why remove the protective galvanization? It'll last much longer if you keep it. Clean it with ammonia, scuff it up, and then use paint formulated for galvanized steel.

Topic author
97CargoCrawler
I sleep in my van
Posts: 754
Joined: Thu Jan 24, 2008 11:50 pm
Location: Near Los Angeles, CA
Contact:

Re: Homebrew Con-Ferr Style Porthole Roof Rack Build

Post by 97CargoCrawler »

I'm not removing the zinc, just the white zinc oxide created from superheating it in the welding process. I like that it's galvanized, it will get scratched and I still don't need to worry about it. Paint does not stick well to it no matter what you do to it. If I wanted plain steel strut I could have bought that instead.

Topic author
97CargoCrawler
I sleep in my van
Posts: 754
Joined: Thu Jan 24, 2008 11:50 pm
Location: Near Los Angeles, CA
Contact:

Re: Homebrew Con-Ferr Style Porthole Roof Rack Build

Post by 97CargoCrawler »

Tonight I cut 4" square spacers out of the nylon. That 6/6 nylon is very durable. Too much in fact, I will not be able to shape it like I had intended. It is much harder than Delrin. Instead of shaping the block to fit the curvature of the roof and cross beams I will just place it flush with the roof sheet metal and then add washers under one end that touches the cross member. Sorry I don't have a photo to show what I mean. I'm not concerned about decreasing the mating surface area of the block and cross member because the area of contact is not much wider than the washer I will use anyway.

Sanding the nylon was bizarre. It seriously smelled like fresh dog chit. And the shavings from cutting it look just like short and curlies:

Image

So then I got a little distracted:

Image

Image

I think I'd most likely date the one with the skull and crossbones or the lightening bolt.

My new heavy duty hole saw arrived today from McMaster-Carr:

Image

Image

It made quick work of the holes in the diamond plate. These are the holes that will sit above the crosses in the rack floor that will allow for extra attachment points:

Image

Tomorrow I will be digging out the foam between the roof and cross members. That's going to be a PITA.

Yeah, I didn't get much done tonight.
User avatar

krsowles
I finally get the smurf thing
Posts: 158
Joined: Mon Aug 15, 2011 4:11 am
Location: Colchester, VT

Re: Homebrew Con-Ferr Style Porthole Roof Rack Build

Post by krsowles »

Too busy arranging your shavings, no doubt =D>
Sometimes, I realize that I'm clueless...Man, I hate those moments!
Image
"S.S. Dark HoMutt"

1999 Chevy Astro AWD
1991 Chevy Astro AWD(retired)

Topic author
97CargoCrawler
I sleep in my van
Posts: 754
Joined: Thu Jan 24, 2008 11:50 pm
Location: Near Los Angeles, CA
Contact:

Re: Homebrew Con-Ferr Style Porthole Roof Rack Build

Post by 97CargoCrawler »

Tonight I chiseled out 4" of foam from between the roof and cross member. That foam if gnarly. It's the same stuff they use in heavy duty equipment cases. I wasn't able to get it all out but that doesn't really matter. What's left over will squish.

I used a putty knife to slide in and severe the bond between the roof and the foam:

Image

The little bit of leftovers are coming up from the small channel in the middle of the cross member. I wasn't able to dig down in there but like i said, it won't matter:

Image

Image

I cut out 4x4" squares and drilled the hole patterns. Notice that I have three different thicknesses. The spacing on the roof is not very consistent so I need three spacer sizes and one section of cross member will only get a washer since there is a very small gap there.

Image

Since this 6/6 nylon is so hard I cannot possibly shave enough of it down to fit as a wedge. So instead I'm going to use thinner slices and shim up the deviations with a few washers. This will increase the force per square inch on the cross member since I have effectively reduced the load bearing surface area. Considering the cross member is formed steel I don't think I'm going to burden it too much. I'm using all 5 cross members to distribute the load from the rack. If it eds up being a problem I can also make new spacers out of a softer material later. I could reverse the washers to the top side but I feel it's better to have the block as a backing plate for the thin sheet metal.

Image

I need to make gaskets for between the rack feet and the top of the roof. I bought three varieties of rubber to see which one will seal the best. I bought silicone, neoprene and EPDM. Each has a certain quality that made me chose it. Ultimately I will go with the one that has the best adhesion to the polyurethane sealant. I made a punch out of steel brake line to make the gasket holes.

Image

Previously pictured I showed that some of the bolts that will hold the rack to the rails would need to be secured with "strut nuts." These are strut nuts:

Image

They slide into the channel and the teeth dig into the rails to kep them from sliding. I will have to use Locktite or Vibratite to keep those two bolts from vibrating loose.

I also countersunk all of the screws that will hold the center of the diamond plate to the rack floor cross members:

Image

And here you can see the holes I cut that will allow for additional mounting anchors in the center of the rack. There will be 8 of these, 4 per side:

Image

I need to go to a paint store and find galvanized steel and aluminum paint primer. I'm still not sure if I will paint the diamond plate or not. If I do it will only look right painted black. If I don't it will turn a nasty dull gray but still have excellent heat reflecting capability. Still undecided. I'll probably paint the underside but not the topside.
1997 SAFARI 2WD CARGO
Image
"I do not think there is any thrill that can go through the human heart like that felt by the inventor as he sees some creation of the brain unfolding to success... Such emotions make a man forget food, sleep, friends, love, everything." Nikola Tesla

Topic author
97CargoCrawler
I sleep in my van
Posts: 754
Joined: Thu Jan 24, 2008 11:50 pm
Location: Near Los Angeles, CA
Contact:

Re: Homebrew Con-Ferr Style Porthole Roof Rack Build

Post by 97CargoCrawler »

Tonight I got some work done on the electrical conduit for the rack. I had mentioned at the beginning of this thread that I had intended to use 1/2" PVC conduit to route my wires for the lamps and future electronic goodies. Here it is in it's infancy. The rack is upside down in these photos.

The pipe serves to protect the wiring from moisture and mechanical damage and adds a nice tidy way to route the wiring. Whenever I design something I always try to incorporate forward compatibility. I know that someday I might want to add more lights, electrical outlets, antennas and a missile launcher. All of those things will require wires so I figured 1/2" pipe ought to allow me some room for future expansion. It should be large enough in diameter to run a lot of wire and allow me to pull more through if needed.

Each lamp will have a TEE fitting behind it fitted with a liquid tight cord grip. The PIAA lamps have a rubber elbow sticking out of the rear portion of the housing that provides an exit for the wiring harness. There is a 5mm opening in that boot. I intend to cut a small length of silicone tubing, run the wires through it, jam it up in that hole (that's what she said), seal it with a dab of silicone sealant and jam the other end into the cord grip fitting in the pipe. This should provide a water tight connection between the lamp and the conduit. The TEE will also face slightly downward to discourage water from collecting at the pipe entrance. Here is the basic idea:

Image

Image

Image

Image

Image

There will also be a junction box somewhere near the front of the rack. Since I will be swapping and adding in most accessories to the front portion of the rack I thought it best to have an access point there so existing wiring can be spliced into (for example the PIAA's will have to have the factory connectors chopped off and bullet style soldered on. I can have the connectors meet in the box for easy access as opposed to someplace within the pipe). I will probably put a box towards the rear too. Any unused TEEs will have a plug inserted to keep it liquid tight. I will have a few extra TEEs around the perimeter for future toys.

Image

I have not decided on a location yet to drill into the roof for feeding the wiring through. It will probably be towards the front of the van, perhaps behind the cross member directly above the front seats.

fishesfromtupperware
I am merely driving my van
Posts: 12
Joined: Fri Jan 22, 2010 7:15 am

Re: Homebrew Con-Ferr Style Porthole Roof Rack Build

Post by fishesfromtupperware »

WOW excellent work! :supz:
97CargoCrawler wrote: I am going to primer it then paint it flat black, rattle can style............ Scratching up an expensive powder coat job would sting
Its a bit more expense and work, but Harbor Fright has a downright adequate powder coating gun on sale periodically for $50. You can make a temporary oven out of rigid insulation board and a couple of hot air guns and do that work of art some justice! Besides, you always need more tools!
And scratching a powder coat job is almost difficult.

Topic author
97CargoCrawler
I sleep in my van
Posts: 754
Joined: Thu Jan 24, 2008 11:50 pm
Location: Near Los Angeles, CA
Contact:

Re: Homebrew Con-Ferr Style Porthole Roof Rack Build

Post by 97CargoCrawler »

Thank you! I have thought about that option. I read you may be able to use UV lights to cure large objects as well, just takes longer. One main reason why I am still siding with Rustoleum is for future repairs and add-ons. If I decide I want to weld on a new bracket, etc. all I need to due is sand a clean spot, weld and then sand the burned paint around it down and spray a new layer that will even out pretty well.

Now with powder coat, that stuff smokes like crazy when your welding near it and often starts on fire. Which is fine but it ends up being a much larger paint debacle to fix. I'm also worried about any type of paint being able to stick to the galvanized steel. If I paint those rails with a thick paint and then bolt something down tight to them there is a good possibility the paint will chip off since it won't bond well to the steel.

Rattle can paint will require yearly maintenance which kinda sucks.

I dunno, I change my mind quite often! I know I can get powder coat in flat black at HF. Perhaps I should try it on some scrap steel and see how it looks. I was planning on painting this weekend though. Hmmmm.
User avatar

doyoulikeithere
ASV Supporter
ASV Supporter
Posts: 2060
Joined: Tue Nov 17, 2009 8:27 pm
Location: Misty Mountains of Cowichan BC.

Re: Homebrew Con-Ferr Style Porthole Roof Rack Build

Post by doyoulikeithere »

97CargoCrawler wrote:Thank you! I have thought about that option. I read you may be able to use UV lights to cure large objects as well, just takes longer. One main reason why I am still siding with Rustoleum is for future repairs and add-ons. If I decide I want to weld on a new bracket, etc. all I need to due is sand a clean spot, weld and then sand the burned paint around it down and spray a new layer that will even out pretty well.

Now with powder coat, that stuff smokes like crazy when your welding near it and often starts on fire. Which is fine but it ends up being a much larger paint debacle to fix. I'm also worried about any type of paint being able to stick to the galvanized steel. If I paint those rails with a thick paint and then bolt something down tight to them there is a good possibility the paint will chip off since it won't bond well to the steel.

Rattle can paint will require yearly maintenance which kinda sucks.

I dunno, I change my mind quite often! I know I can get powder coat in flat black at HF. Perhaps I should try it on some scrap steel and see how it looks. I was planning on painting this weekend though. Hmmmm.
could look for a place in an industrial park that does dip Galvanizing...
I used to send stuff thru there when i was getting stove doors gold plated.
2021 Yamaha Tenere 700 - Blue.
2016 Yamaha XSR900 - Silver.
1990 Astro - AWD - Brown.
1987 Astro - With 5 Speed & 4wd - Silver & Blue.

astroturf
ASV Supporter
ASV Supporter
Posts: 1658
Joined: Wed Sep 09, 2009 6:25 pm

Re: Homebrew Con-Ferr Style Porthole Roof Rack Build

Post by astroturf »

John Deere Blitz Black

Topic author
97CargoCrawler
I sleep in my van
Posts: 754
Joined: Thu Jan 24, 2008 11:50 pm
Location: Near Los Angeles, CA
Contact:

Re: Homebrew Con-Ferr Style Porthole Roof Rack Build

Post by 97CargoCrawler »

doyoulikeithere wrote: could look for a place in an industrial park that does dip Galvanizing...
I used to send stuff thru there when i was getting stove doors gold plated.
Problem is I have not really revealed much about my future plans for the entire van.....I need it black. Stealth black. :-$

astroturf
ASV Supporter
ASV Supporter
Posts: 1658
Joined: Wed Sep 09, 2009 6:25 pm

Re: Homebrew Con-Ferr Style Porthole Roof Rack Build

Post by astroturf »

97CargoCrawler wrote: Problem is I have not really revealed much about my future plans for the entire van.....I need it black. Stealth black. :-$
John Deere Blitz Black...

Topic author
97CargoCrawler
I sleep in my van
Posts: 754
Joined: Thu Jan 24, 2008 11:50 pm
Location: Near Los Angeles, CA
Contact:

Re: Homebrew Con-Ferr Style Porthole Roof Rack Build

Post by 97CargoCrawler »

astroturf wrote:
97CargoCrawler wrote: Problem is I have not really revealed much about my future plans for the entire van.....I need it black. Stealth black. :-$
John Deere Blitz Black...
Says not for sale in CA. I'm sure I can get it from somewhere on the net....

Topic author
97CargoCrawler
I sleep in my van
Posts: 754
Joined: Thu Jan 24, 2008 11:50 pm
Location: Near Los Angeles, CA
Contact:

Re: Homebrew Con-Ferr Style Porthole Roof Rack Build

Post by 97CargoCrawler »

The plan for tomorrow is to weld some expanded steel behind the front openings in the rack to protect the lights, grind any sloppy welds down and then clean and primer it. Tonight I bought some metal cleaner and etch to get all of the oil off of the steel. First I will wash it with Dawn and scrub the crap outta it with steel wool to get all the crud off, then wash it with the etch. I bought aluminum and galvanized steel primer in a can so I can brush it onto the rail and roll it onto the diamond plate. The rest will get rattle can bare metal primer.

Image

I never finalized my tent mounting apparatus...so I suppose whatever it ends up being will be bolt on instead of welded. I think that's probably better anyway in case I hate it.
Post Reply