
You know,I thought it would be a cool thread to see what tools or equipment you all have built to make a job or project easier.It doesn't have to be hard to do type of stuff.Might just be things that make you go oh yeah,that makes sense.
I'll start it off:
I have taken the longer starter bolts and cut off the heads.I cut a slot in them.I thread them into the back of a engine while doing a swap when the tranny is still in place as guides to line up the dowels on the back of the engine.
The second one is you know the primer rods you can buy from a speed shop to prime a engine for oil during a rebuild.If you have ever used one,sometimes you get oil coming out of the open hole where the dist would be.Well I have a old HEI dist and I took off the drive gear and then I welded a nut on where the rotor would go.That way I could take a air wrench with a socket and prime the engine without any oil coming out.
Shop tools and equip you have built.
-
 GEJ
GEJ
Topic author - I plan to be buried in my van
- Posts: 1487
- Joined: Mon Dec 25, 2006 9:50 pm
- Location: Rochester,NY
Shop tools and equip you have built.
Call me Gary
1985 Astro-"Ole Yellar"
1994 LT Astro
1981 Winnebago-"Baby"
12'dual axle enclosed trailer
The vendor trailer
Lead with my heart & take the hits because of it like a man.
1985 Astro-"Ole Yellar"
1994 LT Astro
1981 Winnebago-"Baby"
12'dual axle enclosed trailer
The vendor trailer
Lead with my heart & take the hits because of it like a man.
-
GEJ
Topic author - I plan to be buried in my van
- Posts: 1487
- Joined: Mon Dec 25, 2006 9:50 pm
- Location: Rochester,NY
Re: Shop tools and equip you have built.
I read where a guy pluged in one of those trouble lights that you use in a lighter socket.He was have a problem with something killing the battery charge.So he disconnected the neg side of the battery and the light stayed on.Then he went to pull the fues one at a time until the trouble light when out to see which curcuit had a short with the light right next to him.
Call me Gary
1985 Astro-"Ole Yellar"
1994 LT Astro
1981 Winnebago-"Baby"
12'dual axle enclosed trailer
The vendor trailer
Lead with my heart & take the hits because of it like a man.
1985 Astro-"Ole Yellar"
1994 LT Astro
1981 Winnebago-"Baby"
12'dual axle enclosed trailer
The vendor trailer
Lead with my heart & take the hits because of it like a man.
-
 Smiliesafari
- ASV Supporter

- Posts: 2667
- Joined: Sat Dec 02, 2006 12:34 pm
- Location: Orlando, FL
Re: Shop tools and equip you have built.
I built a air over hydraulic rotisserie. In my spare time, which there is very little, I restore old Datsun Z cars. I'll post up some pics a little later. The rotisserie is in a body shop at the moment with a Porsche 356 hanging on it. It sits on 15" tires, has a tongue, has steering, so whatever you're working on can be moved where ever it needs to be. 
1996 Safari SLX Hotair balloon transport vehicle
-
 TheChopFather
- Retired
- Posts: 193
- Joined: Wed Sep 20, 2006 7:53 pm
- Location: Cleveland,Ohio
Re: Shop tools and equip you have built.
wow I had too read that twice I was like what does a rotisserie have to do with toolsSmiliesafari wrote:I built a air over hydraulic rotisserie. In my spare time, which there is very little, I restore old Datsun Z cars. I'll post up some pics a little later. The rotisserie is in a body shop at the moment with a Porsche 356 hanging on it. It sits on 15" tires, has a tongue, has steering, so whatever you're working on can be moved where ever it needs to be.

ISN'T HE SO SEXY IN HIS PRETTY WHITE DRESS???LOL

Re: Shop tools and equip you have built.
Ya, I had to read it twice too. At first I was thinking man that is one big chicken.TheChopFather wrote: wow I had too read that twice I was like what does a rotisserie have to do with tools
'89 Astro, 4.3L, TBI. Minor intake and exhaust mods. Rebuilt 700R4 trans (by me). Corvette servo, 0.5" boost valve, police grade 1-2 accumulator spring (shifts fast and solid). B&M stacked plate trans cooler. Bilstein shocks. Belltech sway bars front and back. New head unit, speakers and subwoofer. Needs paint and a new headliner.
name's Steve
I can't remember all I've forgotten about that....
name's Steve
I can't remember all I've forgotten about that....
-
GEJ
Topic author - I plan to be buried in my van
- Posts: 1487
- Joined: Mon Dec 25, 2006 9:50 pm
- Location: Rochester,NY
Re: Shop tools and equip you have built.
Smiliesafari wrote:I built a air over hydraulic rotisserie. In my spare time, which there is very little, I restore old Datsun Z cars. I'll post up some pics a little later. The rotisserie is in a body shop at the moment with a Porsche 356 hanging on it. It sits on 15" tires, has a tongue, has steering, so whatever you're working on can be moved where ever it needs to be.
Call me Gary
1985 Astro-"Ole Yellar"
1994 LT Astro
1981 Winnebago-"Baby"
12'dual axle enclosed trailer
The vendor trailer
Lead with my heart & take the hits because of it like a man.
1985 Astro-"Ole Yellar"
1994 LT Astro
1981 Winnebago-"Baby"
12'dual axle enclosed trailer
The vendor trailer
Lead with my heart & take the hits because of it like a man.

Re: Shop tools and equip you have built.
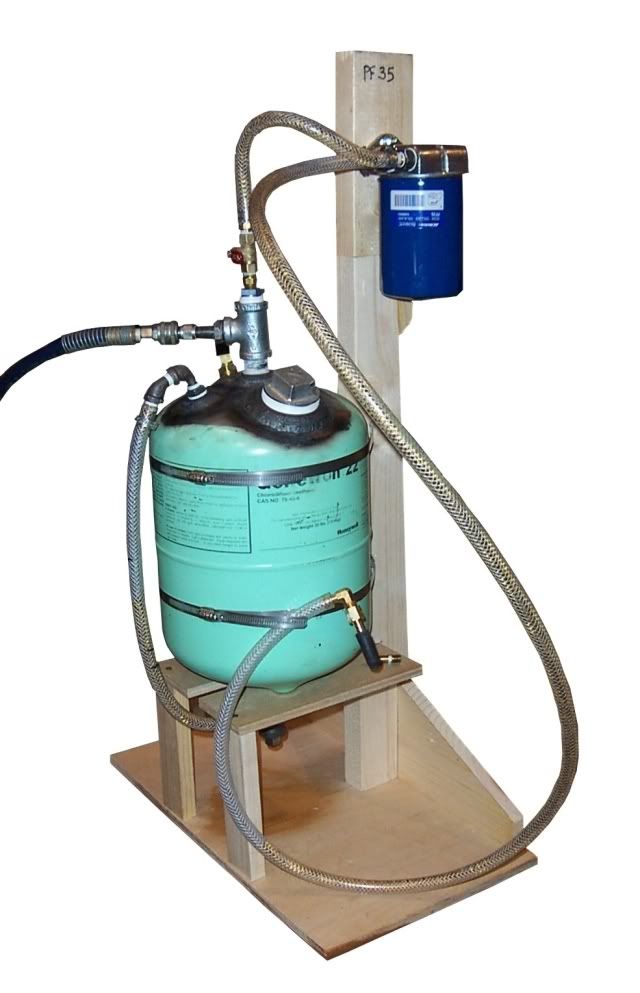
After I had my 305 rebuilt, I decided to break in the cam in an engine test stand. To make the test stand I also had to make some supporting equipment. Like this:
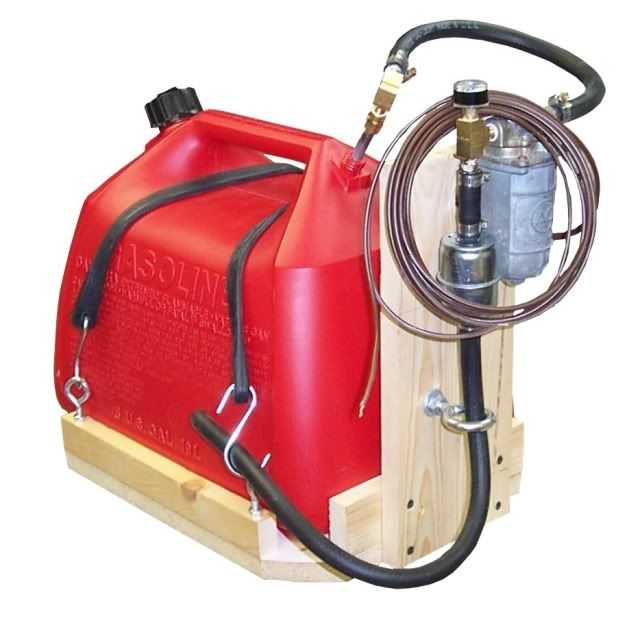
It's how I supplied the fuel to run the engine during the cam break in.
The tank is just a 5 gallon plastic gas can; I placed a 5/16ths inch length of brake line through the tank's vent to act as the fuel pick up tube. The tube is connected to the electric fuel pump. The pump's output is 7 psi--wouldn't operate a TBI system, but it's fine for a carb. The output of the pump is connected to an inline carb-type fuel filter. Battery to operate the pump comes from the engine test stand control panel.
Rob Shaver
1989 Astro 305 with an MSD 6A ignition and a dash-mounted MSD timing control, a 4160 Holley 465 cfm four barrel carb, and an HEI distributor.
Moog 625 front springs and Energy Suspension poly bushings. Rear OEM sway bar. Edelbrock shocks.
1989 Astro 305 with an MSD 6A ignition and a dash-mounted MSD timing control, a 4160 Holley 465 cfm four barrel carb, and an HEI distributor.
Moog 625 front springs and Energy Suspension poly bushings. Rear OEM sway bar. Edelbrock shocks.
Re: Shop tools and equip you have built.
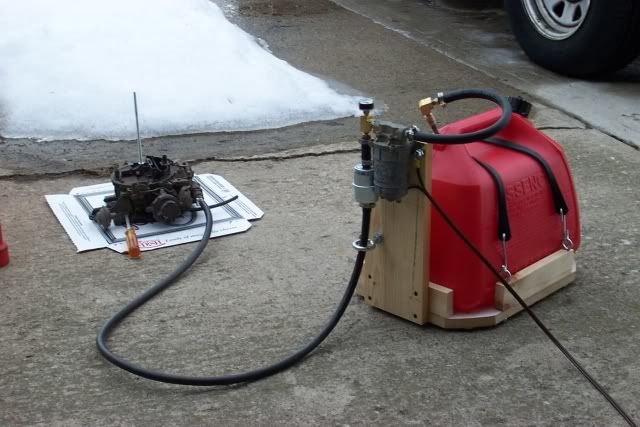
Here's the fuel tank during its first use. I'm both checking it and the quadrajet carb that I rebuilt for the engine's initial run. No leaks in either item, which was sure okay by me.
Rob Shaver
1989 Astro 305 with an MSD 6A ignition and a dash-mounted MSD timing control, a 4160 Holley 465 cfm four barrel carb, and an HEI distributor.
Moog 625 front springs and Energy Suspension poly bushings. Rear OEM sway bar. Edelbrock shocks.
1989 Astro 305 with an MSD 6A ignition and a dash-mounted MSD timing control, a 4160 Holley 465 cfm four barrel carb, and an HEI distributor.
Moog 625 front springs and Energy Suspension poly bushings. Rear OEM sway bar. Edelbrock shocks.
Re: Shop tools and equip you have built.
This is the control panel for the engine test stand. I put about everything I could think of in it. This photo was taken while the 305 was being run for the first time.

Rob Shaver
1989 Astro 305 with an MSD 6A ignition and a dash-mounted MSD timing control, a 4160 Holley 465 cfm four barrel carb, and an HEI distributor.
Moog 625 front springs and Energy Suspension poly bushings. Rear OEM sway bar. Edelbrock shocks.
1989 Astro 305 with an MSD 6A ignition and a dash-mounted MSD timing control, a 4160 Holley 465 cfm four barrel carb, and an HEI distributor.
Moog 625 front springs and Energy Suspension poly bushings. Rear OEM sway bar. Edelbrock shocks.
Re: Shop tools and equip you have built.
This is the beginnings of the engine test stand. It's the subframe of an 88 Astro with 2x6 lumber legs added. The bare block you see in the stand was used for mounting purposes--I wanted to make sure that the assembled 305 would drop in with no problems when the time came. Since the Astro subframe uses the transmission mount, I bolted a spare 700R4, minus the torque converter, to the engine.
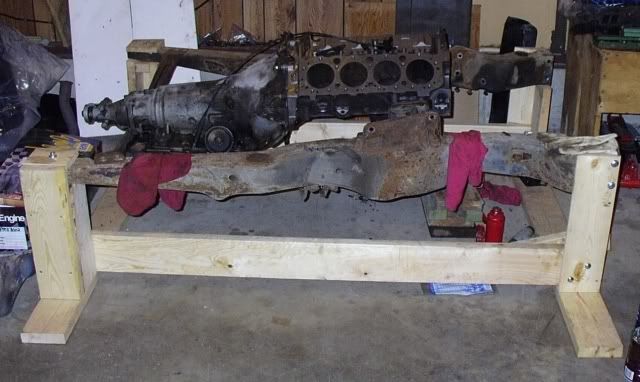
At the time, I had never heard of anyone doing something like this, so I posted what I was up to on several general type of automotive forums. Sure got some crazy replies--several people were utterly convinced that the stand had better be bolted down to the garage floor or the engine would cause it to flop madly around the garage, probably bashing out walls and killing people. That made no sense to me as I'd seen engines run in bare pickup truck chassis before and all present lived to tell of it.
At the time, I had never heard of anyone doing something like this, so I posted what I was up to on several general type of automotive forums. Sure got some crazy replies--several people were utterly convinced that the stand had better be bolted down to the garage floor or the engine would cause it to flop madly around the garage, probably bashing out walls and killing people. That made no sense to me as I'd seen engines run in bare pickup truck chassis before and all present lived to tell of it.
Rob Shaver
1989 Astro 305 with an MSD 6A ignition and a dash-mounted MSD timing control, a 4160 Holley 465 cfm four barrel carb, and an HEI distributor.
Moog 625 front springs and Energy Suspension poly bushings. Rear OEM sway bar. Edelbrock shocks.
1989 Astro 305 with an MSD 6A ignition and a dash-mounted MSD timing control, a 4160 Holley 465 cfm four barrel carb, and an HEI distributor.
Moog 625 front springs and Energy Suspension poly bushings. Rear OEM sway bar. Edelbrock shocks.
Re: Shop tools and equip you have built.
Before I started the 305, I added the oil to the crankcase by using this. It's a pressure pre-luber I made out of a freon tank. I put the 5 quarts of oil into the luber's tank, plumbed it to the engine where the oil pressure sender goes, and applied 40 psi of compressed air from my air compressor to the tank. It was a very slow process but I wanted to make sure that everything in the engine had been primed with oil. However, just for the overkill of it all, I pulled the distributor and primed the engine with an electric drill connected to an old V6 distributor body. Then I knew for sure that the engine's oil pump had been primed.
Rob Shaver
1989 Astro 305 with an MSD 6A ignition and a dash-mounted MSD timing control, a 4160 Holley 465 cfm four barrel carb, and an HEI distributor.
Moog 625 front springs and Energy Suspension poly bushings. Rear OEM sway bar. Edelbrock shocks.
1989 Astro 305 with an MSD 6A ignition and a dash-mounted MSD timing control, a 4160 Holley 465 cfm four barrel carb, and an HEI distributor.
Moog 625 front springs and Energy Suspension poly bushings. Rear OEM sway bar. Edelbrock shocks.
Re: Shop tools and equip you have built.
Finally, here's a shot of the 305's break in run on April 6, 2003. It's difficult to make it out due to low lighting, but the engine is running in the test stand. In the foreground is the fuel tank doing its thing. I had wired in a relay on the control panel that operated the fuel pump. The relay was wired to an oil pressure sender; if the engine lost oil pressure, the relay dropped out and shut off the pump. There was also a kill switch on the control panel that had to be on for the pump to run.
And finally, my apologies to all the long time members here who have seen these photos before.
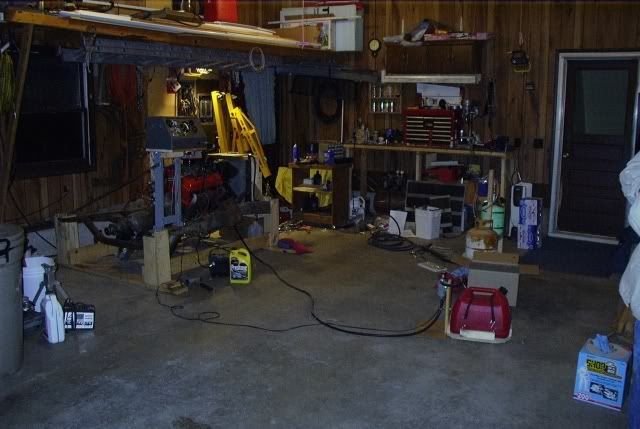
And finally, my apologies to all the long time members here who have seen these photos before.
Last edited by SafariRob on Mon Sep 01, 2008 6:42 pm, edited 1 time in total.
Rob Shaver
1989 Astro 305 with an MSD 6A ignition and a dash-mounted MSD timing control, a 4160 Holley 465 cfm four barrel carb, and an HEI distributor.
Moog 625 front springs and Energy Suspension poly bushings. Rear OEM sway bar. Edelbrock shocks.
1989 Astro 305 with an MSD 6A ignition and a dash-mounted MSD timing control, a 4160 Holley 465 cfm four barrel carb, and an HEI distributor.
Moog 625 front springs and Energy Suspension poly bushings. Rear OEM sway bar. Edelbrock shocks.
Re: Shop tools and equip you have built.
I'm presently rebuilding a Chevy 350 and want to break in its cam before the engine gets put into a vehicle. The original test stand was certainly functional, but it was way too big and ungainly for what was needed. In the end, it got scrapped to free up space in my friend's garage. Below is the beginnings of Engine Test Stand, version 2. Haven't had much time to work on it, but it will end up with the control panel from the first test stand and use the fuel tank. Haven't quite decided on how to do the radiator, yet, but I'm leaning towards an electric fan mounted to a radiator. Test stand number one used an Astro radiator with a Kmart house box fan pushing air through it. It worked well, but I'd rather use an automotive fan, I think. Also, I intend that the radiator will be mounted in its own stand and sit a short distance from the engine. I want unimpeded access to the engine while it's running and that means that the radiator needs to be away from the engine.
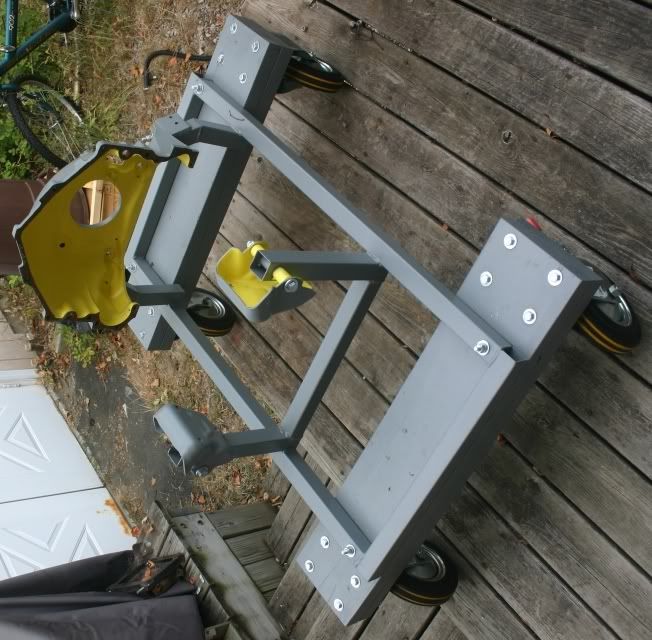
The Chevy bell housing is the 'special' item here; it's a circa 1955 housing that had cast in tabs to act as the transmission mounts. Back then, the manual transmissions did not have a mount on the tailstock; the transmission was hung in place by just its four bell housing ears. But I didn't stop to think about the starter mount--back in the day, the starter was mounted to the bell housing by three bolts...looks like I'll have to find an old style starter, but that won't be difficult.
Oh, and still no provision for floor bolts...maybe this will be the stand that allows an engine to flop madly around, bashing out walls and killing people.
Rob Shaver
1989 Astro 305 with an MSD 6A ignition and a dash-mounted MSD timing control, a 4160 Holley 465 cfm four barrel carb, and an HEI distributor.
Moog 625 front springs and Energy Suspension poly bushings. Rear OEM sway bar. Edelbrock shocks.
1989 Astro 305 with an MSD 6A ignition and a dash-mounted MSD timing control, a 4160 Holley 465 cfm four barrel carb, and an HEI distributor.
Moog 625 front springs and Energy Suspension poly bushings. Rear OEM sway bar. Edelbrock shocks.
Re: Shop tools and equip you have built.
lol flop around wildly and kill people! I've seen a 305 running while sitting on a stack of tires. In reality the weight of the engine is to much for the inertia of the crank shaft to cause it to flop around when it's not connected to a full drive train. Unless there is a massive off balance condition or miss fire but that would create a ton of vibrations that would cause it to vibrate around a bit not flop and kill people.
 98 Safari RWD. Stock.
Do you smell what Barack is cookin ?!?!
-
GEJ
Topic author - I plan to be buried in my van
- Posts: 1487
- Joined: Mon Dec 25, 2006 9:50 pm
- Location: Rochester,NY
Re: Shop tools and equip you have built.
SafariRob wrote:I'm presently rebuilding a Chevy 350 and want to break in its cam before the engine gets put into a vehicle. The original test stand was certainly functional, but it was way too big and ungainly for what was needed. In the end, it got scrapped to free up space in my friend's garage. Below is the beginnings of Engine Test Stand, version 2. Haven't had much time to work on it, but it will end up with the control panel from the first test stand and use the fuel tank. Haven't quite decided on how to do the radiator, yet, but I'm leaning towards an electric fan mounted to a radiator. Test stand number one used an Astro radiator with a Kmart house box fan pushing air through it. It worked well, but I'd rather use an automotive fan, I think. Also, I intend that the radiator will be mounted in its own stand and sit a short distance from the engine. I want unimpeded access to the engine while it's running and that means that the radiator needs to be away from the engine.
The Chevy bell housing is the 'special' item here; it's a circa 1955 housing that had cast in tabs to act as the transmission mounts. Back then, the manual transmissions did not have a mount on the tailstock; the transmission was hung in place by just its four bell housing ears. But I didn't stop to think about the starter mount--back in the day, the starter was mounted to the bell housing by three bolts...looks like I'll have to find an old style starter, but that won't be difficult.
Oh, and still no provision for floor bolts...maybe this will be the stand that allows an engine to flop madly around, bashing out walls and killing people.
Rob,
Thanks for posting this.Might seem to some alittle over the top,but there sure are handy to have for a number of reasons and don't cost that much to build.Best part is to correct any leaks and do some minor tuning.There was one in my past and if you remember a test stand in a trailer at Canton swap meet,that was us.We would start up the engine and the people would come running to see what all that noise was about.
Rob-might I suggest you use a race mid-plate bolted to the rear and welded to the stand's frame.We did that for I can't tell you how many starts we never had a failure.
http://www.jegs.com/webapp/wcs/stores/s ... howValue=1
Call me Gary
1985 Astro-"Ole Yellar"
1994 LT Astro
1981 Winnebago-"Baby"
12'dual axle enclosed trailer
The vendor trailer
Lead with my heart & take the hits because of it like a man.
1985 Astro-"Ole Yellar"
1994 LT Astro
1981 Winnebago-"Baby"
12'dual axle enclosed trailer
The vendor trailer
Lead with my heart & take the hits because of it like a man.