Page 1 of 16
How to wire up a NP 236 in place of a 136.
Posted: Thu Feb 18, 2016 7:53 pm
by racrx7
So I've been asked to do a "how to" wiring install of my NP236 transfer case. I wanted to get this started and will add to it as time permits. First a couple of shout outs to Captn Crunch for already showing us that the 236 is a direct bolt up in place of the 136 and for giving me the inspiration to see this through. And a shout out to Stroverlander for providing digital copies of the wiring diagrams we'll be using.
Use proper soldering techniques with heat shrink where required. If you are a butt splicer, use the correct sizes with the right crimping pliers. Try to use the butt splices with the built in heat shrink sealing. If you live up north where the roads are salted, you want the connections as water tight as possible. Do NOT use any of those "suitcase" type connectors. They WILL fail! You will be re pinning several wires in various connectors. If along the way something isn't clear, ask questions and I'll try to answer them.
We can break this down into four modules. The TCCM, the encoder motor, the range selector switch and the front axle disconnect emulator circuit. In each of these modules, we'll be adding the required wires needed to make them function properly. The good news is, the wires already in use on the 136's TCCM connector will stay. You should have the wiring harness on hand from the 236 donor vehicle so you can add the missing wires needed. You won't need the wiring for the front and rear shaft speed sensors. The original wiring from the 136's speed sensors plug right in. You will need the six wire connector and four wire connector from the 236 donor.
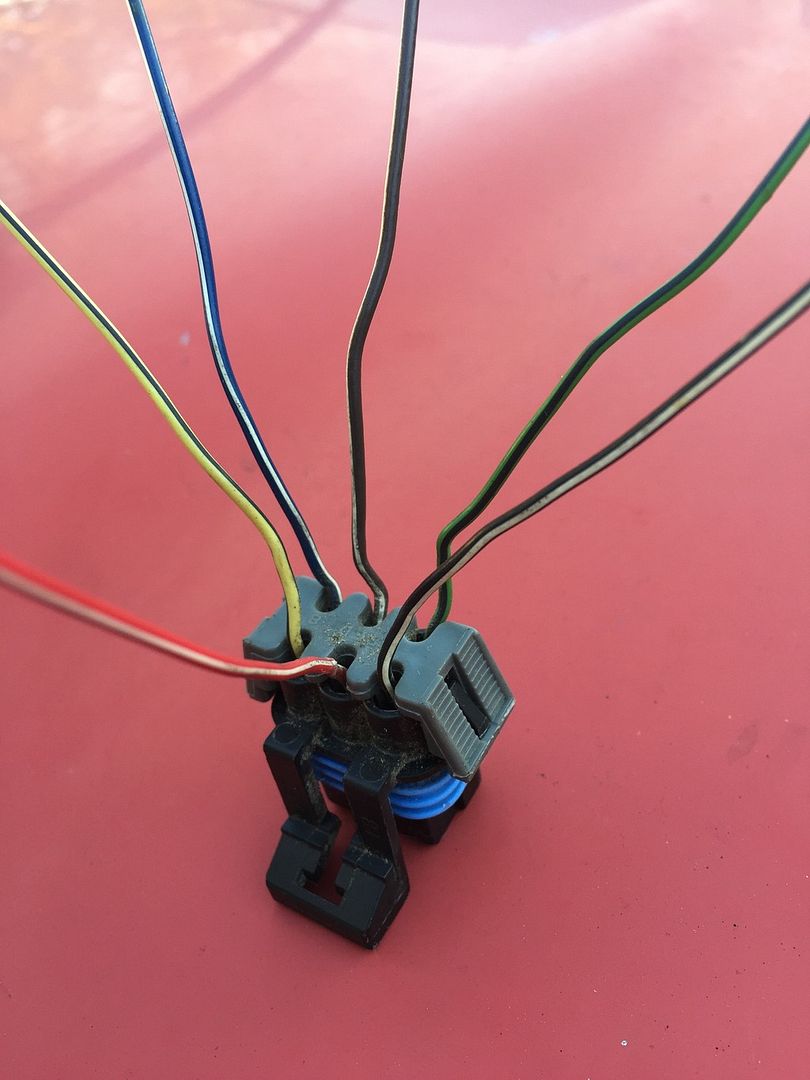
The six wires go strait to the 236 donor TCCM.
There are three switches to choose from.
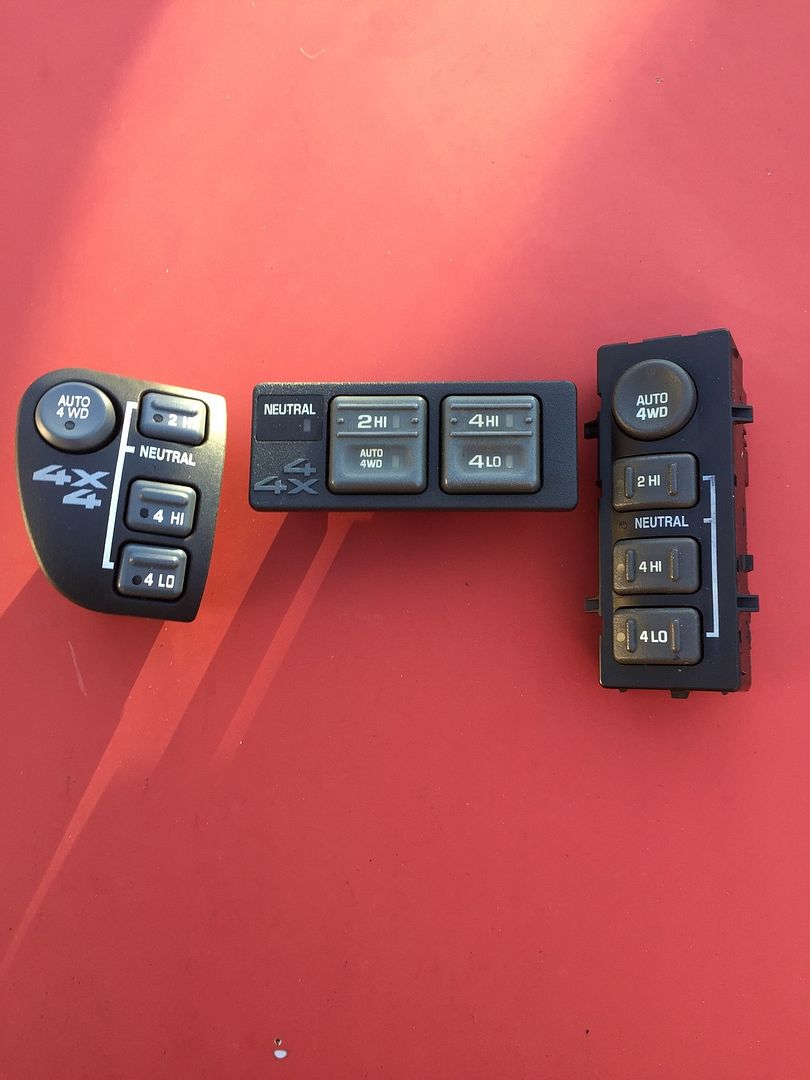
For me, only one has the best mounting options, the center one in the photo. It's from a '99 or earlier Suburban, Tahoe with select trac 4X4. If you can't get one from the bone yards, its available here:
http://amzn.com/B00A14O8LC/
You will need the pig tail connectors from the selector switch from S-10 Blazer donor harnes to fit this switch, or if you got the switch from the junk yard, cut the connectors off back as far as you can and use them.
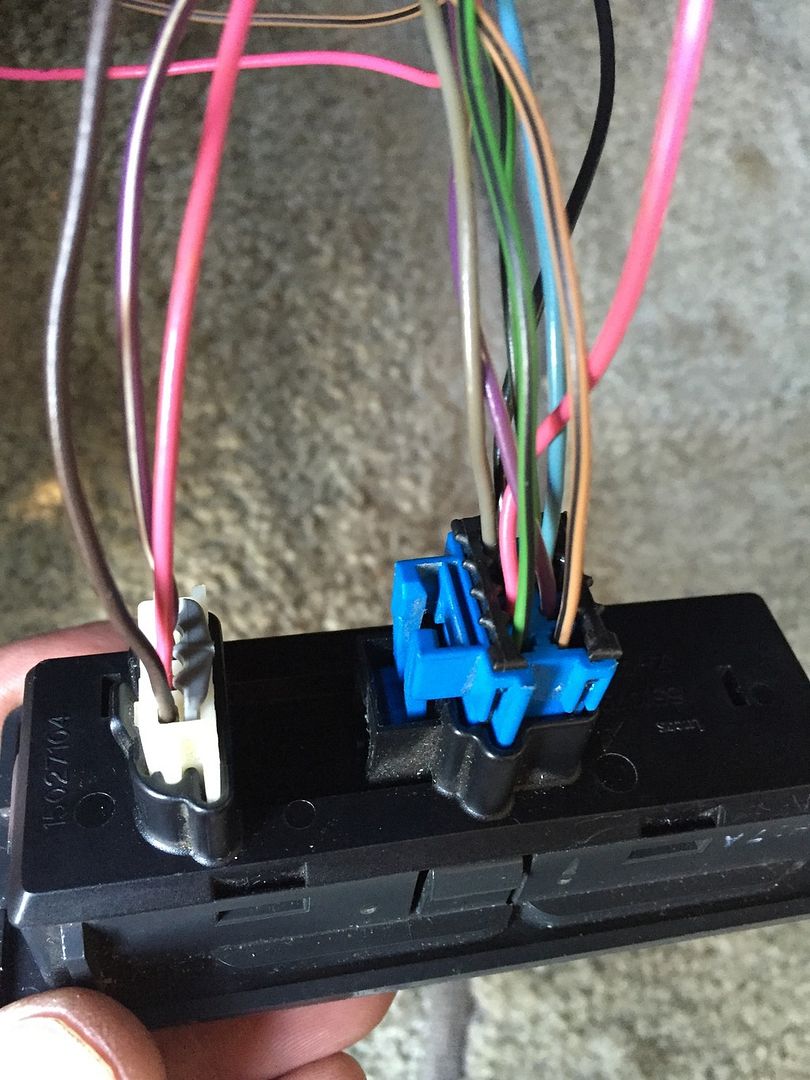
More later

Re: How to wire up a NP 236 in place of a 136.
Posted: Thu Feb 18, 2016 10:02 pm
by Astrophysics
Awesome work!
Thank you,
AP
Re: How to wire up a NP 236 in place of a 136.
Posted: Fri Feb 19, 2016 4:50 pm
by RINNY
Re: How to wire up a NP 236 in place of a 136.
Posted: Fri Feb 19, 2016 9:00 pm
by trip_south
Thank you for putting this together!
Re: How to wire up a NP 236 in place of a 136.
Posted: Fri Feb 19, 2016 9:29 pm
by racrx7
Rinny, that switch came out of an '01 S-10 Blazer. The Amazon link is below.
http://www.amazon.com/Dorman-901-060-Ch ... an+901-060
I'd like to see how that switch would look in the location you mentioned. May have to revisit that one. Nice thing is, it shares the same connectors and wiring of the middle switch.
Trip south, your welcome

Re: How to wire up a NP 236 in place of a 136.
Posted: Sat Feb 20, 2016 12:11 pm
by RINNY
Thanks again!! A couple from Tenessee just dropped off a 2004 AWD Astro van LT Package. Very nice people. They took a 500.00 deposit back in November and held the van and then drove it to Rhode Island. 128000 on it in really nice shape. I covered their flight back fuel/tolls/hotel and a really nice lunch. Great people. Going to get the 2003 just how I want it then build out the 04. If it wasn't for this site and help from people like you I would not have been able to have one mean fishing machine. Where down south cause when I get the 04 done it is definatly going on a road trip!! I will put up pics as soon as I start on it.
Re: How to wire up a NP 236 in place of a 136.
Posted: Sat Feb 20, 2016 6:26 pm
by racrx7
Hey Rinny, so your a fellow fisherman? That's mostly what I am building my van for. What ever beaches that allow vehicles on them

Maybe we could meet and fish Cape Hatteras someday

I also used to visit Newport RI every summer years ago. Loved it!!
Ok, back to our regularly scheduled program =D>
Re: How to wire up a NP 236 in place of a 136.
Posted: Sat Feb 20, 2016 7:40 pm
by racrx7
So next, we're going to wire up the encoder motor from the TCCM. There are two connectors on the encoder motor. A six wire connector that handles the Hall effect switches and a four wire connector that handles power to drive the motor and controls the holding brake of the motor. Look at the two schematics below for reference.

The red and black wires (A and B on the black TCCM connector), are already run to the 136's encoder motor. They will stay were they are at on the TCCM connector, but will need to be re pinned to a four wire connector at the encoder motor. The orange wire (D on the black TCCM connector), to the encoder motor will tie into the original orange wire feeding the TCCM. It's battery voltage on at all times, feeds the encoder motor brake and fused on the same circuit. I spliced into the existing orange wire at the TCCM with an orange wire of the same gauge by skinning back the existing wire and soldering in the new feed wire. Make this connection solid! NO suitcase connectors. And don't forget to insulate that connection. The other black wire (C on the black TCCM connector), is a ground and already in place from the 136's TCCM. No need to change it. The tan wire is the brake control wire for the encoder motor and connects to the E1 position of the orange 32 pin TCCM connector. Look at the following pic of the orange TCCM connector for the pin referencing. The top row is E and numbered 1-16 starting from the right while the lower row is F 1-16 starting from the right. Use this for reference in adding the required wires.
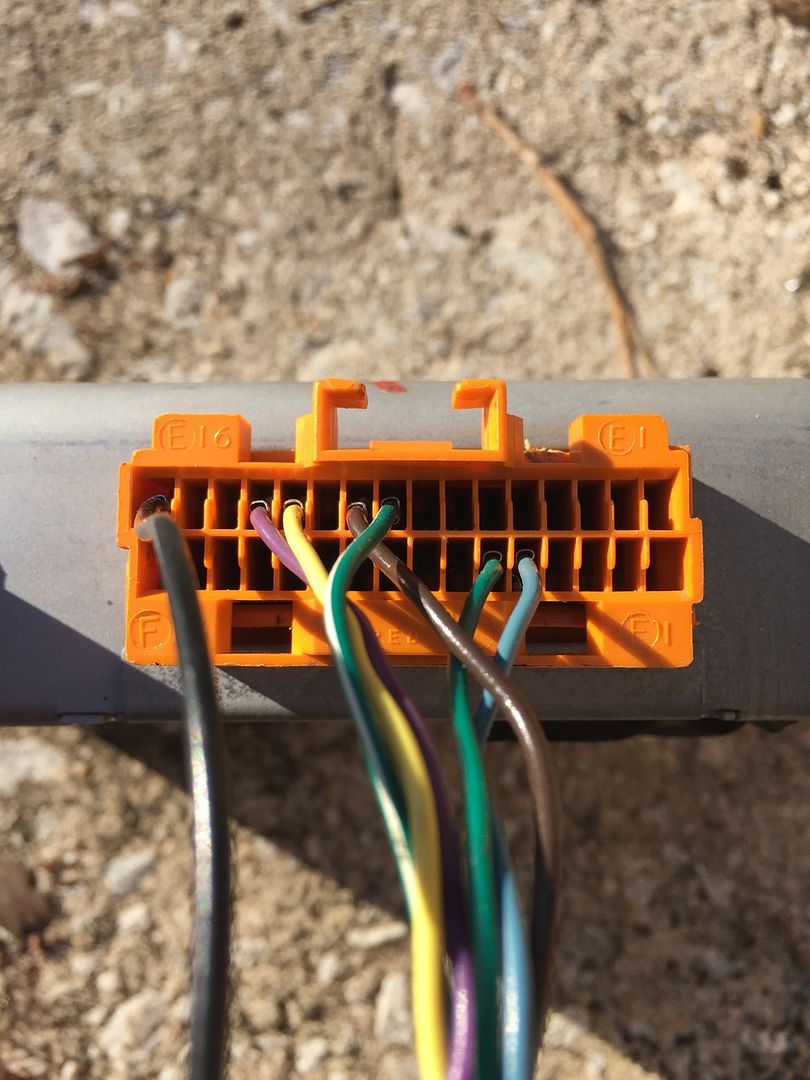
The next image is for the six wires going to the six wire connector to the encoder motor.

Refer the orange connector to locate F13, E5, E8, E7, E6 and F12. Insert the six coresponding colored wires into those locations. It should look like this.
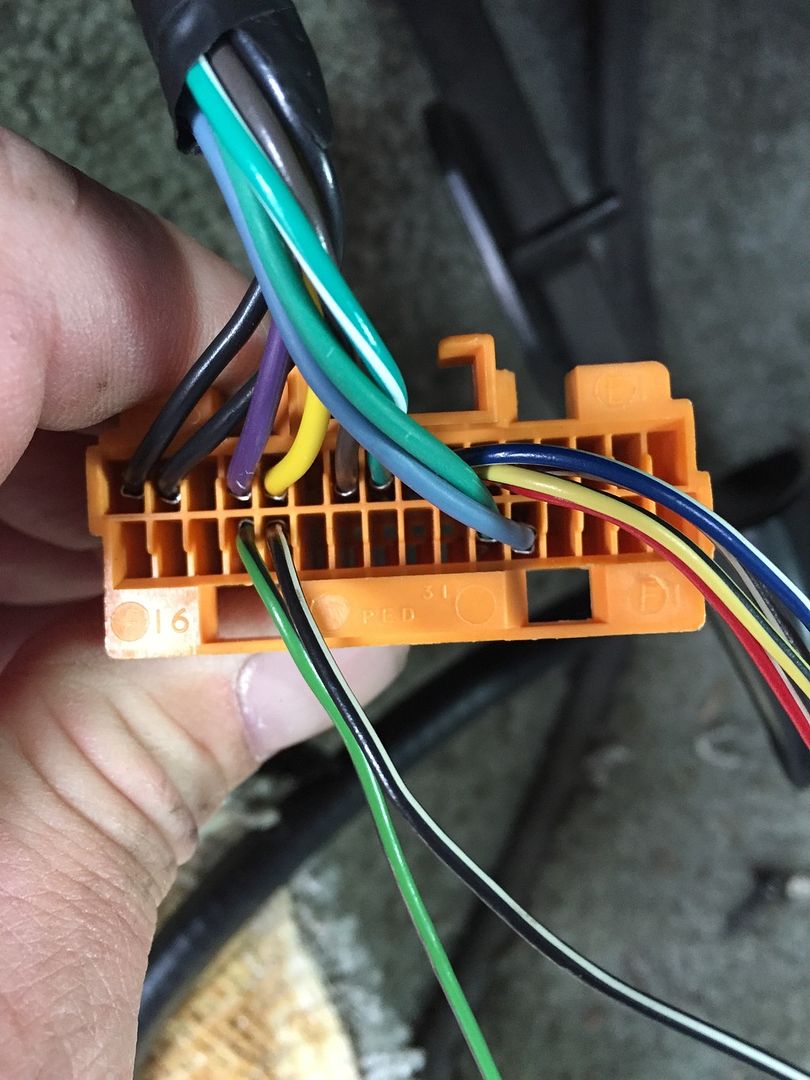
Also I should note here that the black wire in the E15 position needs to be removed and insulated. It's a second ground wire that is not used in the 236 TCCM.
Now run all the newly connected wires from the TCCM down to the encoder motor. Look at the following pics to see where I ran them. I removed the sill plate cover and the panel behind the drivers seat below the window that, (on some models), covers the rear heater core.
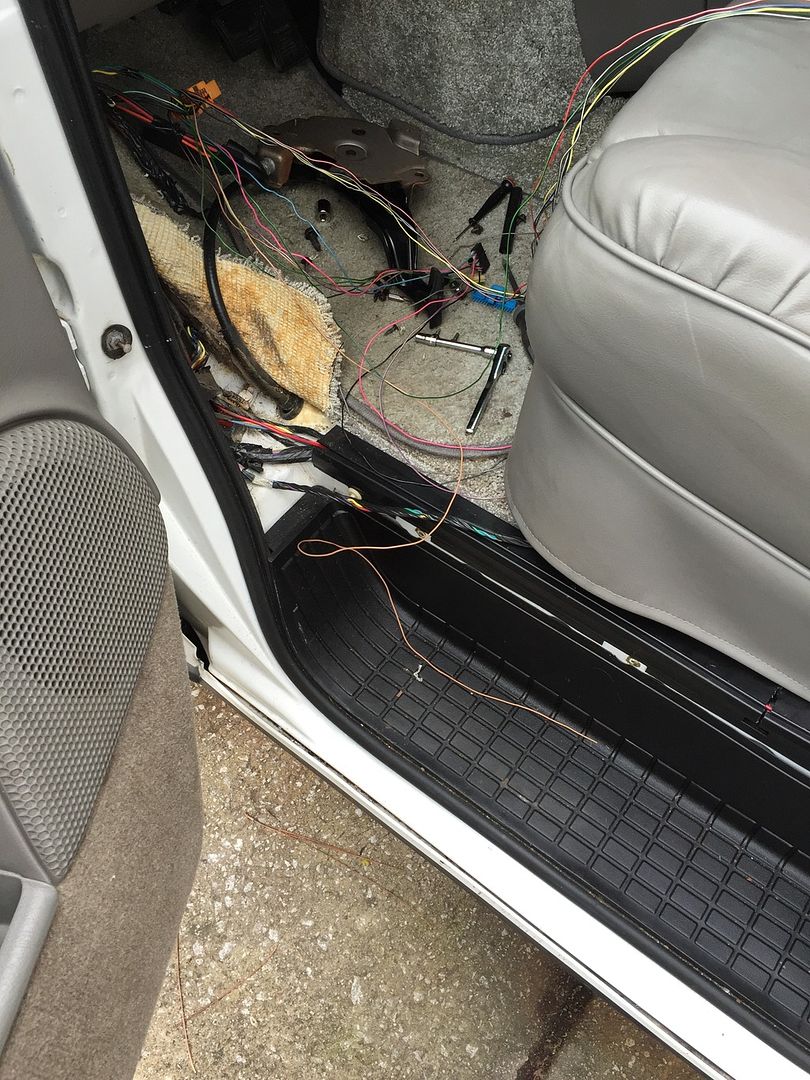
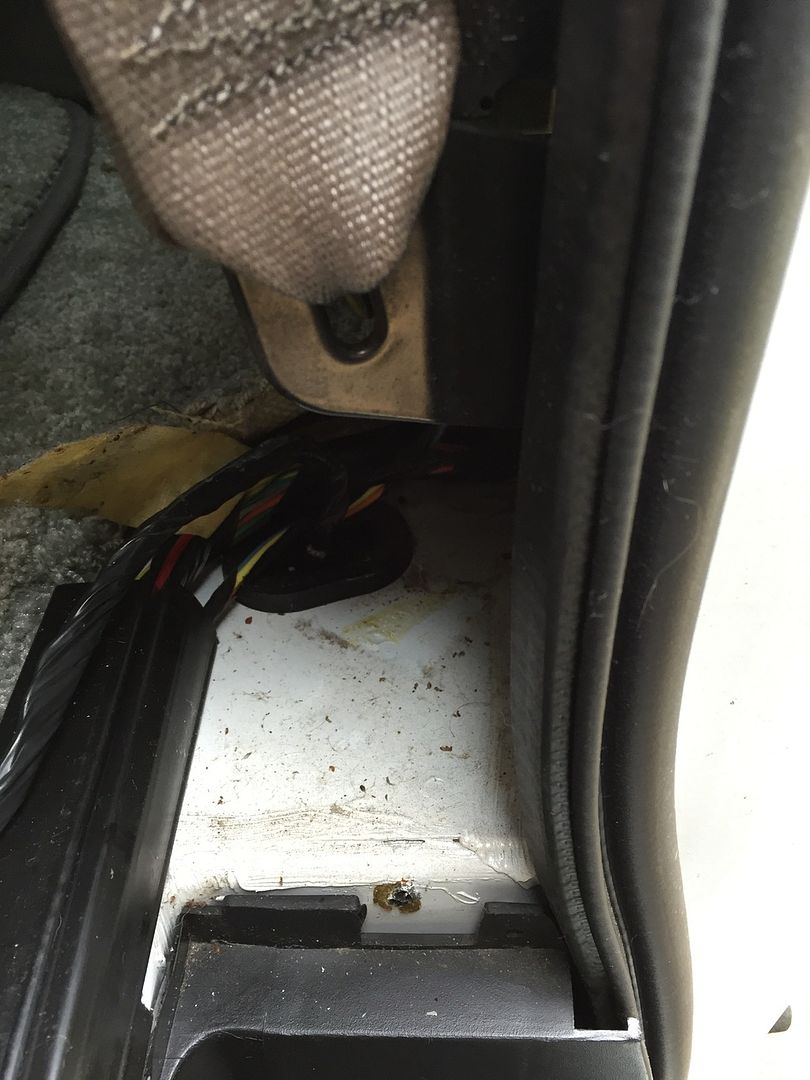
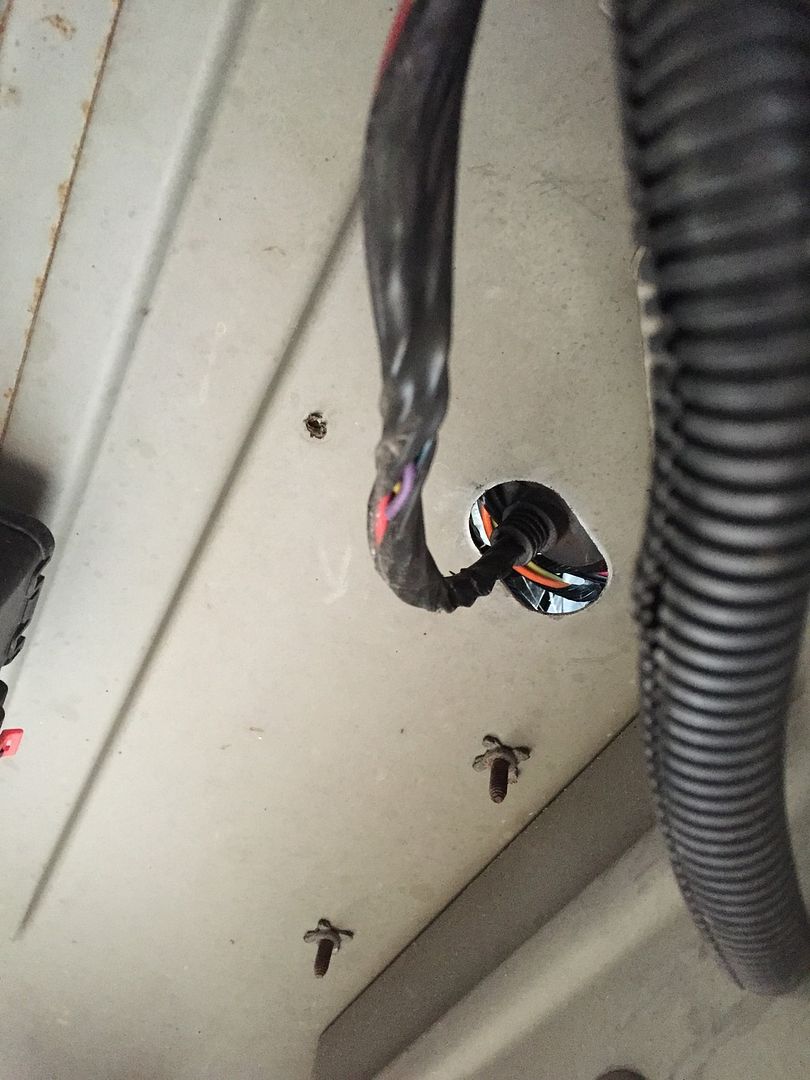
At the rubber body grommet, I punched a hole next to the wires that already run through it.
In my next post, we'll make the connections at the encoder motor. Any questions so far, fire away.

Re: How to wire up a NP 236 in place of a 136.
Posted: Sun Feb 21, 2016 5:28 pm
by racrx7
So you have all those wires ran to the transfer case, now what. First, you'll need one of these:
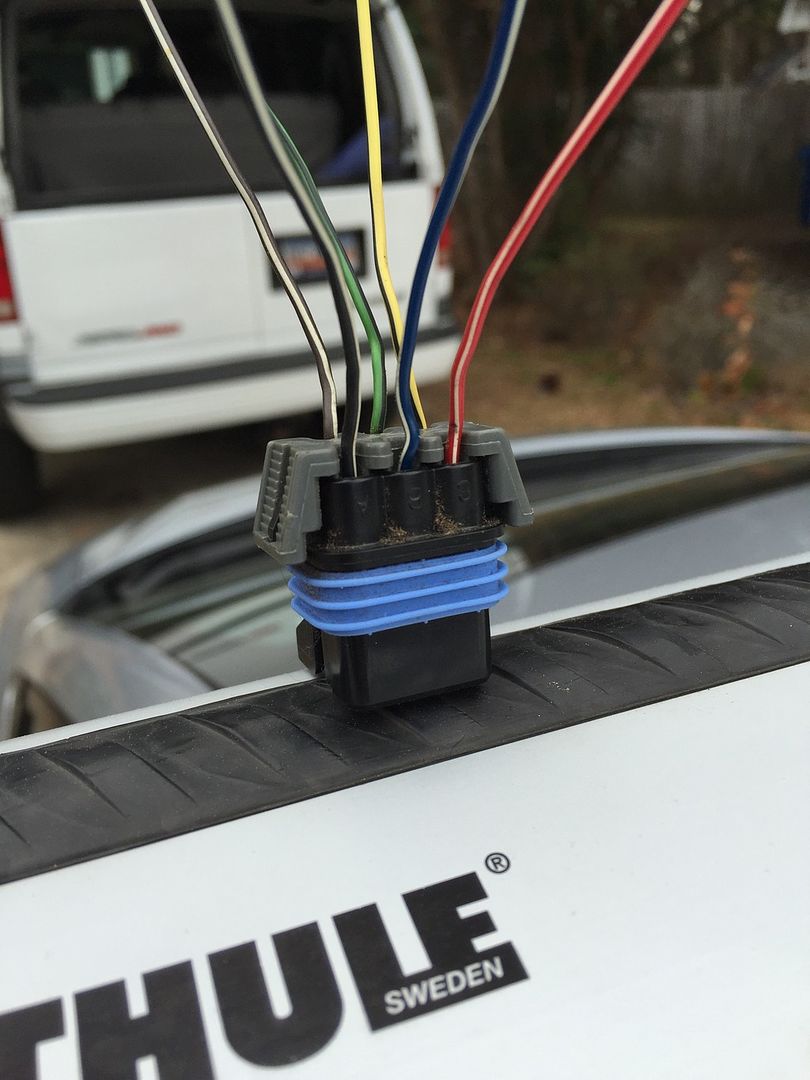
To connect to this:
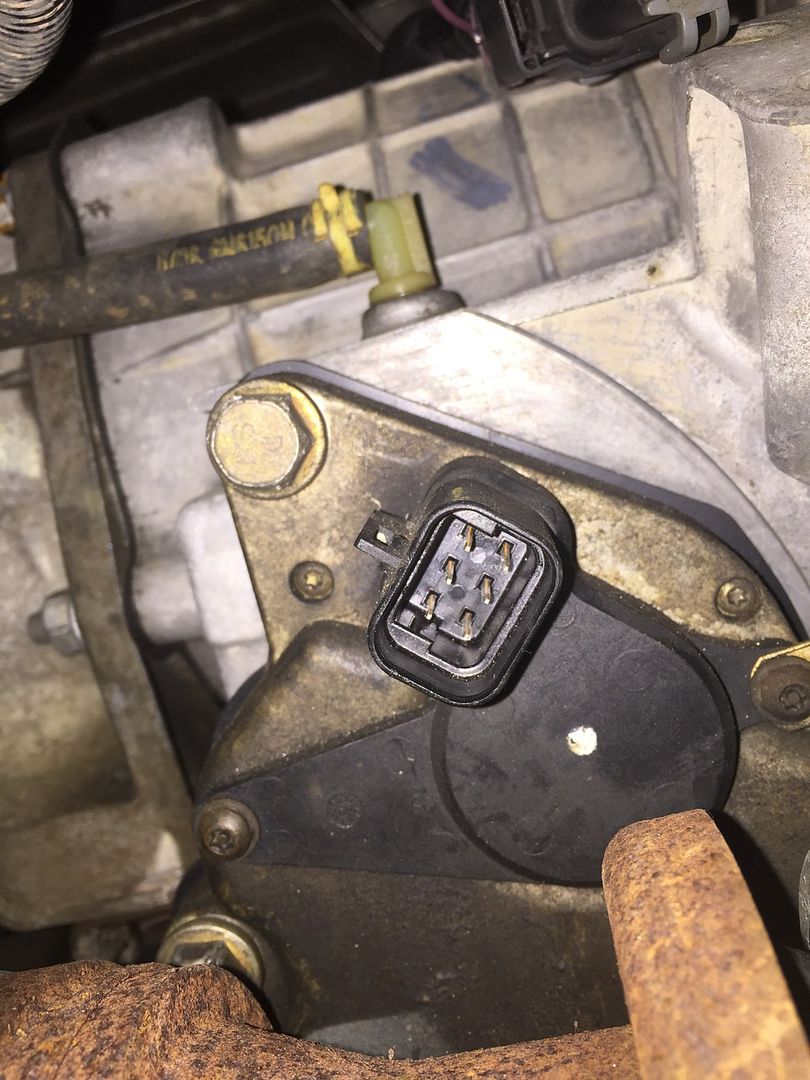
The color configuration of the six wires from the TCCM orange connector are correct in that photo and correspond with this:
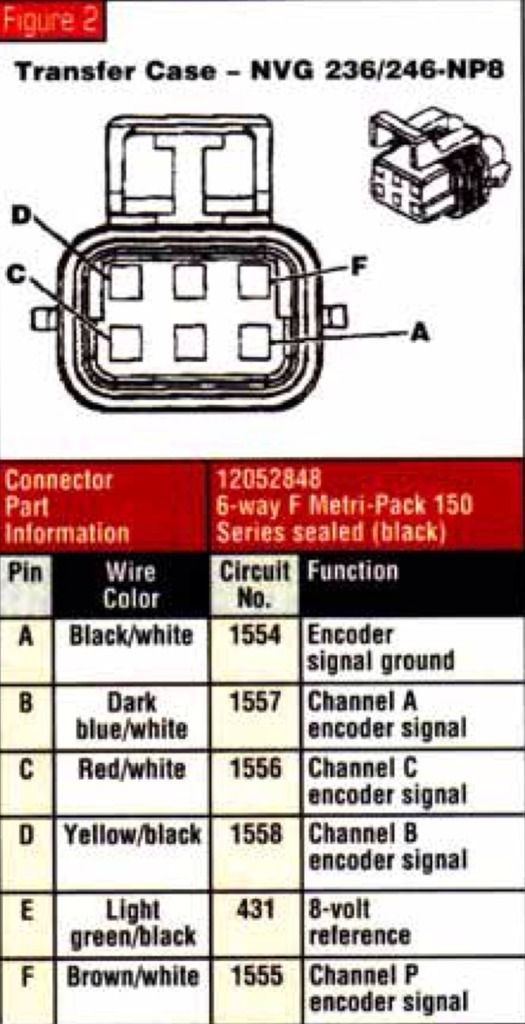
The four wire connector for the motor and brake itself:
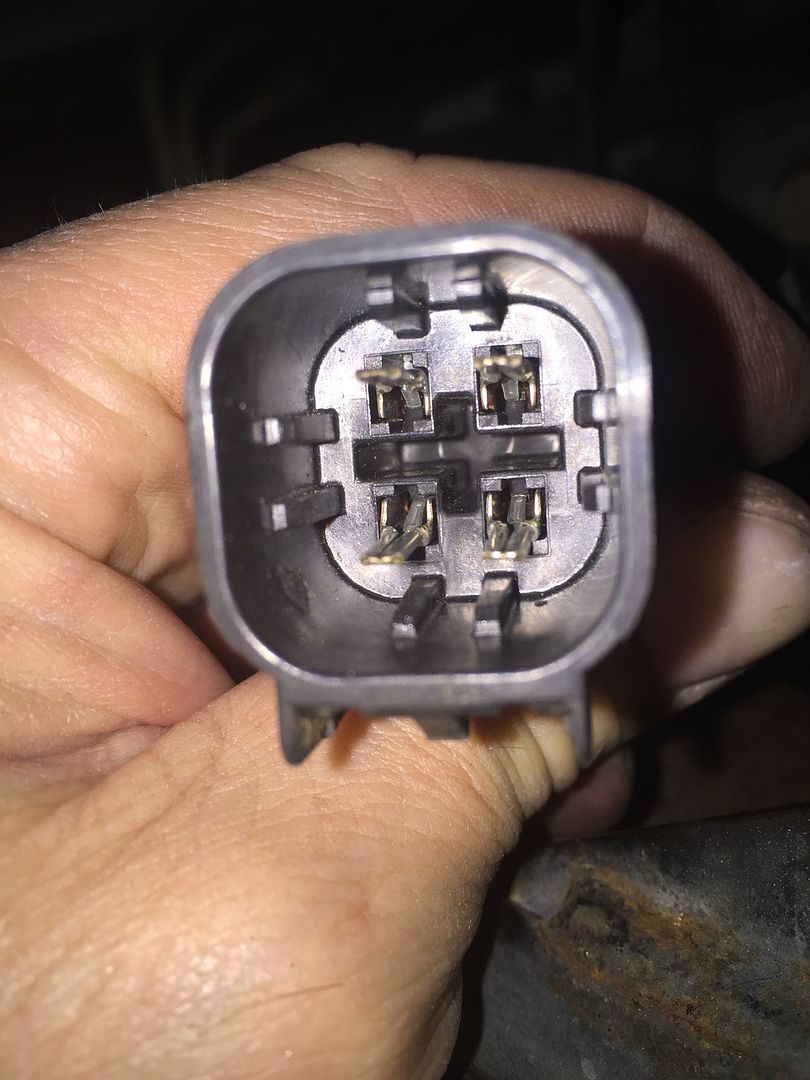
Accept the four wires from the black TCCM connector and are pinned out to this:
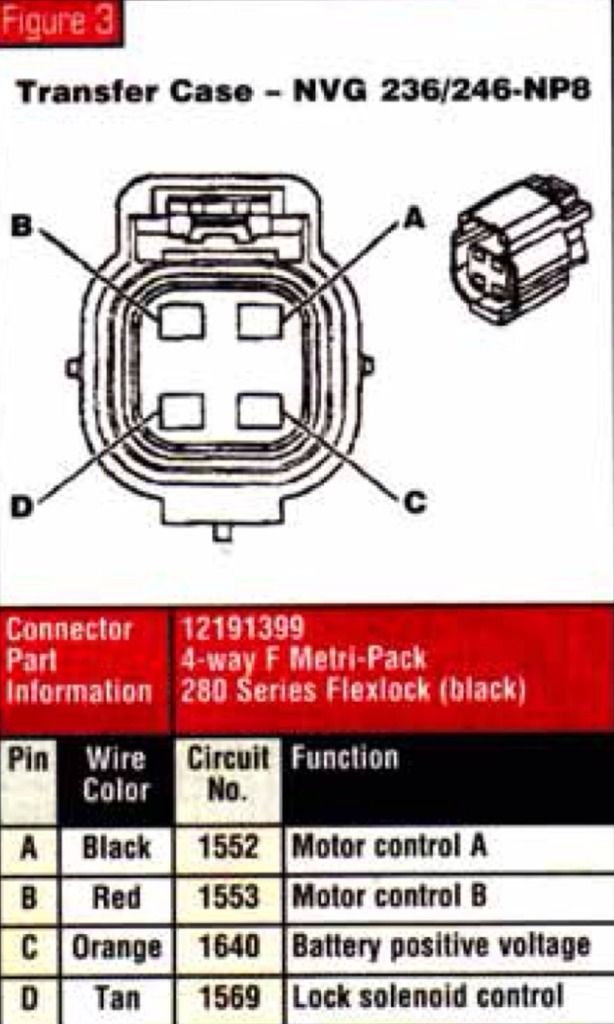
You will need to remove the black and red wire from the original 136 encoder motor connector and transfer them into the four wire connector along with the newly ran orange and tan wire.
Refer back to my posting with the highlighted schematics for reference. This is what it looks like under my van when it's all said and done:
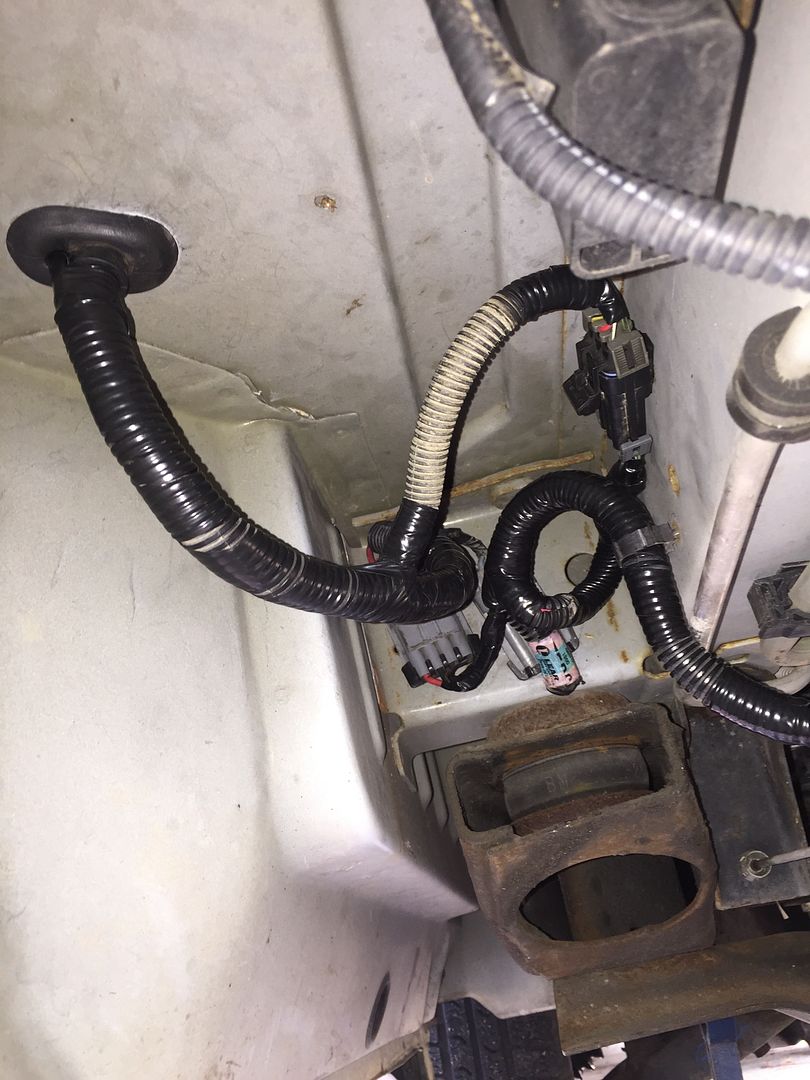
So that's it for the encoder motor

Next, we'll cover wiring to the selector switch.
Until next time,

Re: How to wire up a NP 236 in place of a 136.
Posted: Mon Feb 22, 2016 6:38 pm
by chuck.z
Bravo!!!

Thank you so much for taking the time to chronicle the swap. Also thanks for being the guinea pig on the NV236/246!!
Question: Did you run into any issues with the Class 2 serial bus? From past research, I believe the TCCM communicates with the PCM via the bus, and does checks like finding the VIN#, the gear ratio, tire size, etc from the PCM. I'm not terribly familiar with the 136 electronically- but did you run into any issues with the TCCM communication on the bus?
Also, to further ask the question (since I have a BW xfer case), from your research, do you believe this is adaptable (electronically) to the BW (TCCM-less) models with a lot of wiring? From what I understand, the TCCM in 233's work independently from the PCM (no serial communication), and is adaptable. I'm curious to see if 236 is adaptable, or if the serial bus is the limiting factor.
Congrats! And thank you for your service to the Astro community.
Re: How to wire up a NP 236 in place of a 136.
Posted: Tue Feb 23, 2016 7:09 am
by racrx7
Hello ChuckZ. Thanks for the nice words.
The short answer is no, there were no complications or conflicts with the serial bus. Other than registering faults and throwing AWD codes, I'm not sure what all is communicated to the PCM via the bus, but the swap works perfect. The TCCM I used came from an 01 Blazer and works just fine in my 03 Astro. There is a single wire, (I have yet to cover), that goes from the TCCM to the PCM. All it does is inform the PCM that 4L has been selected and allows the transmission to shift properly when in 4L.
Will a 236 work in a BW equipped van? Electronically, I think it would. The 136 has few circuits that control it to begin with. Pretty strait forward. Does the 233 equipped vehicles use the serial 2 bus? I don't know this. But if it's TCCM works without being on the bus, I don't see why the 236 TCCM wouldn't be able to stand on its own without being on the bus. Again, I believe it's a diagnostic feature. Maybe I'll take my TCCM off of the bus and see how it acts. Would be interesting to see. I've also wondered if the 136 TCCM has the ability to control a 236? GM seems to use parts that cover a range of vehicles. I say this because, how does my PCM acknowledge that I now have a 236 with 4 low and communicates this to the transmission controller to adjust the shift points? I took a gamble, and it worked. Maybe I'll also plug the 136 controller back in and see what it does

Maybe someone that has done the 233 swap can shed some insight in their install.
This community has provided me with a wealth of knowledge through proven applications and from those who pioneered new techniques and applications. I'm happy to be able to share what I have accomplished back to the community. That's what makes them valuable. Also, there's a bunch of good guys here that are super helpful and share their knowledge without big egos.

Re: How to wire up a NP 236 in place of a 136.
Posted: Tue Feb 23, 2016 10:55 am
by Captn. Crunch
I can't even begin to tell you how pumped I am seeing all of this finally coming together. I just went back and checked my posts and it was the first of July 2014 when I started taking apart a 136 and a236 to see if this all would work. I had been looking online for months trying to discern if this was going to be possible but there was no info because no one had done it before. No one had merged these two cases, no one had used the beefed up parts from a 246 to make it even better.
No one had plugged it all in and waited for smoke to rise from under the dash as the computer burst into flames. It had never been done.
Big kudos to all who followed with interest and encouragement. A huge shout out to racrx7 who read it all and put it all together so that everyone could now have the ultimate in two speed setup.
thanks for the nod in my direction racrx7, it was nice of you to do so. Thanks for the step by step on the wiring aspect of this upgrade. It won't be long before this is the go to mod that everyone will be doing in vans around the globe.
I'm thinking this will deserve a co-authored sticky or something

Re: How to wire up a NP 236 in place of a 136.
Posted: Tue Feb 23, 2016 11:47 am
by racrx7
thanks for the nod in my direction racrx7
You bet Captn!! You did all the mechanical leg work that led me to believe it could be done and answered questions I still had. You provided links to others who have experience with these clutch cases that provided great insight! I always try to give credit to where credit is due

Re: How to wire up a NP 236 in place of a 136.
Posted: Thu Feb 25, 2016 11:04 am
by Captn. Crunch
. Also, there's a bunch of good guys here that are super helpful and share their knowledge without big egos.
just to set the record straight-the above quote is not entirely true. I have to admit that my ego took a shot when racrx7 posted up that he had a working system but that's the chance you take when you put your work on line. I could have kept all of this under wraps till I had gotten it all done but that's not how we roll round here. Not gonna lie to ya tho, after so much time and research I guess I had come to think of this as my baby.
So thanks for having faith in my work and choosing it as a path to follow even though it had never been done.
Now lets see if we can't find somewhere between Ct and SC to get together and go wheeling dude!
Re: How to wire up a NP 236 in place of a 136.
Posted: Mon Feb 29, 2016 8:25 am
by 4FX
As a Noob, I have to ask. This was all to take a AWD Astro and turned it into a shiftable 4x4 Astro ??
If this is the case man that is some AWESOME work and perseverance on getting this accomplished.
Troy
2003 RWD
2003 AWD


