Page 1 of 1
Small renovation to rear body
Posted: Wed Mar 17, 2021 8:01 pm
by MountainManJoe
Once in a while I like to clean behind the trim at the back of my van. Here on the wet coast, things get really mildewy, and I start to get dark streaks running down my white paint.
Of course one of the problems with trim pieces, is that they're made for quick assembly. Not for reuse. The retention clips get brittle and break very easily. Essentially disposable.
I found a 15 pc bag of these clips on eBay for around $3. (listed as "Car Panel Trim Clip Fastener Retainer For GM Rocker Cadillac Chevy 25693852")
They are not exactly the same as my OEM ones, but close enough, and they do work.
Here is the original (left) and eBay (right) clips
Re: Small renovation to rear body
Posted: Wed Mar 17, 2021 8:29 pm
by MountainManJoe
Other pieces are held are held on by flange nuts which thread onto studs which have been stud welded to the body sheet metal. Well the welding quality is very poor (much like a lot of things on this van unfortunately). And they used ordinary steel hardware for these exterior parts which are exposed to the elements. So of course the hardware corrodes and seizes up, and when you try to take the nut off, the stud easily twists off with it.
Since I don't have a stud welder, and you can't really weld sheet metal with a stick welder, I came up with another solution using things I already had laying around. I enlarged the hole a bit with a drill, and then I pressed in an aluminum M6 threaded insert (smeared some sealing goo on it too)
I ordered a stainless steel bolt with the same thread. I measure how much I would need and cut it to length. I put some threadlocker on it , and threaded the bolt through the insert from the inside until snug.
The other studs were still intact, so I just applied copper anti-seize to them.
I also ordered a bag of A4 stainless steel flange nuts from eBay to replace all the steel ones.
They cost about $4 for 20 pcs
The nut flanges weren't big enough for some of the trim pieces, so I added ordinary fender washers. I hit them with a bit of black paint so they don't stand out so much.
So hopefully now I shouldn't have problems with rusted hardware on the body.
Re: Small renovation to rear body
Posted: Wed Mar 17, 2021 8:54 pm
by MountainManJoe
Next I wanted to tackle the rear windows. They only swing out a little bit. Not enough to be able to clean the whole window, and behind it. And the rubber gaskets were getting pretty nasty.
So I decided to take them out, but I ran into problems. The windows are held in by little screws with
philips heads!
](./images/smilies/eusa_wall.gif "Banging my head")
They were cranked down really tight, and possible seized up too, so of course the heads started stripping. I HATE phillips screws so much!

All the screws stripped, and I very nearly gave up one of them. I was worried I'd have to get out the drill which is so scary around windows. But with some fresh bits, lots of pressure and patience, and probably vice grips, I got them out.
So with that in mind, I wanted to put the windows back in with hardware that wouldn't corrode, and wouldn't strip if they got tight. I opted for these A4 stainless steel socket head screws (allen head, recessed hex... whatever you want to call it). The dimensions of these is really critical.The head needs to be small enough to fit in the grommet "cup". (hex head is too big) The length also needs to be perfect, to clamp the grommets and glass just the right amount. These cost around $2 for 10. (M5 x 10mm)
They fit inside the cup perfectly, and they'll never strip. No more stress taking the windows out.
Re: Small renovation to rear body
Posted: Thu Mar 18, 2021 1:35 pm
by okie1
A little thought and imagination can go a long way to solving problems, good work!
Re: Small renovation to rear body
Posted: Thu Mar 18, 2021 7:21 pm
by WoodButcher
Nice work Joe, it's sad you need to do that to a newer vehicle.
That trim piece IMO is an abomination to the appearance of the GM van. Is there any way, body mod other than body color paint to hide it?
Re: Small renovation to rear body
Posted: Thu Mar 18, 2021 11:55 pm
by MountainManJoe
Don't get me started on things I had to redo properly on this newer van. I think it was built on a Friday afternoon.
Anyway, I can kind of understand the function of the trim. There is a lip that goes all the way around the rear opening to keep water away. The roof eaves drain into the channel the lip creates. So the trim is probably meant to hide this gutter of sorts, which of course gets gungy.
The white corners you see further down are actually hollow. They hide the rear door hinges.
I agree that clean, unbroken white body would look better. I really hate cheap plastic too. But it doesn't bother me enough to justify doing something about it

There are other priorities.
Re: Small renovation to rear body
Posted: Fri Mar 19, 2021 7:05 pm
by WoodButcher
I had a close look at an '18 today, in order to mold that w/ fiberglass you need to use the inner portion of the part itself to attach to the truck. That would take a master.
I drove and worked out of this van for a week last August and loved it, drove well with a load on the rack and the AC was ice cold. The only bad thing was getting out of it into the 90+ degree weather.
Like I said, nice work. These are the tasks we finish and say, "That's the way GM should've done it!"
Re: Small renovation to rear body
Posted: Thu Jun 16, 2022 7:47 pm
by MountainManJoe
OEM part numbers and associated Rockauto listing.
Re: Small renovation to rear body
Posted: Mon Dec 04, 2023 6:55 pm
by MountainManJoe
By the way, don't do this ... mixing stainless steel and aluminum. Apparently this is a no-no in the boating world, because it causes bad galvanic corrosion.
Re: Small renovation to rear body
Posted: Tue Dec 05, 2023 2:39 pm
by WoodButcher
Interesting,,,
Roof rack on my '93, tin roof, brass nutserts, SS bolt, aluminum track for steel crossbar.
Years ago I made a few bucks working on boats on the shore. I worked in marinas and clubs wherever the boat was, scrape the bottoms, paint and repairs. I'd replace and add zincs, remove and reattach fixtures all over and never did I have an owner supply anything other than stainless or brass.
What is suggested instead?
The majority of bow rail I remember if not wood were aluminum into pot metal fixtures and or aluminum turnings.
Re: Small renovation to rear body
Posted: Tue Dec 05, 2023 3:42 pm
by MountainManJoe
Here is a stainless screw in an aluminum sailing yacht mast.
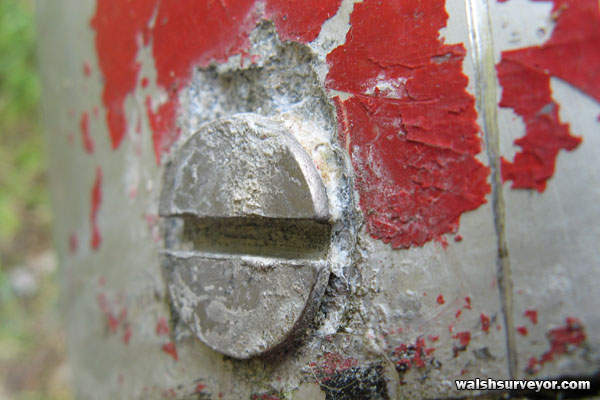
- rig3.jpg (91 KiB) Viewed 3917 times
Youtube video

I remember I had to go a scrapyard once for Astro roof rack parts. The rack is aluminum and I'm pretty sure the long torx screws are stainless. Not sure what the threaded inserts were. But the screws were seized in there really well, and spun the inserts.
My amateur understanding is that stainless being a noble metal, will accelerate the dissolution of the more reactive metals (Magnesium, Aluminum, Zinc,etc.)
https://en.wikipedia.org/wiki/Reactivity_series
So, the boat zinc is a perfect example. We call them sacrificial anodes, right. Why? The more reactive metal (zinc) is dissolving (being sacrificed) to protect the other hardware. And in the case of the boat, that's exactly what you want. But in my case, I don't want the aluminum insert to dissolve, because it is a structural element.
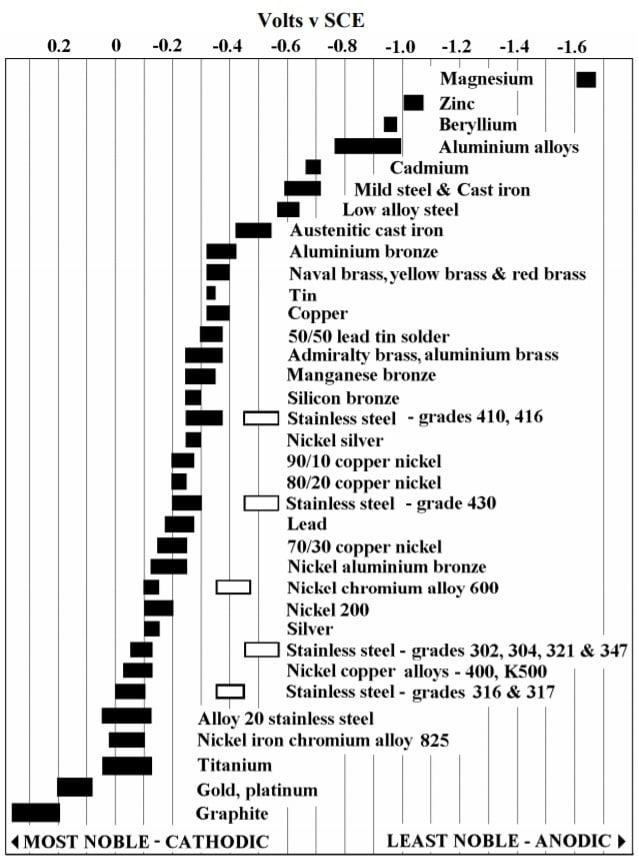
- galvanic series noble metals.jpg (72.18 KiB) Viewed 3917 times
It's electro-chemistry. So this happens when you place metals which are far apart on the table, next to each together. If you put zinc and aluminum together for example, there is very little galvanic action.
It's not that simple, however. Apparently surface area comes into play as well. Here is an article for solar panels:
https://www.solaracks.com/galvanic-corr ... num-alloy/
And fasteners:
https://www.marshfasteners.com/can-stai ... -together/
This is an instance where galvanic corrosion led to death and injury on a ferry:
https://stevedmarineconsulting.com/unde ... corrosion/
WoodButcher wrote: ↑Tue Dec 05, 2023 2:39 pm
What is suggested instead?
Good question. I guess stainless on stainless is ideal. But stainless is a hard metal which does not lend well to inserts which need to be crushed to work. So probably plated hardware. I think yellow chromate electroplating offers a good balance of durability and cost effectiveness. Good enough for a van I think. Probably not marine.