Fuel Pump - Fuel Sender Assembly - Replacement Procedure

Tank, pump, filter, regulator, injectors and poppet valves etc.

Topic author
chemist
I finally get the smurf thing
Posts: 155
Joined: Tue Mar 13, 2007 7:30 pm
Location: Pocono Mts, PA

Fuel Pump - Fuel Sender Assembly - Replacement Procedure

Post by chemist »

If you plan on keeping your Astro or Safari van, one thing is certain. Your fuel pump will eventually die. This has happened to me once with my previous 98 Astro at 138,000 miles, and more recently with my 03 Astro at about 122,000 miles. The 98's fuel pump used to hum loudly. The 03's really didn't, but you could always hear it engage upon turning the ignition to on, which you should hear. The only behavior they had in common was that both died and stranded me when I was over 30 miles from home, resulting in nearly $300 tows for vehicles that were still too new in my opinion to justify the expense of a AAA plus membership. Strangely it happened on my previous 90 Ford Escort at roughly the same mileage.

Everyone here warned me to replace at 100,000 miles. Because I didn't it cost me a $250 tow. It also cost me not using the AC Delco part, which most auto shops have to order. So, because I didn't listen I now have a fuel pump that could put me through all of this again in as little as a year. Take the advice of the wisdom here on this board and make changing your fuel pump a 100,000 mile general maintenance item. Also, if it's planned you have time to do other stuff under the vehicle because you're not as rushed.

The Astro and Safari vans use an electronic fuel pump that resides inside the gas tank. If your van strands you, and you don't hear the pump engage when you turn the ignition to the on position, it may just be your fuel pump. If you're close to home and yours dies, take a hammer or your tire iron and bang the bottom of your gas tank using an upward motion. Do this a few times and then have someone turn the key while you continue to do this. If you're lucky your van will start and stay running long enough to get you a short distance. By the way if that worked, you've pretty much confirmed a dead fuel sender assembly (fuel pump). Murphy's law says that if your pump dies and strands you, you must have a full gas tank. At least that's how it worked for me every time.

So, it begins. Safety Notes:
* Gasoline is extremely flammable, and volatile. Vapors can explode given a heat source or spark. Disconnect the battery before starting. If additional light is needed, do NOT use an open faced trouble light. Flashlights are a somewhat safer alternative.
* Crawling around underneath your vehicle often results in road dirt and rust falling, usually finding its way into your eye. Safety glasses are good, a face shield is better—this would the second time my van sent me to an optometrist to look at my eye...
* Additionally, gasoline can contain carcinogens—it's not all just straight chain octane, though that is one of the goals of refining it. Nitrile gloves aren't a bad good idea, and good ventilation is a must—this is a good one for the driveway instead of the garage.

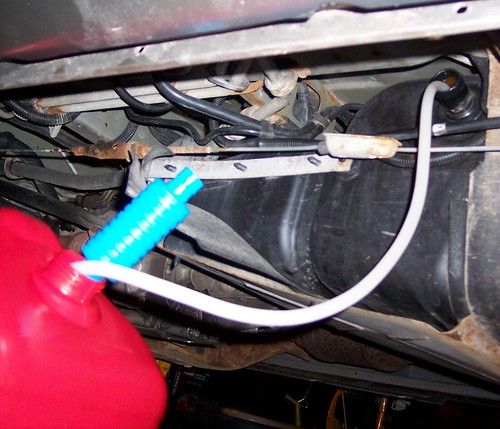
Start by siphoning gasoline out of the tank. I couldn't get a hose into the tank through the gas filler tube (where you insert a gas nozzle to fuel up), because something kept blocking it. So my procedure will involve doing it without the gas filler tube attached. Try to siphon through that first, though.

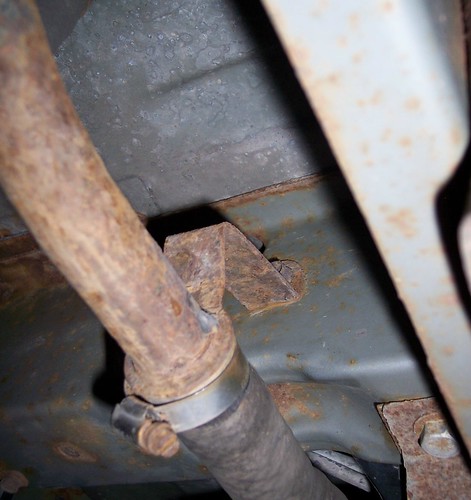
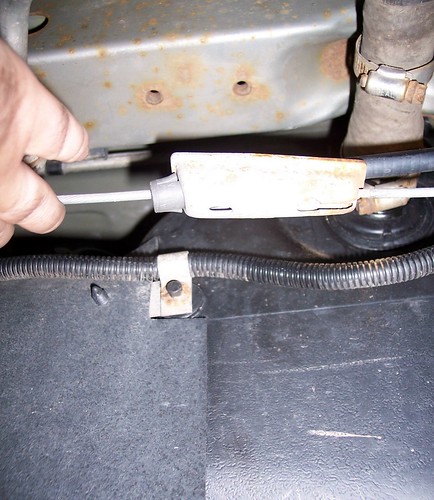
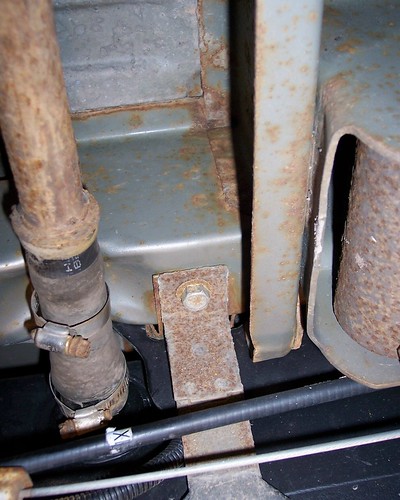
The only way to access the fuel pump is to remove the gas tank. Stuff attached to the gas tank has 3 fuel lines and 3 sensor wires. Additionally, the gas tank is held in place by two straps. Your gasoline filler tube (where you insert a gas nozzle to fuel up) is attached, and is not part of the tank. Start by removing it. The gas filler tube is attached to the side of the van by two small bolts (7 mm on my 03). shown below:

Image

The filler tube also has a bracket, underneath the van. If memory serves me, it's a 13 mm bolt on my 03. Unbolt it.
Image

Lift and the back end of the van and then loosen the clamps on the hose connecting the oil filler tube to the gas tank and remove the gas filler tube from the gas tank—if you can't fit the a screwdriver in there to do it, they are probably 5/16” bolts.

Image

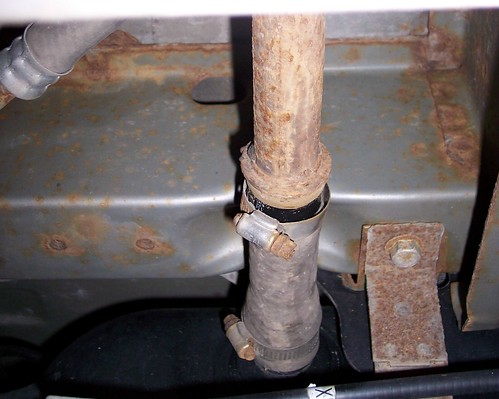
Pull the gas filler tube off of the gas tank and remove the gas filler tube from the van. See all that rust on it? Now might be a good time to wire brush it, sand it a little and hit it with some black rustoleum. If not already done, siphon any gas out of the tank. You may need to round up the neighborhood's gas cans for this one.

Image

This will take a while if you had a full tank. Have a beer or do something else to pass the time, while keeping half an eye on the can so it doesn't overflow...

Image

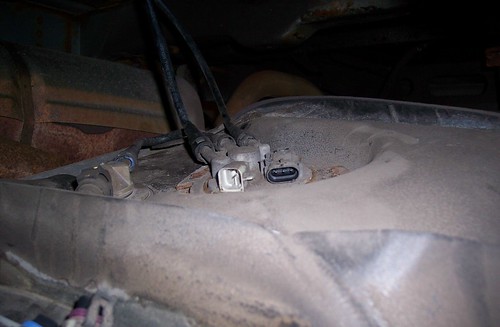
Okay now that the tank is drained, you can start at removing all of the wiring harnesses and fuel lines connected to the gas tank. Service manuals tell you to disconnect the EVAP purge line and the related sensor wires.

Image

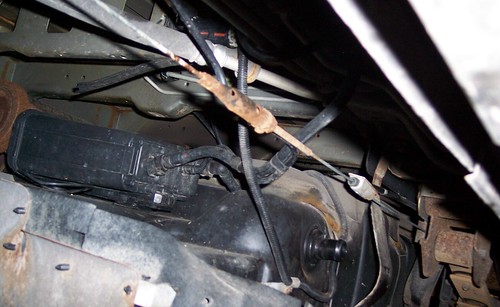
You could do that, and it works well for any shop that does this repair I'm sure. Here's another idea. See the assembly in the upper part of the photo below? Disconnect the wiring harness from that, than simply unbolt the assembly from the side of the van. No fuel lines disconnected... Probably no more difficult, but it just shows there's more than one way to skin a cat.

Image

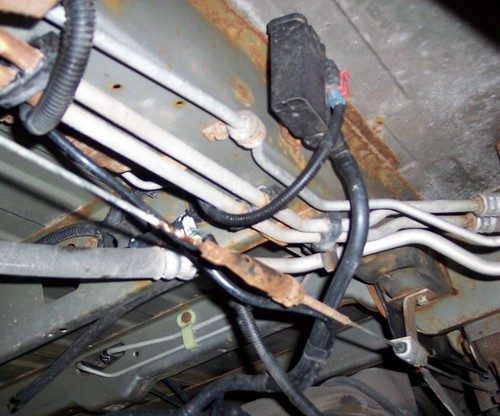
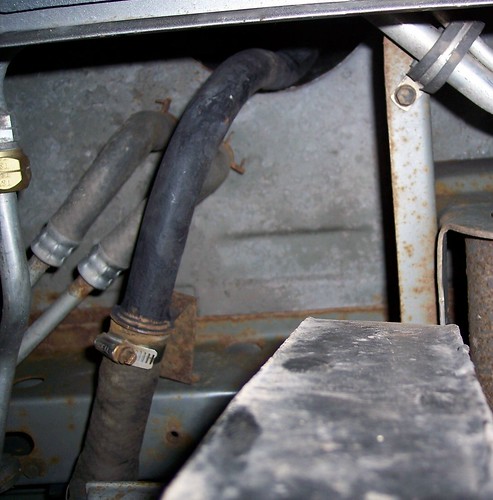
If you can reach them, there are two fuel lines between the gas tank and the drive shaft (coming from the fuel pump). No photos because I couldn't see them. If you can't reach them, don't sweat it. You're saving an enormous amount of money doing this yourself as it is, and I believe that these lines should be lengthened so that they're long enough to drop the tank, and then be disconnected. In their current form, they're not. So if you can't reach them, and kink them while dropping the tank, get yourself a 5/16” and a 3/8” fuel line repair kit (contains one PVC line with one quick connector and an barbed fitting to go onto the non-kinked part of your hose). The lines will be a little longer for next time. Only thing is you must be careful to keep the lines away from the muffler when re-installing the tank.

You'll want to detach the wiring from the side of the fuel tank. This is the wiring going into the fuel pump. It will be hooked on the side of the tank to keep it from dangling when you drive—unhook it.

Image

Now support the gas tank with a jack—try to off center it slightly toward back of vehicle for balance, and begin to loosen the tank straps.

Image

Next start to loosen the bolts on the tanks straps. If memory serves me, these are 15 mm bolts. You'll need socket extensions with this as well. Loosen the strap bolts on the drivers side. Remove the strap bolts on the passenger side.

Image

Now slowly release tension on the jack to lower the tank, slowly. If you couldn't reach those fuel lines off of the pump, you'll be able give yourself one more chance before you kink them. Additionally, remove the two wiring harnesses attached to the fuel pump.

Image

Now drop the tank to the ground and pull it out from under the vehicle. Remove all fuel lines from the fuel pump. I used a small screwdriver and my fingers to depress the plastic clips retaining them.

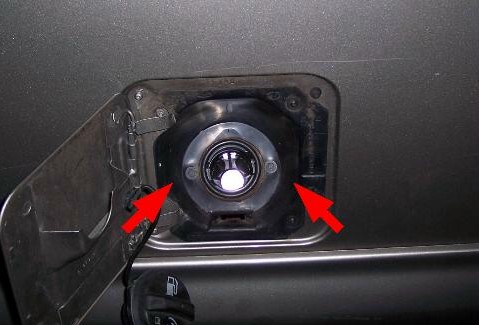
Your fuel pump will probably be held in by a retaining ring that has to be unscrewed. GM has a fuel sender wrench just for removing this. I didn't need one, and you probably don't either. What you do need is a can of PB Blaster or some other liquid wrench type of stuff, patience, a hammer, and a brass drift. There are some model years of these vans that require use of snap ring pliers or a right angle pick instead of the brass drift. If yours doesn't look much like this, and has holes in it, you'll need to use snap ring pliers instead. If it looks like below, use liquid wrench and a brass drift striking at the points and directions of the arrows as shown below. You may need to let the liquid wrench soak in a while—idea: spray it liberally, have a beer, spray again then use brass drift. Before you do this, note the direction of the fuel pump inlet and outlets (install new one facing same way).

Image

Once that ring turns free, your going to lift the old pump (fuel sender assembly) out, tilting as needed to get gas guage float out. No photos of this, sorry. Clean the retaining ring a little if you like. Be careful not to get dirt from outside your tank in if you can. Remove and replace the old seal ring between the fuel pump and tank. Then place in the new fuel pump (fuel sender assembly) and replace the retaining ring. Then replace the center line on the pump.

Edit Note: Be very carefull of the fuel pump float when placing in the new one. You don't want your van to show empty on the gas guage all of the time. Also, depending on model year, if your van reads nothing from that sensor, it may not start, regardless of how full your tank really is. I know this because mine had this issue when it was still under warrenty.

Image

Replace the gas filler tube, going in the reverse of how you removed it—you did get that rust off it right?

Image

Push tank back under vehicle and replace all fuel lines, placing them on the pump first. If you cut the lines as I did and used a line repair kit to lengthen them, you'll be able to attach them to the vehicle's hard lines as well. Place wiring harnesses back onto the fuel pump. Edit Note: Remember that if you did this, you need to be especially carefull to keep them away from the muffler when raising the tank.

NOTE: You may have to replace one of the wiring harnesses—I did. All you need is wire cutters, electrical tape, and a crimping tool—although I think needle nose pliers would work too... It's easy. Follow the directions that came with the wiring harness to the letter—it would have come with the fuel pump if you need to do this. Sorry, no pics or procedure. Simply cut the 4 wires, placing cuts at least 1.5” from each other. Strip about 5/16" or so off each of the wires, and line them up with the new harness. Cut and strip harness wires to fit. Use the included clips to splice the wires or twist together and use electrical tape—the included clips are better to use. Wrap everything with electrical tape when done.

Replace the gas tank—that will likely be a 2 person job, but I did it myself by pulling the tank on top of myself and wrangling it into place. Here's a tip, remember to bring the tank strap bolts and your socket/ratchet with you. I didn't remember the first time... Replace straps and bolts—but leave them loose until you re-attach the fuel pump lines to the hard lines above it if you have not already done this.

Replace everything else you did, working in reverse order.

Put some gas in the tank and start it.

If anyone sees anything I might have missed please reply and mention it. Also, if anyone has any pics of the fuel pump with snap ring in place, please reply and post them.
Last edited by chemist on Sat Aug 29, 2009 2:56 pm, edited 1 time in total.

Previous Vans: 1998 Astro, AWD, 138K mi; traded on 2003 Chevy Astro, AWD, 125K mi; traded on
2009 Chevy Silverado 1500 WT, 4x4, ext, long box
2007 Chevy Cobalt
1998 Maza MPV (180K mi and in need of PA inspection--only paid $500!)

Needed: a Gen 2 Astro project vehicle...

astrozam
I have my van tatooed on my cheeks
Posts: 2770
Joined: Fri Sep 08, 2006 2:57 am
Has thanked: 1 time
Been thanked: 2 times

Re: Fuel Pump - Fuel Sender Assembly - Replacement Procedure

Post by astrozam »

=D> Thanks chemist for contributing that "How To" nice pics & write up.
User avatar

SoCalli V8
Retired
Retired
Posts: 1209
Joined: Wed Sep 20, 2006 5:42 pm
Location: Lost Angels, Sovern KarlyFornia.

Re: Fuel Pump - Fuel Sender Assembly - Replacement Procedure

Post by SoCalli V8 »

Whoa.... Great write up with Great informational pics chemist, Well Done mate :supz: :supz: :supz:

I am the guy that always says "replace your fuel pump at 100k miles and replace your $10 fuel filters every 25k"

I work at a 'Triple A' approved automotive shop that fixes cars dragged off the freeway everyday, and I replace alot of fuel pumps. I see the tow bill charges and sigh to myself, which makes me wanna pass on my valuable info to my StroFari brothers here and help them save some huge ca$h.

This is The Bottom Line.

At around 100k ( + or - 20k ) run your gas tank very low, and replace your fuel pump with a Genuine AC Delco unit and strainer filter, in the comfort of your driveway. < Yes it is a P-I-T-A.....job, but for your "piece of mind" and knowing that you are not gonna leave your family stranded some place, it is Soo worth it.

Sure you can use a cheaper brand, but bear in mind..... that they are of lower quality and you may have to do this whole job again in a year or two. When it comes to fuel pumps, I Highly Recommend GM only, for original equipment and longevity.

Replace your $10 fuel filter every 25k, this will also prolong pump life and engine performance.
`86 V8 Lowered Cargo, extensively modified, shaved bald, wearing the shortest, sluttyest white primer dress....

A British Wanker living in So KarlyFornia.
My Astro tows my toys to Glamis sand dunes http://www.youtube.com/watch?v=jp2pqjQtpso
First ever canal jump at Glamis http://www.youtube.com/watch?v=oXZjM84x_Xc
User avatar

kings-x59
ASV Supporter
ASV Supporter
Posts: 1374
Joined: Thu Sep 21, 2006 7:50 pm
Location: Cypress, Tx

Re: Fuel Pump - Fuel Sender Assembly - Replacement Procedure

Post by kings-x59 »

excellent write up! =D>
I can personally attest to Socalli's post, don't go cheap on the fuel pump. It is a pita to replace, I did go cheap and got to do it twice within a year. One thing though, replacing it yourself saves a huge amount of coin.
'89 Astro, 4.3L, TBI. Minor intake and exhaust mods. Rebuilt 700R4 trans (by me). Corvette servo, 0.5" boost valve, police grade 1-2 accumulator spring (shifts fast and solid). B&M stacked plate trans cooler. Bilstein shocks. Belltech sway bars front and back. New head unit, speakers and subwoofer. Needs paint and a new headliner.

name's Steve
I can't remember all I've forgotten about that....
User avatar

Rileysowner
I plan to be buried in my van
Posts: 1290
Joined: Sat Sep 09, 2006 7:14 pm
Location: Exeter ON
Contact:

Re: Fuel Pump - Fuel Sender Assembly - Replacement Procedure

Post by Rileysowner »

Great writeup! I still wish between us we could find a way to put an external pump in. I can't imagine it would cost any more than the late model GM fuel pumps, and would have the advantage of being changeable without dropping the tank. Sadly, I don't have the know how to come up with something.
"I have a torque wrench and I am not afraid to use it."
Jim
1997 GMC Safari RWD, Power Windows and Locks, 7 passenger, a/c, rear heat

http://rileysowner.blogspot.com/
User avatar

CaptSquid
I plan to be buried in my van
Posts: 1230
Joined: Sun Sep 10, 2006 4:50 am
Location: Billings, MT, 'MERICA!

Re: Fuel Pump - Fuel Sender Assembly - Replacement Procedure

Post by CaptSquid »

Killer write-up!
Mike, Billings, MT, 'MERICA!
92 Safari SLE w/Z Motor (sold to a good home)
98 AWD Stro LS
93 Suburban Silverado 4x4

Look for the MISSING Alien in the Right Seat. AL, PHONE HOME!!!

ImageImage
Image
User avatar

Smiliesafari
ASV Supporter
ASV Supporter
Posts: 2667
Joined: Sat Dec 02, 2006 12:34 pm
Location: Orlando, FL

Re: Fuel Pump - Fuel Sender Assembly - Replacement Procedure

Post by Smiliesafari »

That's a great write up. Here's a helpful tip. If you have a transmission jack (or access to one) they are a bit better than a floor jack. The platform is larger and you can use a small ratchet strap to tie the gas tank to it. \:D/
1996 Safari SLX Hotair balloon transport vehicle

gabequest
I finally get the smurf thing
Posts: 208
Joined: Sun Jun 01, 2008 7:44 pm
Location: Truckee, CA
Contact:

Re: Fuel Pump - Fuel Sender Assembly - Replacement Procedure

Post by gabequest »

Thank you kindly. I'm at 119000 and running fine (rarely below a 1/4 tank), but I'm starting to wonder. My problem is I like to see how long things can go for. I should probably do this procedure under my own terms. Hmmm.
2004 Astro AWD
4inch Overland lift, 265/70/16, Poptop Colorado CamperVan, 11inch Roof Fan, Custom Bumper...more to come on the interior

SafariRoadster
I am smitten with my van
Posts: 30
Joined: Tue May 11, 2010 8:17 pm

Re: Fuel Pump - Fuel Sender Assembly - Replacement Procedure

Post by SafariRoadster »

Rileysowner wrote:Great writeup! I still wish between us we could find a way to put an external pump in. I can't imagine it would cost any more than the late model GM fuel pumps, and would have the advantage of being changeable without dropping the tank. Sadly, I don't have the know how to come up with something.
Well you could do what the PO did to my van.
Image
I suppose he had to replace the fuel pump at some point and didn't feel like droppin the tank again.

batmo
I sleep in my van
Posts: 264
Joined: Tue Apr 21, 2009 1:11 pm

Re: Fuel Pump - Fuel Sender Assembly - Replacement Procedure

Post by batmo »

chemist, thanks for the contribution! allthough in no way will needle nose pliers work instead of real wire crimpers but if your not familiar with real wire crimpers I can see why one might think so.

the market is flooded with chinese type tools now and fake wire crimpers are the norm these days. sad because they can cause real problems. poor crimps are major fire hazzards! when they are close to fuel tanks... Bad, VERY Bad.

SafariRoadster wrote:
Well you could do what the PO did to my van.
Image
I suppose he had to replace the fuel pump at some point and didn't feel like droppin the tank again.

oh my! no thanks..

I fail to see the big deal with these fuel pump replacements. mine went out at ~200,000 and I replaced it on the side of the road after getting a lifetime warrantied one from autozone. now going on 400,000!

just incase Im not within walking distance of a parts store I bought another one later and keep it in the van but I aint changing it untill its needed.

I guess the TBI fuel pumps are better quality than later types?

trevcda
I am merely driving my van
Posts: 19
Joined: Sun May 29, 2011 10:02 am

Re: Fuel Pump - Fuel Sender Assembly - Replacement Procedure

Post by trevcda »

Really great write up! I wish I had the time and place to do this myself. I just lost my fuel pump at 201,000 miles. I just got back from a long road trip and was on my way to work in another state when barely out of the driveway, it quit. Got it back into the drive way.

My little tip: I don't know what AAA charges per month for their membership, but years ago after being stranded in the middle of nowhere, I added Roadside Assistance from my cellphone carrier for what was then $3.00 a month and vowed never to be without that service again. Good for up to four uses a year; one tow will more than pay for itself and they offer lockout, jump start and other services included. It may be up to $5.00 per month by now, but still worth it when you need it.

Anyway, towed to the shop, it's going to run close to $700 to replace fuel pump and filter. There sure proud of those things aren't they?! Oh well, high milage cars. I still think the timing was good, though. I could have been seriously stranded on either side of when it actually happened.
User avatar

bobenhotep
I am merely driving my van
Posts: 11
Joined: Sun Apr 22, 2012 7:13 am

Re: Fuel Pump - Fuel Sender Assembly - Replacement Procedure

Post by bobenhotep »

On most older GM vehicles with fuel injection, you can siphon the gas out of the tank through the return line. It goes all the way to the bottom of the tank and if you are lucky you can just take it loose next to the fuel filter and it starts siphoning on its own. I dont know about the later ones.
2000 Astro 2wd

Image

LAZ 1
I get chills without my van.
Posts: 91
Joined: Fri May 30, 2014 8:52 am
Has thanked: 1 time

Re: Fuel Pump - Fuel Sender Assembly - Replacement Procedure

Post by LAZ 1 »

I replaced a couple of fuel sending units on my previous rides, the 96 -98 Mazda MPV 4WD vans. These vehicles come with a removeable hatch in the floor so you don't have to drop the tank to get at the nasty bits inside.

Has anyone simply cut a hole in the floor over the pump assembly instead of dropping the tank?
And then reinstalled and resealed the hatch.,

Any reason NOT TO??

Larry Z
User avatar

Smiliesafari
ASV Supporter
ASV Supporter
Posts: 2667
Joined: Sat Dec 02, 2006 12:34 pm
Location: Orlando, FL

Re: Fuel Pump - Fuel Sender Assembly - Replacement Procedure

Post by Smiliesafari »

Been done many times. No...there is no reason not to.
1996 Safari SLX Hotair balloon transport vehicle

LAZ 1
I get chills without my van.
Posts: 91
Joined: Fri May 30, 2014 8:52 am
Has thanked: 1 time

Re: Fuel Pump - Fuel Sender Assembly - Replacement Procedure

Post by LAZ 1 »

Thanks.

I will be camperising my Safari and installing a plywood floor so sealing the hole in the floor over the gas tank fuel pump hatch should be easy.
[;{)
Post Reply