
Is it just me, or is this happening to a lot of vans lately?
-
LiftedAWDAstro
- I have my van tatooed on my cheeks
- Posts: 4379
- Joined: Sat Sep 09, 2006 3:35 pm
- Location: New Haven, NY
Re: Is it just me, or is this happening to a lot of vans lat
That is SHARP! It'll be good for another 24 years at least!
Current rides:
2013 Toyota Tundra DC 4x4
2008 Dodge Nitro 4x4
2005 Nissan Sentra 1.8S Special Edition
Mileage spreadsheet
Vans owned:
1986 Safari 2.5L 4 speed manual - scrapped
1995 Astro 2WD conversion 4.11 posi, shift kit, DHC rock rails - sold to Skippy
1998 Astro 4x4 D44, D60, NP231, full hydraulic system with 9k# Milemarker winch and snow plow - sold to Lockdoc
2003 Astro AWD all stock - traded for a 3/4 ton truck
2005 AWD, 4.10's - sold to skippy

Re: Is it just me, or is this happening to a lot of vans lat
Very nice James.
1979 Malibu drag race only car
1999 Sonoma 4.3 5 speed-Rufus
1989 Astro-Ole Yellar cancelled-still selling off parts
1985 Astro-shop van R.I.P. my friend
1994 Astro LT RWD W4.3 rod knock RIP
1982 Winnebago single rear wheel-Chevy 350 Scraped 1/28/13-broken dreams......
Rochester,NY
1999 Sonoma 4.3 5 speed-Rufus
1989 Astro-Ole Yellar cancelled-still selling off parts
1985 Astro-shop van R.I.P. my friend
1994 Astro LT RWD W4.3 rod knock RIP
1982 Winnebago single rear wheel-Chevy 350 Scraped 1/28/13-broken dreams......
Rochester,NY
-
 tbhager94
- I sleep in my van
- Posts: 467
- Joined: Fri Mar 30, 2007 2:26 pm
- Location: saskatoon sk canada
Re: Is it just me, or is this happening to a lot of vans lat
hows the re assembly coming along??
2000 chev blazer 4x4
If its got tits or wheels, its gonna give you problems!
im sure we all know the #1 junk yard rule if it fits in your pocket its free.
If its got tits or wheels, its gonna give you problems!
im sure we all know the #1 junk yard rule if it fits in your pocket its free.
-
6spd_monte
Topic author - I sleep in my van
- Posts: 431
- Joined: Fri Jun 08, 2007 11:50 pm
- Location: Orange County, CA
Re: Is it just me, or is this happening to a lot of vans lat
Very slowly.tbhager94 wrote:hows the re assembly coming along??
Looking at the date of my last post, I can't believe it's been a month already! I feel like I've gotten next to nothing done on it. At first I was overwhelmed by the enormity of the task at hand. That surprised me, because I'm no stranger to big projects. I've had cars this far apart before at work, and once with one of my own.
The first few days I would just go into the garage and stare at it, look it over and wonder what to start with. I also began looking in detail at the repaired side. I was a little bummed to find a few things that I felt are not as good as they maybe could be. Everything looks great to someone who's not going to look under and behind things, which is probably most people. But somebody like me, and I suspect most of you, is going to look at every aspect of the job.
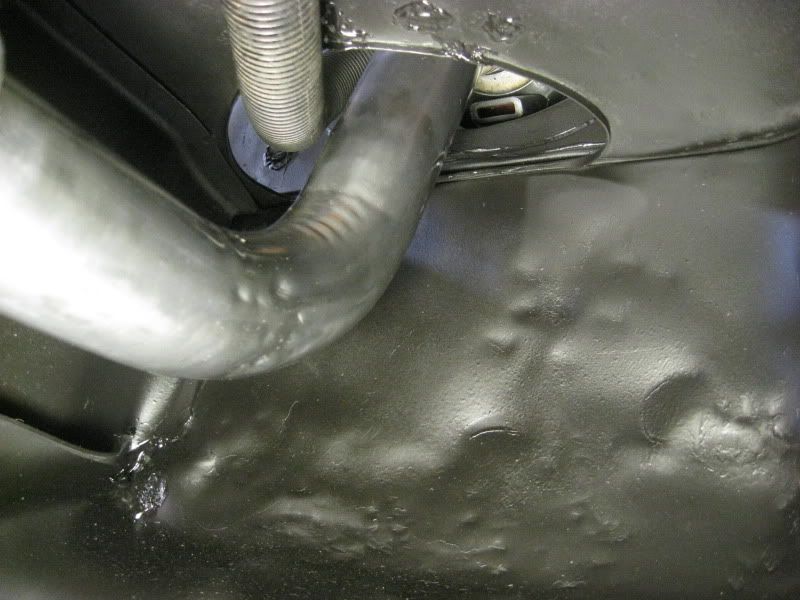
One thing, probably the biggest, is that the floor isn't as flat as I had hoped it would be. Don't get me wrong, the giant crease that had formed behind the b-pillar is gone, but I can clearly see lots of hammer sized dents where it was. It looks like they went at it with an air hammer and that's fine, I just wish that they'd finished it a little better. It looks kinda like cellulite.
So that's where I decided to start. I bought a cheap hammer & dolly set and went to work trying to flatten it all out.
Then, I learned about thing called "oil-canning". It describes the phenomenon you get with too much hammering. Basically what happens is that when the metal is dented it gets stretched a bit. When you hammer the dent flat it gets stretched a bit more. Before too long the metal has actually expanded so that now it's too big for the space it has to fit in. It will either bulge up or down, making a metallic popping noise like when you squeeze an empty oil can. Hence the name. According to the interweb it is frequently encountered by novices getting over-zealous with the hammer and dolly. Sounds like a nice way of saying that I've brought this on myself.
Anyway, after the initial session of hammer & dolly I ended up with about three larger dents that I couldn't get rid of. Also, there was a large area that I could push down and it would go "pop" and stay down, too low. Or I could push it up from underneath and "pop!" it would be too high.
Back to the internet.
I learned that heat can be used to shrink the metal back into place. I don't have an oxy torch, so I ended up using a heat gun to warm it up and then quenched the area with a wet rag. Repeated a few dozen times, and it actually made a big improvement. The area that I could pop up and down before I started, now I can push it down but it takes much more effort. It doesn't move as far as before, doesn't make any noise and it won't stay down. I need to work on it some more but it's a very encouraging start.
Here's a YouTube video that I found illustrates the process pretty well.
[youtube]http://www.youtube.com/watch?v=mptiiRLEJs0[/youtube]
Keeping up with Rule 6b, here's some pictures:
As a reminder, this is what it looked like after the accident and before it went to the body shop:
This is what it looked like when I brought it home. Much better, but still lumpy:
And this is how it is right now. After the hammer/dolly work and after the heat shrinking:
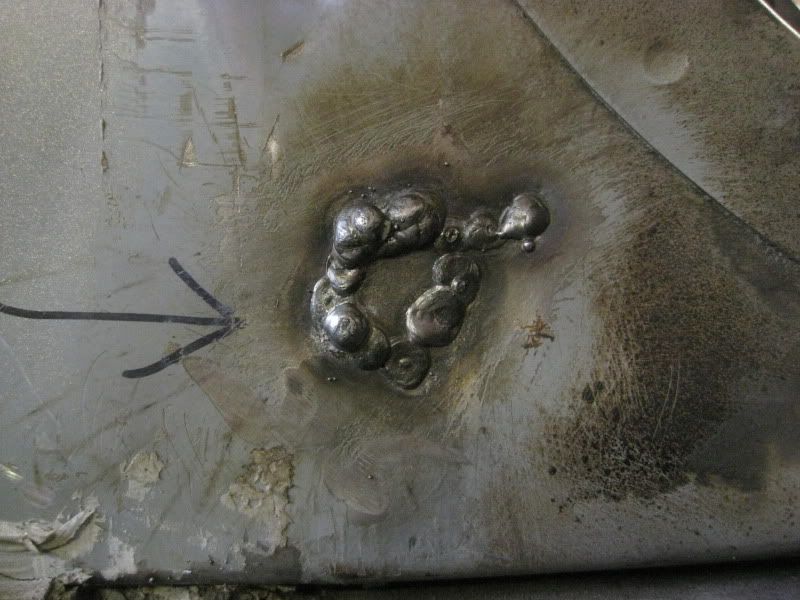
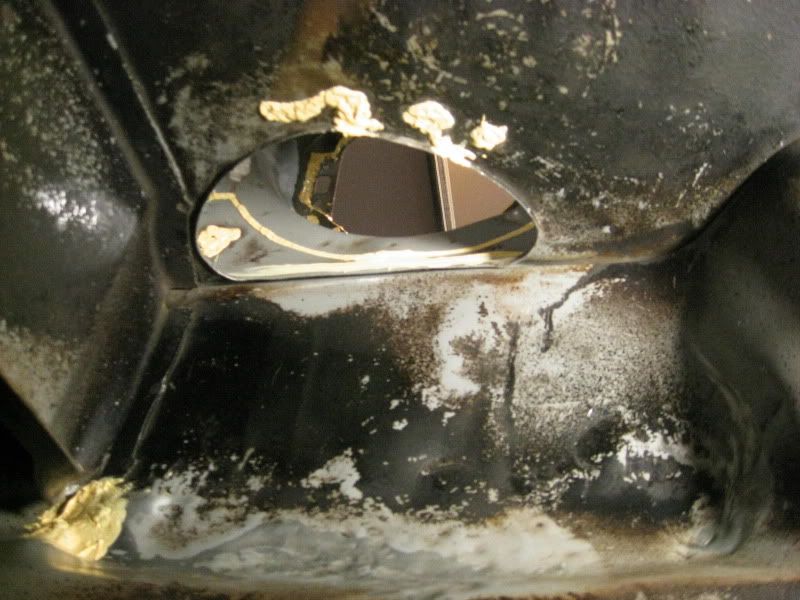
I removed the filler neck cover panel for a couple of reasons. First, it's the only way I can reach the other side of the floor to work on the dents. Second, the flange where it meets the floor was still bent too and I couldn't work on it at all with the cover in place. You can see I boogered up the edge quite a bit when I chiseled the spot welds, I'll fix that too.
The floor is not as flat as it looks in the last picture, the lighting is poor but if you look closely you can still see some small waves that I need to work out. I'm not expecting it to be perfect, but I think I can still make it better than it is.
Something that's made me quite happy is that everyone who has seen it has had nothing but positive things to say about it. I usually have the garage door open when I'm working on it, because it gets warm in there. Two of my neighbors have commented that it looks great, and one of them who saw it after it got hit walked up and said "That's not the same van, is it??" He then went on and on about how much he loves the color.
So, that's where it's at. Once the floor is done I'm probably gonna dynamat the whole thing. Might as well while it's all apart, right?
-James
1987 LT
249,000 miles
1987 LT
249,000 miles
-
 mdmead
- ASV Supporter

- Posts: 2153
- Joined: Sun Sep 10, 2006 6:45 pm
- Location: Selah, WA
- Been thanked: 1 time
- Contact:
Re: Is it just me, or is this happening to a lot of vans lat
Wow, I hadn't checked in on this thread for awhile. Amazing! Can't wait to see it all put back together!
Matt
Selah, WA
-96 GMC Safari AWD Hi-Top Conversion -->Stalled 5.3L swap & 5" lift
-74 Ford Bronco -->Far from perfect but mine!
-99 V-10 Ford Super Duty Super Cab 4x4 -->Stock with 285 Cooper ATs
-00 Ford Focus Wagon -->The Red Turd
-95 Ford 24' Class C Motorhome -->My big block sleeper
-07 Can-Am Outlander XT -->My yellow 4x4 quad for work & play
-04 Ski Doo REV Summit -->Still several chassis behind!
No new projects until the current ones are done!
Re: Is it just me, or is this happening to a lot of vans lat
James:6spd_monte wrote:Very slowly.tbhager94 wrote:hows the re assembly coming along??
Looking at the date of my last post, I can't believe it's been a month already! I feel like I've gotten next to nothing done on it. At first I was overwhelmed by the enormity of the task at hand. That surprised me, because I'm no stranger to big projects. I've had cars this far apart before at work, and once with one of my own.
The first few days I would just go into the garage and stare at it, look it over and wonder what to start with. I also began looking in detail at the repaired side. I was a little bummed to find a few things that I felt are not as good as they maybe could be. Everything looks great to someone who's not going to look under and behind things, which is probably most people. But somebody like me, and I suspect most of you, is going to look at every aspect of the job.
One thing, probably the biggest, is that the floor isn't as flat as I had hoped it would be. Don't get me wrong, the giant crease that had formed behind the b-pillar is gone, but I can clearly see lots of hammer sized dents where it was. It looks like they went at it with an air hammer and that's fine, I just wish that they'd finished it a little better. It looks kinda like cellulite.
So that's where I decided to start. I bought a cheap hammer & dolly set and went to work trying to flatten it all out.
Then, I learned about thing called "oil-canning". It describes the phenomenon you get with too much hammering. Basically what happens is that when the metal is dented it gets stretched a bit. When you hammer the dent flat it gets stretched a bit more. Before too long the metal has actually expanded so that now it's too big for the space it has to fit in. It will either bulge up or down, making a metallic popping noise like when you squeeze an empty oil can. Hence the name. According to the interweb it is frequently encountered by novices getting over-zealous with the hammer and dolly. Sounds like a nice way of saying that I've brought this on myself.
Anyway, after the initial session of hammer & dolly I ended up with about three larger dents that I couldn't get rid of. Also, there was a large area that I could push down and it would go "pop" and stay down, too low. Or I could push it up from underneath and "pop!" it would be too high.
Back to the internet.
I learned that heat can be used to shrink the metal back into place. I don't have an oxy torch, so I ended up using a heat gun to warm it up and then quenched the area with a wet rag. Repeated a few dozen times, and it actually made a big improvement. The area that I could pop up and down before I started, now I can push it down but it takes much more effort. It doesn't move as far as before, doesn't make any noise and it won't stay down. I need to work on it some more but it's a very encouraging start.
Here's a YouTube video that I found illustrates the process pretty well.
[youtube]http://www.youtube.com/watch?v=mptiiRLEJs0[/youtube]
Keeping up with Rule 6b, here's some pictures:
As a reminder, this is what it looked like after the accident and before it went to the body shop:
This is what it looked like when I brought it home. Much better, but still lumpy:
And this is how it is right now. After the hammer/dolly work and after the heat shrinking:
I removed the filler neck cover panel for a couple of reasons. First, it's the only way I can reach the other side of the floor to work on the dents. Second, the flange where it meets the floor was still bent too and I couldn't work on it at all with the cover in place. You can see I boogered up the edge quite a bit when I chiseled the spot welds, I'll fix that too.
The floor is not as flat as it looks in the last picture, the lighting is poor but if you look closely you can still see some small waves that I need to work out. I'm not expecting it to be perfect, but I think I can still make it better than it is.
Something that's made me quite happy is that everyone who has seen it has had nothing but positive things to say about it. I usually have the garage door open when I'm working on it, because it gets warm in there. Two of my neighbors have commented that it looks great, and one of them who saw it after it got hit walked up and said "That's not the same van, is it??" He then went on and on about how much he loves the color.
So, that's where it's at. Once the floor is done I'm probably gonna dynamat the whole thing. Might as well while it's all apart, right?
This site has a very knowledgeable membership and is very helpful with forum questions.Might want to check them out.
http://allmetalshaping.com/index.php
1979 Malibu drag race only car
1999 Sonoma 4.3 5 speed-Rufus
1989 Astro-Ole Yellar cancelled-still selling off parts
1985 Astro-shop van R.I.P. my friend
1994 Astro LT RWD W4.3 rod knock RIP
1982 Winnebago single rear wheel-Chevy 350 Scraped 1/28/13-broken dreams......
Rochester,NY
1999 Sonoma 4.3 5 speed-Rufus
1989 Astro-Ole Yellar cancelled-still selling off parts
1985 Astro-shop van R.I.P. my friend
1994 Astro LT RWD W4.3 rod knock RIP
1982 Winnebago single rear wheel-Chevy 350 Scraped 1/28/13-broken dreams......
Rochester,NY

-
6spd_monte
Topic author - I sleep in my van
- Posts: 431
- Joined: Fri Jun 08, 2007 11:50 pm
- Location: Orange County, CA
Re: Is it just me, or is this happening to a lot of vans lat
I know I've been neglecting you guys and this thread. I just finished the work on the floor section a couple of days ago. I have uploaded the pictures to my photobucket account and I'll post an update here when I get home from work this afternoon.
-James
1987 LT
249,000 miles
1987 LT
249,000 miles
-
6spd_monte
Topic author - I sleep in my van
- Posts: 431
- Joined: Fri Jun 08, 2007 11:50 pm
- Location: Orange County, CA
Re: Is it just me, or is this happening to a lot of vans lat
Ok. As promised, here's a current look at the way things are.
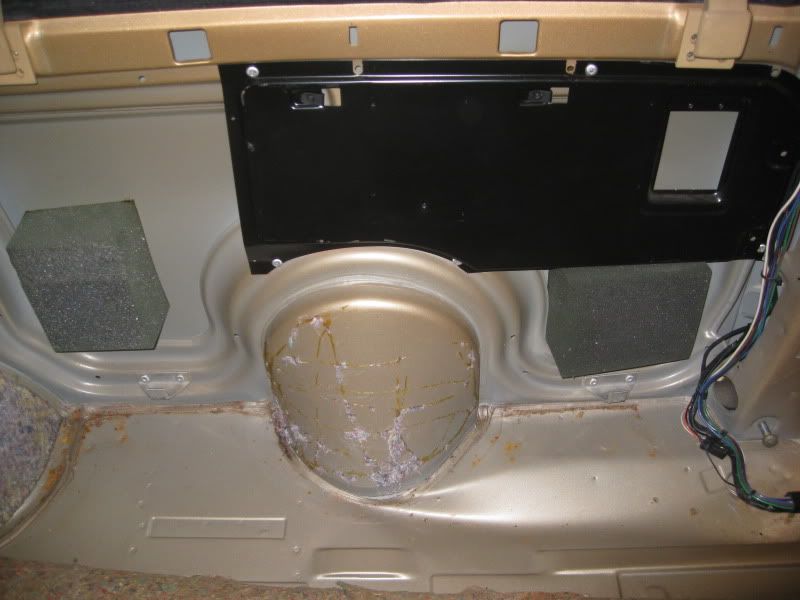
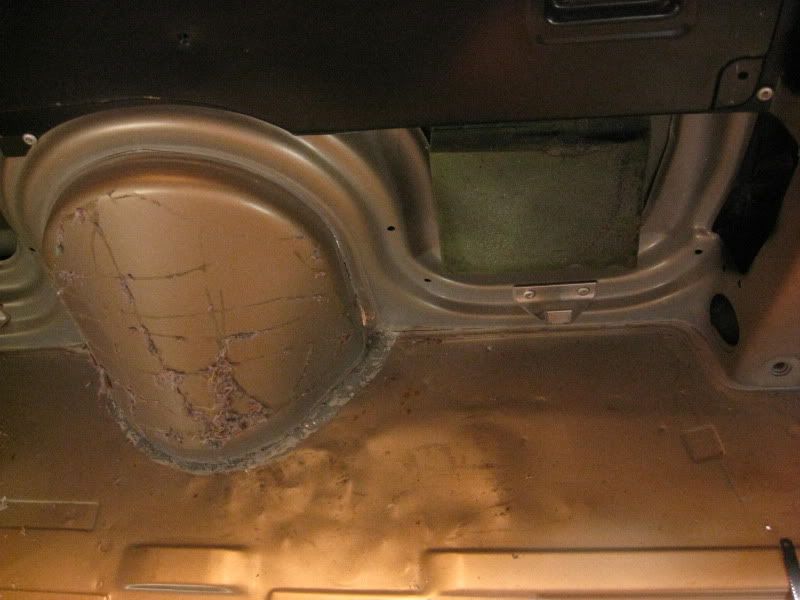
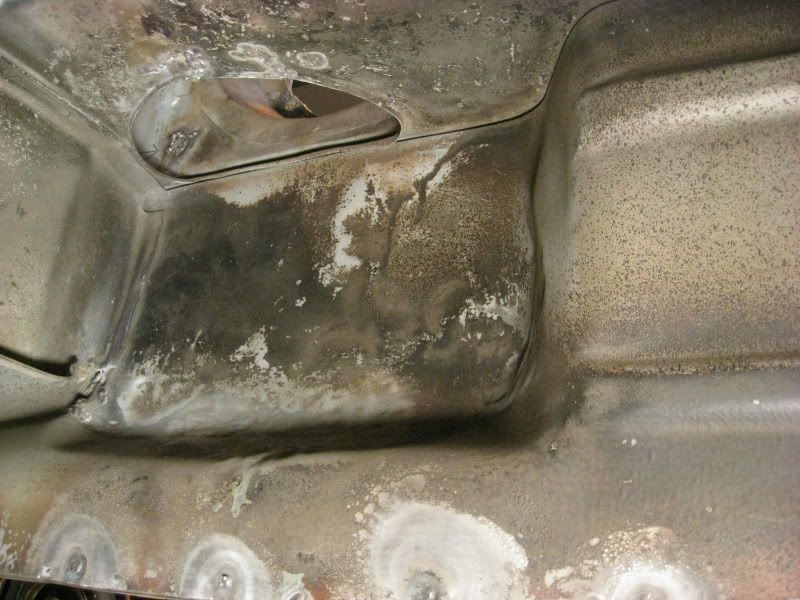
Another shot of how the floor looked when it came home from the shop. You can see that the floor is still sporting some extra curves, and that the factory seam sealer is separated along to top and bottom edges.
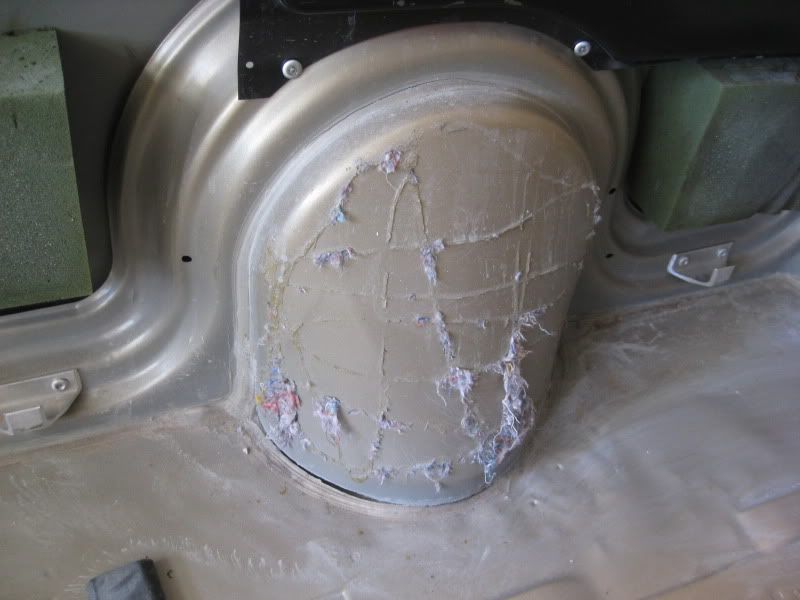
As I mentioned I tore the floor and wall a little when I separated the spotwelds holding the panel in place.
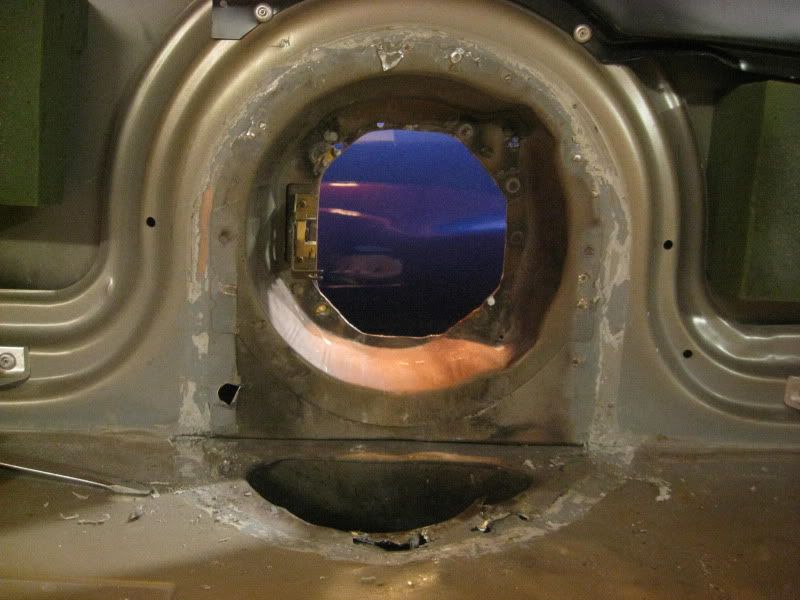
Well, I stitched the floor tears back together:
And patched the hole in the wall:
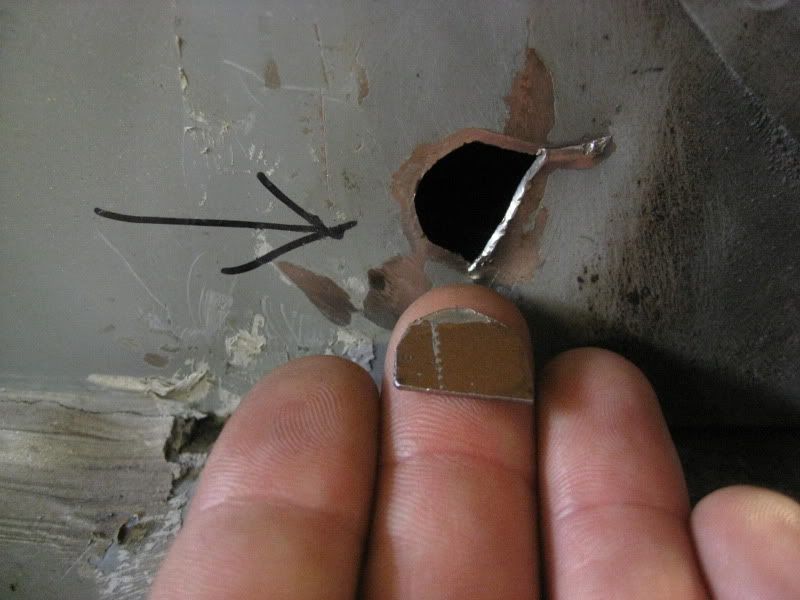
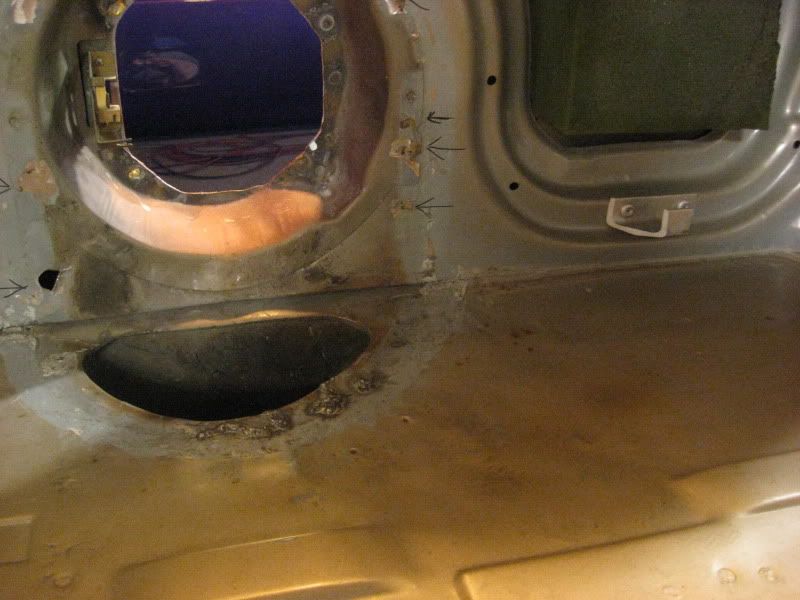
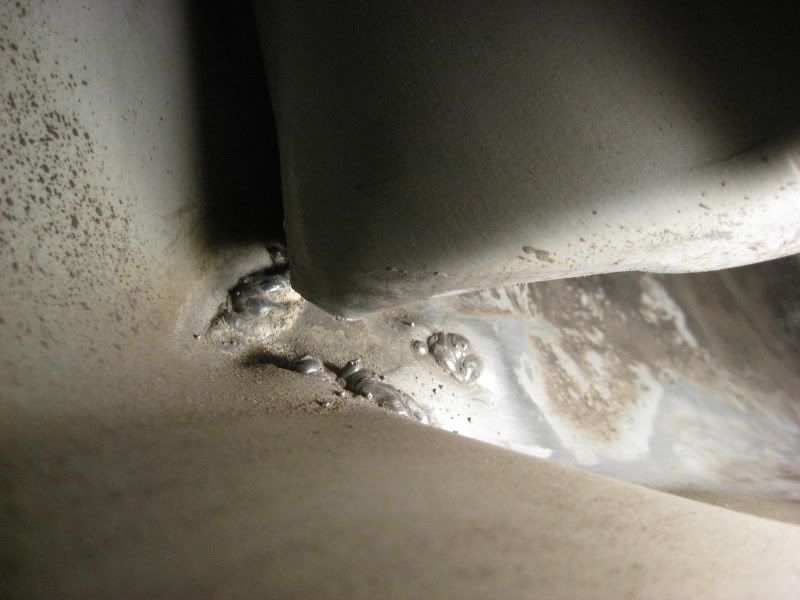
There were some tears in the inner quarter under the vehicle. These happened in the accident when the inner panel collided with one of the body braces. I didn't want moisture to get in there and start rust so I welded the tears closed.
The factory paint was in great shape under the body, but after the panel was wrinkled and then pulled back the paint was peeling off in big flakes. I wire brushed the loose pieces off, then smoothed the edges a bit with a red 3M pad to prevent further lifting. I also cleaned the entire repair area in several steps of degreasers and residue-free cleaners.
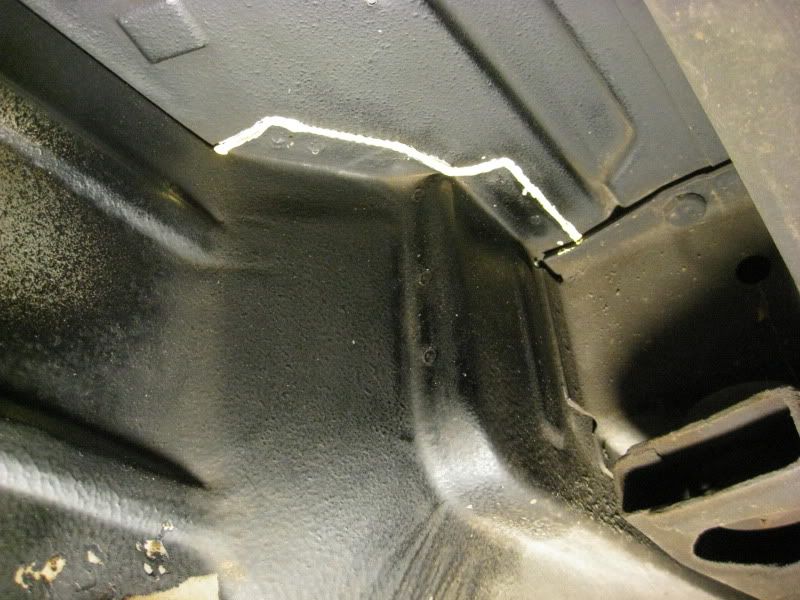
Next, I applied automotive seam sealer to every place that was welded, or that the factory seam had been compromised, or anywhere that I felt outside weather might try to get inside.
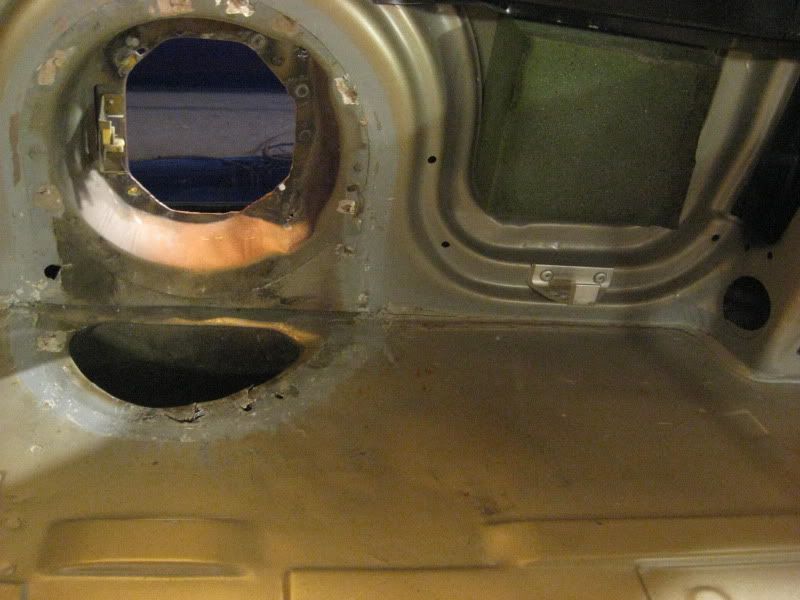
Behind the fuel filler:

At the corner where the floor meets the driver's door footwell:
Of course where I welded the floor and the welded holes on the inner quarter panel:
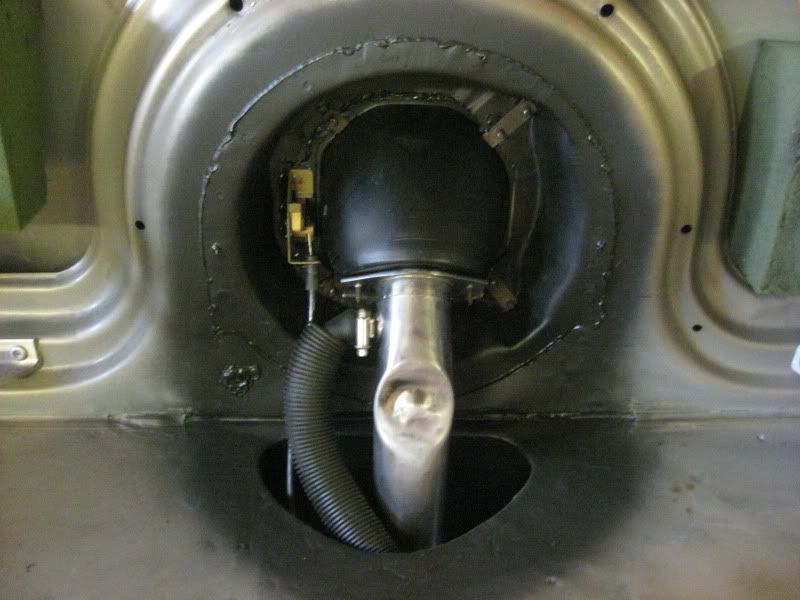
Next, I had to reinstall the filler neck. I wanted to clean it up because it had road grime and light corrosion and red overspray all over it. I started on it with my bench mounted wire wheel and it ended up so shiny that I decided to just spray it clear to keep it looking nice! But first the entire repaired and resealed area was coated in rust inhibiting paint, again to keep corriosion away. Then the filler was installed with new fill and vent hoses. The plastic flexy cover on the vent hose is original, cleaned and reused.

Inside the van, the area that I worked on was cleaned just as throughly as underneath. Painted with the anti-rust stuff, and assembled with a new filler support piece, and the original fuel door release mechanism.
I couldn't install the cover panel with spotwelds because, while I could weld the bottom side to the floor from under the van, I couldn't get to the vertical face with the quarter panel installed. Also, the edges were still somewhat distorted from the wreck and repair. I thought about buying or renting a stud gun and pulling the inner panel back closer to perfectly straight, but I realized that since the inner panel and outer skin are attached, anything I pulled on the inside would cause huge problems on the outside. So, I worked the cover panel flange edges not so that they were perfectly flat, but instead I contoured them to match the slight variances in the floor and wall. I was able to get the panels so close that the biggest gap was probably 1/8 inch or less. Then decided to use automotive windshield urethane adhesive to glue the panel in place.
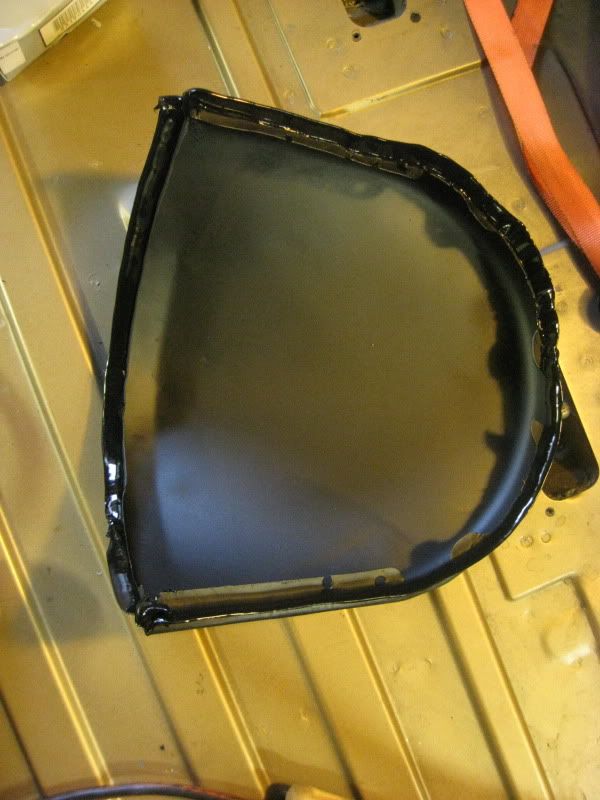
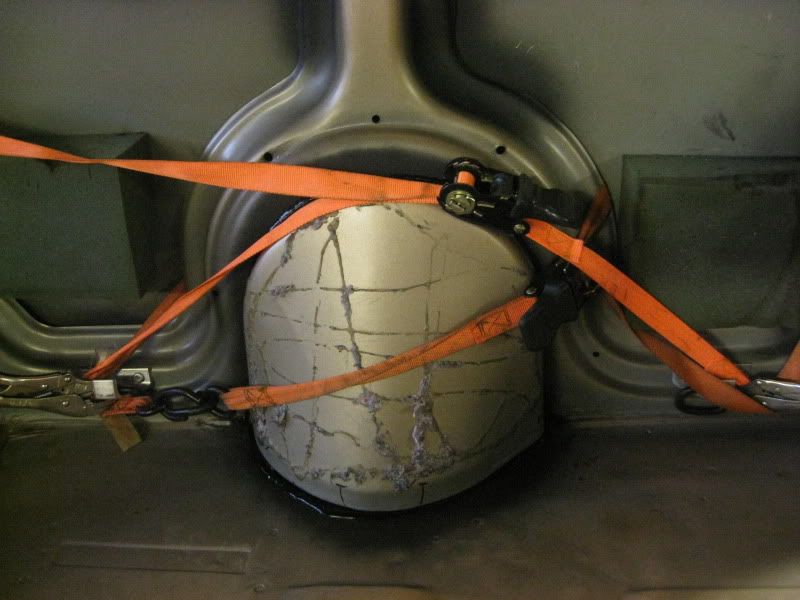
I strapped it in place while the adhesive set,
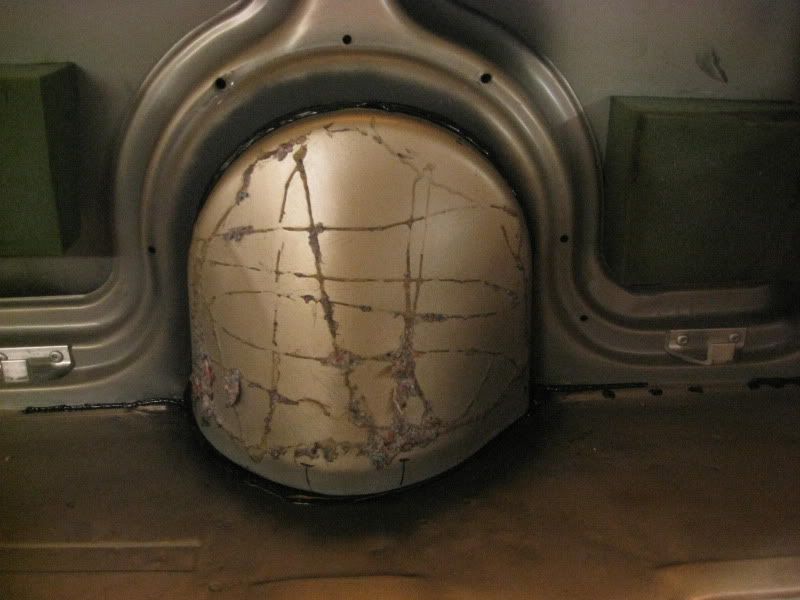
I think it came out pretty well. I applied the glue bead fat enough to account for the irregularities in the mating faces of the two panels, and the windshield urethane will also be a perfect stand-in for the OEM seam sealer that originally sealed the panel. I also used the windshield glue to fill in any small cracks that remained in the factory sealer along the joint between the floor and the wall.
After all this the van was a mess on the inside and my garage was a mess on the outside. I spent some time cleaning, sweeping and putting tools away.
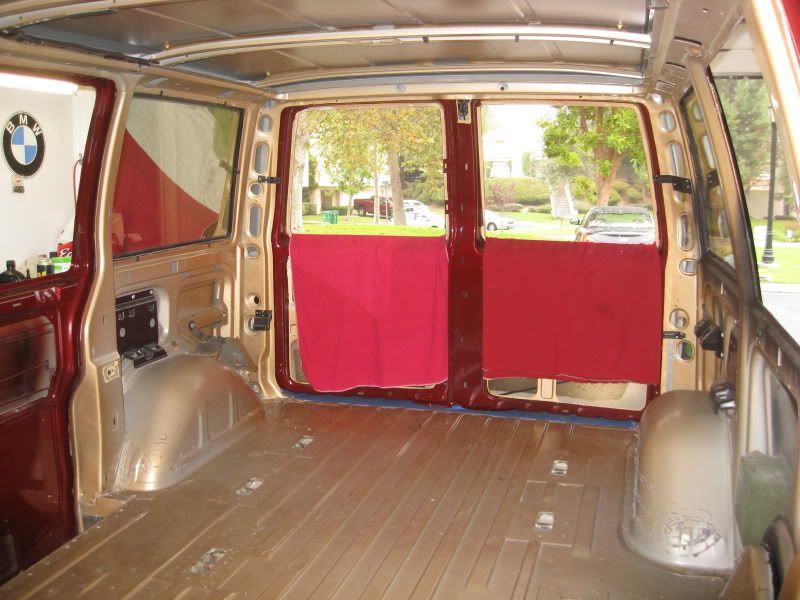
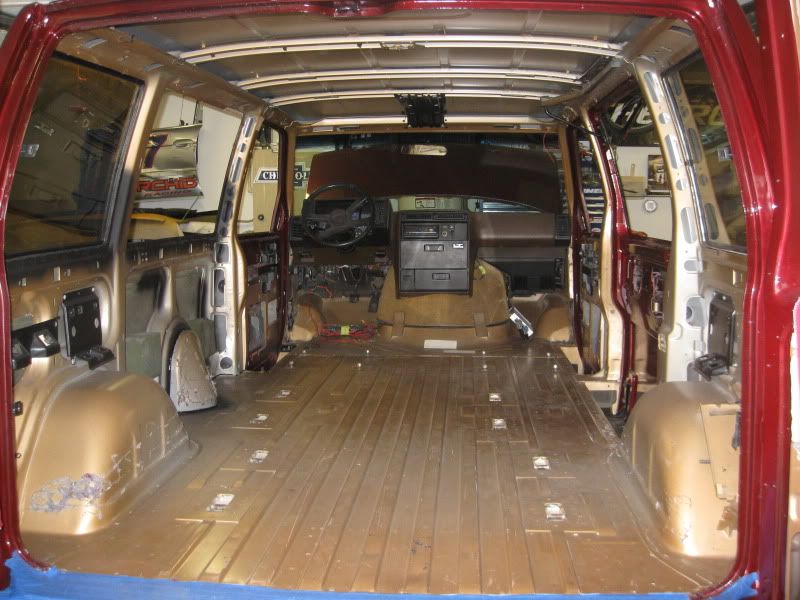
Here's how the project is today:
That's where I'm at. I'm at the point where I could proceed with putting the interior together right now, but I think it would be nice to install some sound deadening and thermal insulation while everything is out. It would be nice to cut down on the amount of road noise in the cab. I'm researching options and I think I've got it figured out. I need to buy some stuff and get on that next.
I'll have more pictures for you in a week or so, hopefully.
Another shot of how the floor looked when it came home from the shop. You can see that the floor is still sporting some extra curves, and that the factory seam sealer is separated along to top and bottom edges.
As I mentioned I tore the floor and wall a little when I separated the spotwelds holding the panel in place.
Well, I stitched the floor tears back together:
And patched the hole in the wall:
There were some tears in the inner quarter under the vehicle. These happened in the accident when the inner panel collided with one of the body braces. I didn't want moisture to get in there and start rust so I welded the tears closed.
The factory paint was in great shape under the body, but after the panel was wrinkled and then pulled back the paint was peeling off in big flakes. I wire brushed the loose pieces off, then smoothed the edges a bit with a red 3M pad to prevent further lifting. I also cleaned the entire repair area in several steps of degreasers and residue-free cleaners.
Next, I applied automotive seam sealer to every place that was welded, or that the factory seam had been compromised, or anywhere that I felt outside weather might try to get inside.
Behind the fuel filler:
At the corner where the floor meets the driver's door footwell:
Of course where I welded the floor and the welded holes on the inner quarter panel:
Next, I had to reinstall the filler neck. I wanted to clean it up because it had road grime and light corrosion and red overspray all over it. I started on it with my bench mounted wire wheel and it ended up so shiny that I decided to just spray it clear to keep it looking nice! But first the entire repaired and resealed area was coated in rust inhibiting paint, again to keep corriosion away. Then the filler was installed with new fill and vent hoses. The plastic flexy cover on the vent hose is original, cleaned and reused.
Inside the van, the area that I worked on was cleaned just as throughly as underneath. Painted with the anti-rust stuff, and assembled with a new filler support piece, and the original fuel door release mechanism.
I couldn't install the cover panel with spotwelds because, while I could weld the bottom side to the floor from under the van, I couldn't get to the vertical face with the quarter panel installed. Also, the edges were still somewhat distorted from the wreck and repair. I thought about buying or renting a stud gun and pulling the inner panel back closer to perfectly straight, but I realized that since the inner panel and outer skin are attached, anything I pulled on the inside would cause huge problems on the outside. So, I worked the cover panel flange edges not so that they were perfectly flat, but instead I contoured them to match the slight variances in the floor and wall. I was able to get the panels so close that the biggest gap was probably 1/8 inch or less. Then decided to use automotive windshield urethane adhesive to glue the panel in place.
I strapped it in place while the adhesive set,
I think it came out pretty well. I applied the glue bead fat enough to account for the irregularities in the mating faces of the two panels, and the windshield urethane will also be a perfect stand-in for the OEM seam sealer that originally sealed the panel. I also used the windshield glue to fill in any small cracks that remained in the factory sealer along the joint between the floor and the wall.
After all this the van was a mess on the inside and my garage was a mess on the outside. I spent some time cleaning, sweeping and putting tools away.
Here's how the project is today:
That's where I'm at. I'm at the point where I could proceed with putting the interior together right now, but I think it would be nice to install some sound deadening and thermal insulation while everything is out. It would be nice to cut down on the amount of road noise in the cab. I'm researching options and I think I've got it figured out. I need to buy some stuff and get on that next.
I'll have more pictures for you in a week or so, hopefully.
-James
1987 LT
249,000 miles
1987 LT
249,000 miles
-
6spd_monte
Topic author - I sleep in my van
- Posts: 431
- Joined: Fri Jun 08, 2007 11:50 pm
- Location: Orange County, CA
Re: Is it just me, or is this happening to a lot of vans lat
I was never able to get the floor 100% straight and flat. But that's ok. It's far, far better than it was when I started. I was concerned that it was so wavy that it would be noticed even with the carpet installed. Also, when I would stand on that section of the floor it actually felt like it was flexing. Neither of those things were acceptable to me. Now, the floor is straight enough that I'm confident the repair will be undetectable once the interior is back together, and when I put my weight on it the floor feels strong again.
Gary, the metal shaping forum was quite helpful. I registered so that I would be able to see all of the images in the threads. I was able to learn what I needed without actually posting any questions, so I may end up being one of those guys who joins the forum and then is never heard from again. But, thanks for pointing me in that direction, it is a great knowledge base.
Some of you might be wondering how I was able to do any welding so close to the fuel tank without blowing myself up.
Well, I was very, very worried about that. After I removed the filler neck you can imagine that my garage smelled quite strongly of gas fumes. What I did was seal off the two openings in the tank with duct tape, latex gloves and hose clamps. Then I waited about a week to be certain that, even when I crawled under the van and stuck my nose up to the sealed openings, I could not smell any fumes. Finally, at all times while I was working I placed a fan under the vehicle to clear away any slight traces of fuel vapors that I might not have been able to detect with my nose.
I understand that the airflow from the fan risked blowing away the shielding gas and contaminating the welds, but since they are not structural and I had always planned to cover them with sealer I felt it was a good plan.
-James
1987 LT
249,000 miles
1987 LT
249,000 miles
-
6spd_monte
Topic author - I sleep in my van
- Posts: 431
- Joined: Fri Jun 08, 2007 11:50 pm
- Location: Orange County, CA
Re: Is it just me, or is this happening to a lot of vans lat
I know that I promised un update in a week, seven weeks ago... but better late than never, right?
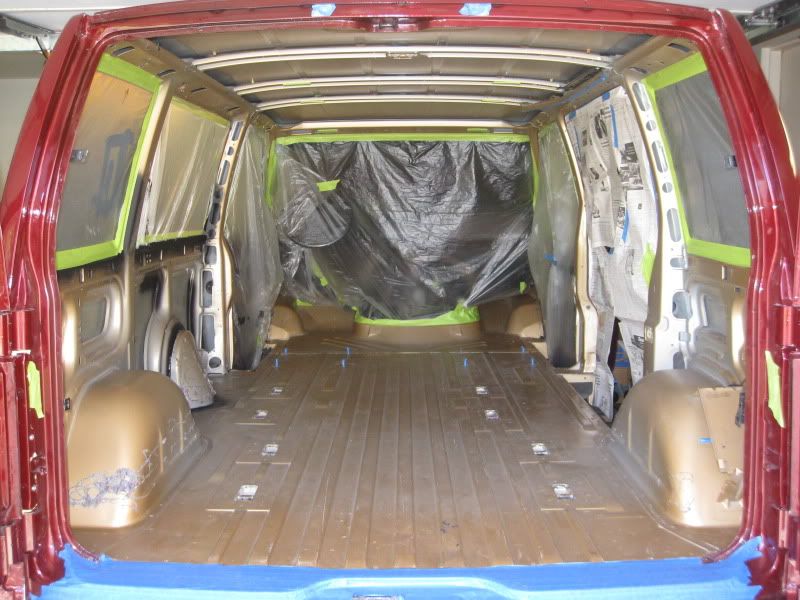
I finally purchased a pile of insulation materials:
I've started taping and masking off the windows and whatever else I don't want sprayed, because the first thing to go in will be a spray-in sound barrier kinda similar to a bedliner. I am planning to start spraying this weekend, possibly tomorrow.
More pics in a few days, Monday at the latest, I promise.
-James
1987 LT
249,000 miles
1987 LT
249,000 miles
-
 Smiliesafari
- ASV Supporter
- Posts: 2667
- Joined: Sat Dec 02, 2006 12:34 pm
- Location: Orlando, FL
Re: Is it just me, or is this happening to a lot of vans lat
Great update, James. Thanks. It looks like it's coming along nicely.
1996 Safari SLX Hotair balloon transport vehicle
-
6spd_monte
Topic author - I sleep in my van
- Posts: 431
- Joined: Fri Jun 08, 2007 11:50 pm
- Location: Orange County, CA
Re: Is it just me, or is this happening to a lot of vans lat
Alright it's still Monday for a few more minutes, so as promised here's an update!
I got everything masked good and proper:
And sprayed:
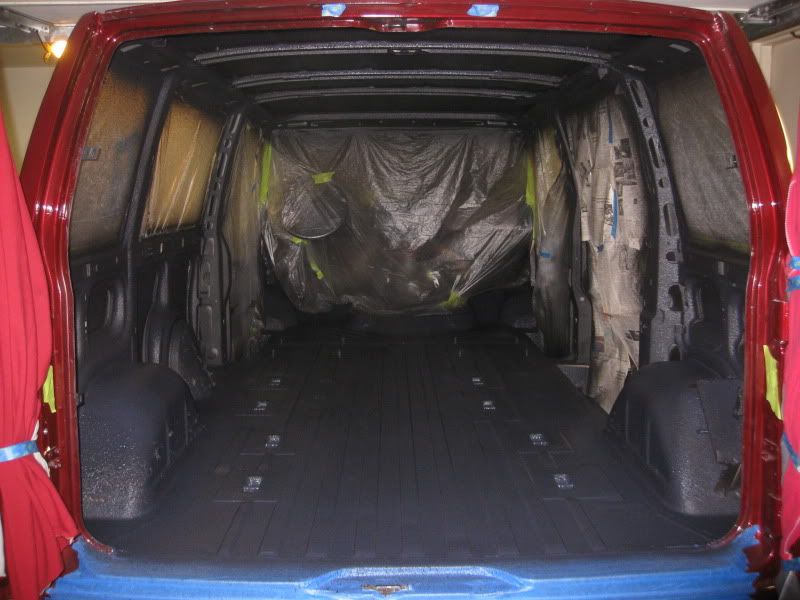
I think it needs another coat or two to get the right thickness and I haven't done the doors yet, but it's progress!
I got everything masked good and proper:
And sprayed:
I think it needs another coat or two to get the right thickness and I haven't done the doors yet, but it's progress!
-James
1987 LT
249,000 miles
1987 LT
249,000 miles
Re: Is it just me, or is this happening to a lot of vans lat
wow 6spd!
I havnt been arround here much lately so this is the first view of your thread for me.
I would have been sick if that happened to my '86! (still my daily driver too)
Im really glad to see you repaired the van! color change... well you picked the only other color that looks better than what it was originally IMO but I liked the color scheme it had too
had I been arround when you started the thread an knew you were changing colors I would have suggested the factory burgandy for '86 (thats what mine is) but the color you have looks very close to it.
I discovered when I painted mine that the original color was a tripple pearl mixture, I watched them mix it in and no metallic was added at all, only pearls.. what really blew me away was when he mixed in pure black! was going by the book from the factory code too.
anyway, that is a nice color change, my favorite for them all. the factory bronze tinted windows match it really well too (those reflective ones) if yours doesnt have them they have a film that almost matches it now.
personally though, I think your original gold rims would look better on that too, those were my favorite "factory alloys" and Ive considered rounding up a set for mine but the the Sierra alloys I allready have aint too bad either. are you painting the grillwork to match also (if so please reconsider ;-) not really.. do what suits your taste since thats all that really matters right.
the good thing is your interior color go really well with that color. mine came with the marron dash and trim from the factory but explorer conversions changed the carpet and seats to gold and tan which looks good with all the woodgrain they added.
nice work man! glad its still arround!
-
mtrhead79
- I get chills without my van.
- Posts: 52
- Joined: Thu Jun 14, 2007 7:20 pm
- Location: phila pa
Re: Is it just me, or is this happening to a lot of vans lat
nice write up. looks like the body shop did a great job. your color looks like it will go great with the int. dont mean to pry but what did they charge for paint? i know paint with that much detail (removing doors) gets up there fast
john 79 camaro, 01 safari, 00 astro , 94 caprice wagon lt1, 89 safari gt