Idler Arm Replacement Procedure
-
Topic author - I finally get the smurf thing
- Posts: 155
- Joined: Tue Mar 13, 2007 7:30 pm
- Location: Pocono Mts, PA
Idler Arm Replacement Procedure
Idler Arms can and will eventually fail. Mine just went around 115K miles. You'll notice they're bad by grabbing a front wheel with one hand on each side when the vehicle is jacked up and noting excessive play as you push and pull. Anyway, mine just failed state inspection, so now here's how they're changed.
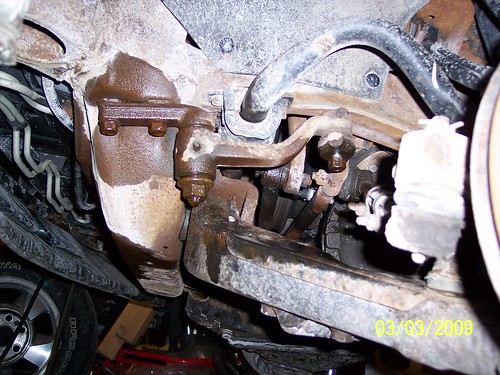
1. Jack the front of the van and remove the front wheels for ease of working. Now here is the idler arm--note that I sprayed it with some PB Blaster to make the bolts easier to remove--something like that or WD40 would not be a bad idea at this point:
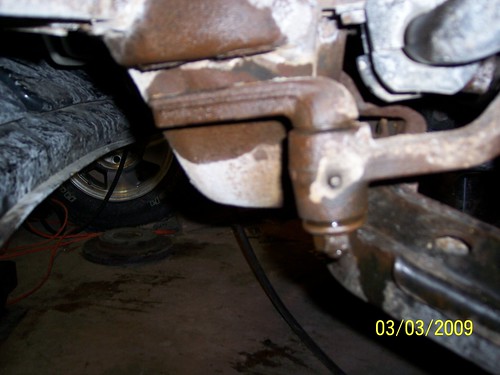
2. Remove the two bolts closest to the front bumper. On the 2003 model, these are 18 mm bolts. Here it is with them out:
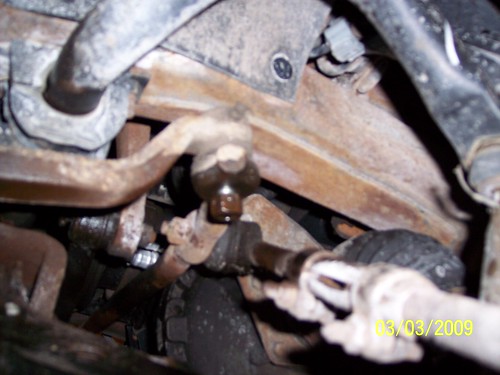
3. Remove the prevailing torque nut from the idler arm ball stud, shown below. Note, on 2003 model, this is an 18 mm bolt. Also, if it's been replaced it may have a carter pin in it--obviously, if it does pull that first
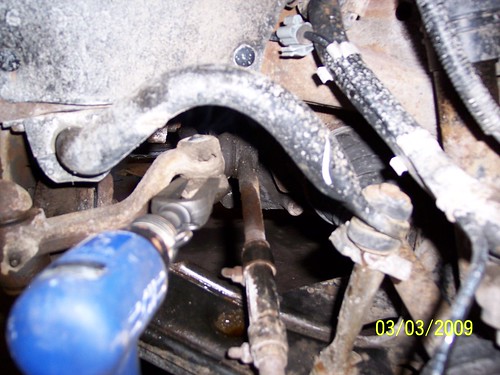
4. Now use a tie rod separator to remove the relay rod from the idler arm. Note, while shopping for tools I found out they make tie rod separators for air hammers--COOL! But it may actually be just as easy with the standard long hand held tool... EDIT--READ THIS: I heard that if you do what I did you could damage stuff--apparantly I got luck. They make a special tool for this, and for $20, just get it. Here's what I'm talking about: http://www.jcwhitney.com/LISLE-TIE-ROD- ... _10101.jcw The photo below worked for me but you could damage your tie rods:
5. Tighten the nut in the center of the new idler arm to 40 ft/lbs--I did this in my vice prior to installation...
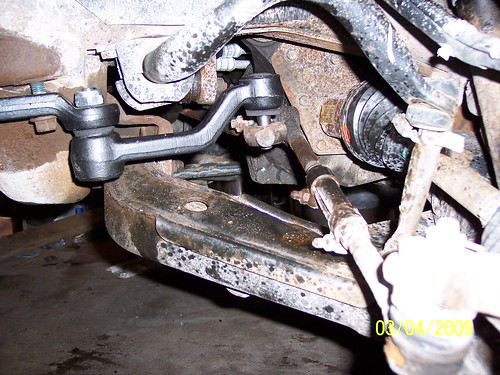
6. Install the new idler arm. Note: I found that a deep well socket on a breaker bar works great to seat the ball stud, when applied from underneath and lifted up. Here it is before seating that and tightening the bolts:
Torque settings:
* The two bolts closest to the front bumper should be tightened to about 105 ft/lbs
* The bolt in the center of the idler arm should be tightened to 40 ft/lbs
* The prevailing torque nut should be tightened to 35 ft/lbs.
Notes:
* Remember to install the grease fitting(s) if not already on the part
* Remember to grease all grease fittings when done
* I am only providing this procedure to tell you how I did this. In no way am I telling anyone to do this, especially if they're not comfortable with this repair. Also note, I'm a chemist not a lisenced mechanic, so as with all things, consider the source.
I would like some more experience folks to comment on what this does to the front end alignment and to double check my torque settings...
Last edited by chemist on Fri Mar 13, 2009 9:46 pm, edited 3 times in total.
Previous Vans: 1998 Astro, AWD, 138K mi; traded on 2003 Chevy Astro, AWD, 125K mi; traded on
2009 Chevy Silverado 1500 WT, 4x4, ext, long box
2007 Chevy Cobalt
1998 Maza MPV (180K mi and in need of PA inspection--only paid $500!)
Needed: a Gen 2 Astro project vehicle...
-
- I have my van tatooed on my cheeks
- Posts: 4379
- Joined: Sat Sep 09, 2006 3:35 pm
- Location: New Haven, NY
Re: Idler Arm Replacement Procedure
Nice write-up! Torque specs sound about right. The alignment will not be affected by the replacement unless it was way off to begin with.
Current rides:
2013 Toyota Tundra DC 4x4
2008 Dodge Nitro 4x4
2005 Nissan Sentra 1.8S Special Edition
Mileage spreadsheet
Vans owned:
1986 Safari 2.5L 4 speed manual - scrapped
1995 Astro 2WD conversion 4.11 posi, shift kit, DHC rock rails - sold to Skippy
1998 Astro 4x4 D44, D60, NP231, full hydraulic system with 9k# Milemarker winch and snow plow - sold to Lockdoc
2003 Astro AWD all stock - traded for a 3/4 ton truck
2005 AWD, 4.10's - sold to skippy
-
- I sleep in my van
- Posts: 686
- Joined: Wed Feb 07, 2007 1:22 pm
- Location: Pioneer Valley WMass
Re: Idler Arm Replacement Procedure
Some manufacturers are getting tough with their 'Guarantees' .Moog is starting to ask for old idlers and only warranting after inspection.
Grease the front end EVERY time you change your oil!!!!!!
also.....do yourself a favor and buy a off-set/90* slide on fitting for your grease gun.This makes acessing those grease nipples alot easier.
Good write-up =D> because these vans eat idlers if the idlers are not maintained correctly.
Grease the front end EVERY time you change your oil!!!!!!
also.....do yourself a favor and buy a off-set/90* slide on fitting for your grease gun.This makes acessing those grease nipples alot easier.
Good write-up =D> because these vans eat idlers if the idlers are not maintained correctly.
1999 LS AWD 3" Lift,4.10's,Snowplow,9500lb Ramsey winch
-
- I have my van tatooed on my cheeks
- Posts: 2667
- Joined: Sat Dec 02, 2006 12:34 pm
- Location: Orlando, FL
Re: Idler Arm Replacement Procedure
Good job. I went to check my idlers and there aren't any. #-o Oh yea...I remember...I got rid of those POS parts.
1996 Safari SLX Hotair balloon transport vehicle
Re: Idler Arm Replacement Procedure
wiseass!!!Good job. I went to check my idlers and there aren't any. #-o Oh yea...I remember...I got rid of those POS parts.
-
- I have my van tatooed on my cheeks
- Posts: 2667
- Joined: Sat Dec 02, 2006 12:34 pm
- Location: Orlando, FL
Re: Idler Arm Replacement Procedure
Sometimes I just can't help myself. Boy... aren't we back to our old self?
1996 Safari SLX Hotair balloon transport vehicle
-
- I have my van tatooed on my cheeks
- Posts: 2667
- Joined: Sat Dec 02, 2006 12:34 pm
- Location: Orlando, FL
Re: Idler Arm Replacement Procedure
Really glad to hear it, Skippy. It's really brave of you to go through that surgery. You wont regret it. It'll add years to your life.
1996 Safari SLX Hotair balloon transport vehicle
-
Topic author - I finally get the smurf thing
- Posts: 155
- Joined: Tue Mar 13, 2007 7:30 pm
- Location: Pocono Mts, PA
Re: Idler Arm Replacement Procedure
Most of you probably know about this one, but I didn't at the time. Step 4, the way I did it can damage tie rods from something I heard. Apparantly they make a special tool just for separating these from the tie rods. It can be had cheaply, and you don't risk damage using it.
Previous Vans: 1998 Astro, AWD, 138K mi; traded on 2003 Chevy Astro, AWD, 125K mi; traded on
2009 Chevy Silverado 1500 WT, 4x4, ext, long box
2007 Chevy Cobalt
1998 Maza MPV (180K mi and in need of PA inspection--only paid $500!)
Needed: a Gen 2 Astro project vehicle...
-
- I am merely driving my van
- Posts: 1
- Joined: Sat Aug 31, 2013 9:33 pm
- Location: union, mo
- Contact:
Re: Idler Arm Replacement Procedure
Thanks for helping me with your great write ups!
Just replaced both idler arms in a 1995 astro service van and thought I would add a tip:
If your ball joint seperator won't do the trick, I've found a pitman arm puller will JUST fit. Apply slow and easy tension to the bolt (don't rush it). The constant pressure will finally crack the old boys loose.
Again, thanks for all the great tips on astro vans! Saved me a ton of cash in the last 2 years!
Current ride:
1995 Astro Service Van (CL special $900!)
2006 Cadillac SRX
1999 Acura 2.3
1995 Astro Service Van (CL special $900!)
2006 Cadillac SRX
1999 Acura 2.3