
Homebrew Con-Ferr Style Porthole Roof Rack Build
-
 tribri1
- I get chills without my van.
- Posts: 75
- Joined: Tue Mar 29, 2011 8:09 am
- Location: Portland, Ore
Re: Homebrew Con-Ferr Style Porthole Roof Rack Build
[one of those times I am happy to only know you guys virtually] 
2000 Ford Econoline GTRV Full Camper
2003 AWD Astro-VTop-Surf/River/Roadtrip Rig - In the great campground in the sky
2003 AWD Astro-VTop-Surf/River/Roadtrip Rig - In the great campground in the sky
-
97CargoCrawler
Topic author - I sleep in my van
- Posts: 754
- Joined: Thu Jan 24, 2008 11:50 pm
- Location: Near Los Angeles, CA
- Contact:
Re: Homebrew Con-Ferr Style Porthole Roof Rack Build
I tend to be a little bit on the eccentric side. There's always something weird and scary being constructed in my driveway. Neighbors on all sides have fled. The only ones willing to move in are relatives. Which isn't too cool considering some of the questions I get. "What is that?" ......"Oooooh you know, it's just a thing for something else I built."
-
 WoodButcher
- ASV Supporter

- Posts: 418
- Joined: Wed Apr 06, 2011 7:01 pm
- Location: Woodbury, CT.
- Has thanked: 1 time
- Been thanked: 18 times
Re: Homebrew Con-Ferr Style Porthole Roof Rack Build
ROFLMAO!!!!!
Too much CC.
Yeah I'll build anything, for freinds or paying clients.
Interesting circle of freinds you have there,,,,
Something like that spare tire support.
You see the flex in all my hinged doos isn't in the hinge or pin but where the sheet metal attaches to the hinge plate.
Nice work on the "table" btw
'93 Safari shorty, 350 swap
'05 Astro AWD, lifted, 6 liter, cammed, ported and programmed for fast.
'93 cargo, work in progress
'05 Astro AWD, lifted, 6 liter, cammed, ported and programmed for fast.
'93 cargo, work in progress
-
97CargoCrawler
Topic author - I sleep in my van
- Posts: 754
- Joined: Thu Jan 24, 2008 11:50 pm
- Location: Near Los Angeles, CA
- Contact:
Re: Homebrew Con-Ferr Style Porthole Roof Rack Build
So the door is going to get Peterized.
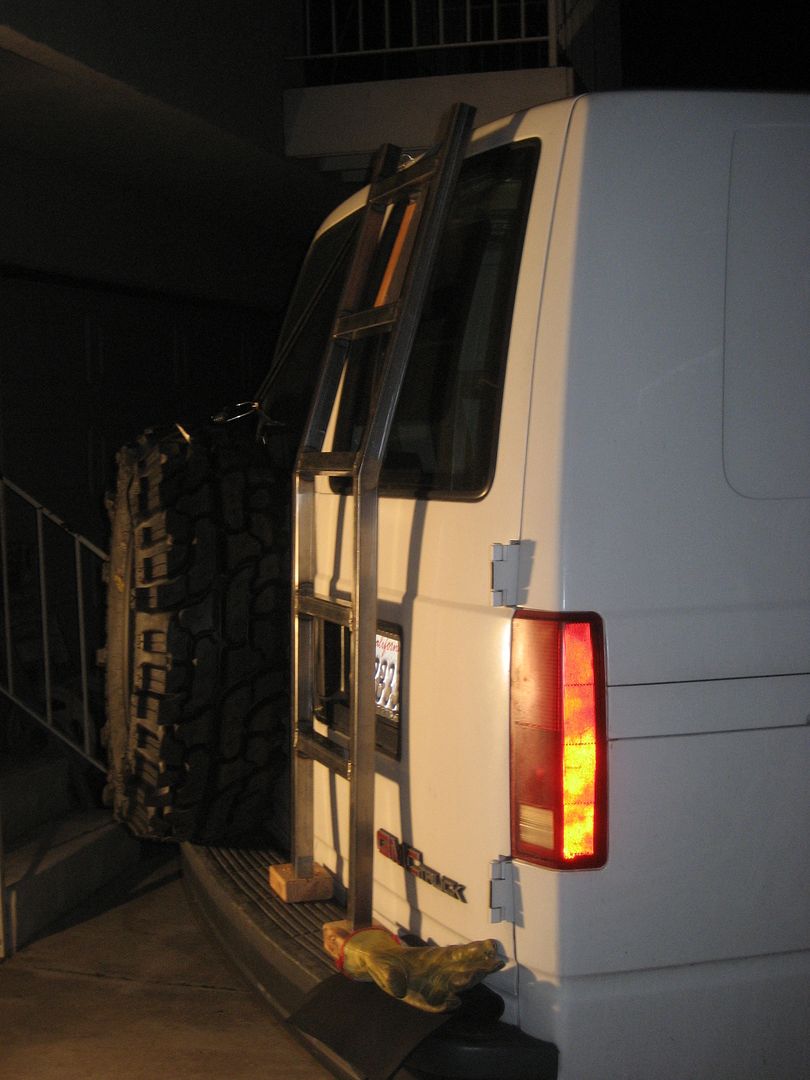
It's gonna need a full frame built inside. The ladder will have to be a good 4" away from the door in order to get a decent foothold on the rungs. That is a whole lot of torque on the sheet metal and hinges. No big deal. I should even be able to work around the license plate holder.
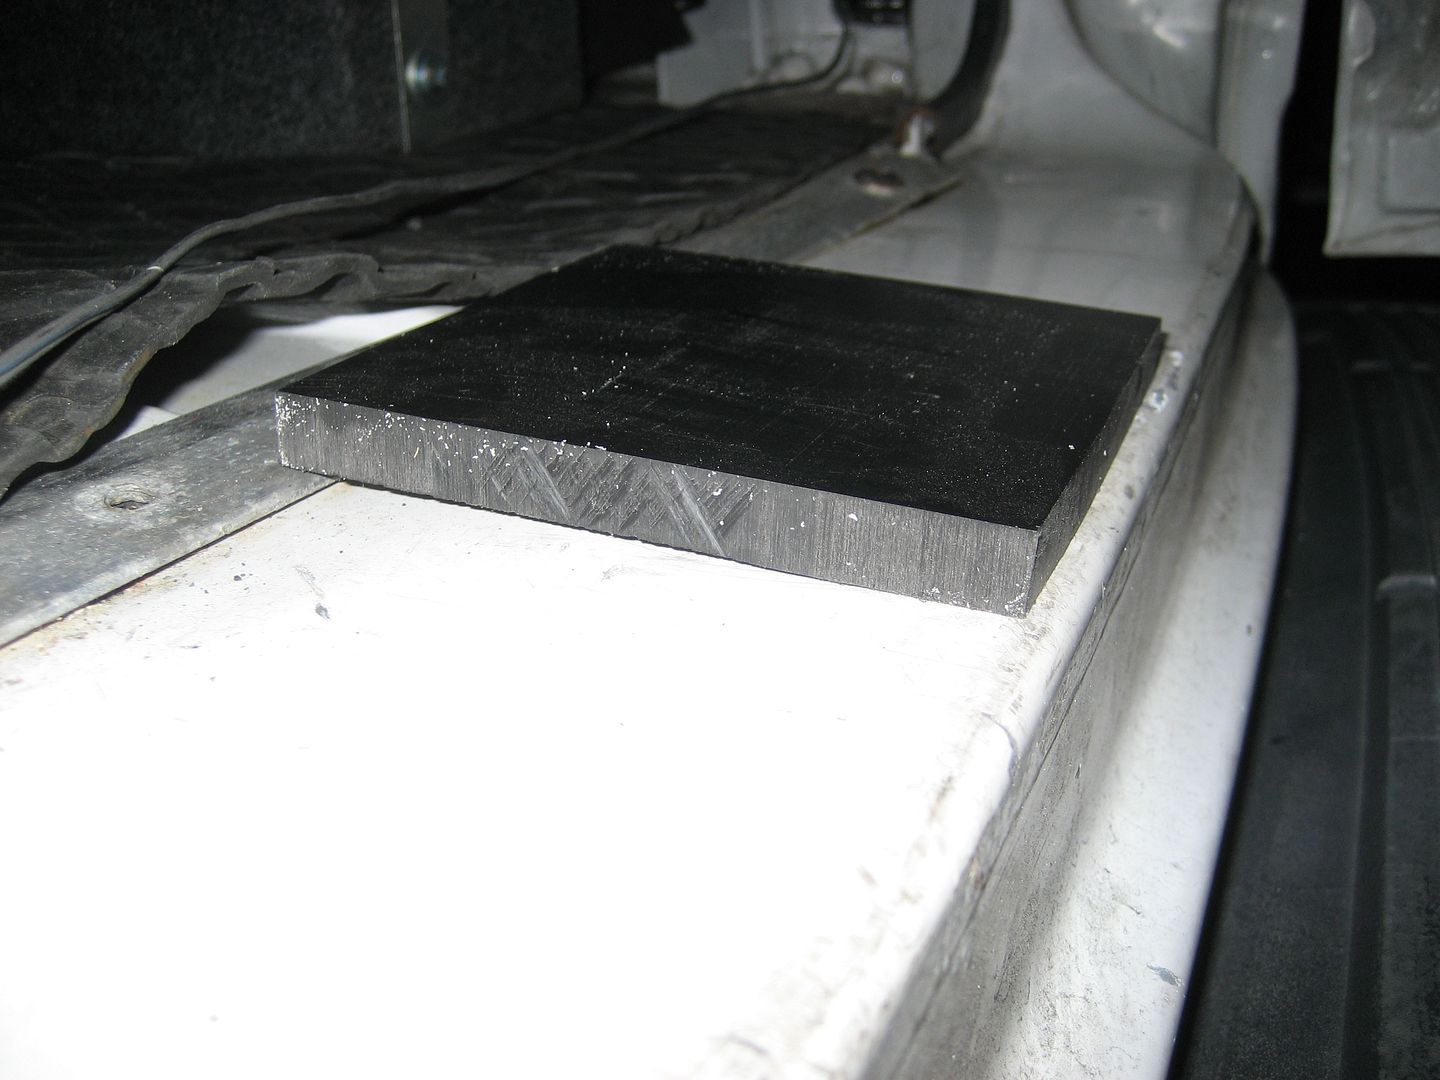
There is a sizeable gap underneath the door. Roughly 3/8". I was able to almost fully close the door with this spacer under it. So I will bolt a spacer to the bottomside of the door and make a full frame. The combo should be more than sufficient.
Are the door hinges glued on or what? I don't see any welds or bolts just some hard crap that looks like it was definitely a liquid at one time.
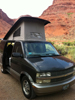
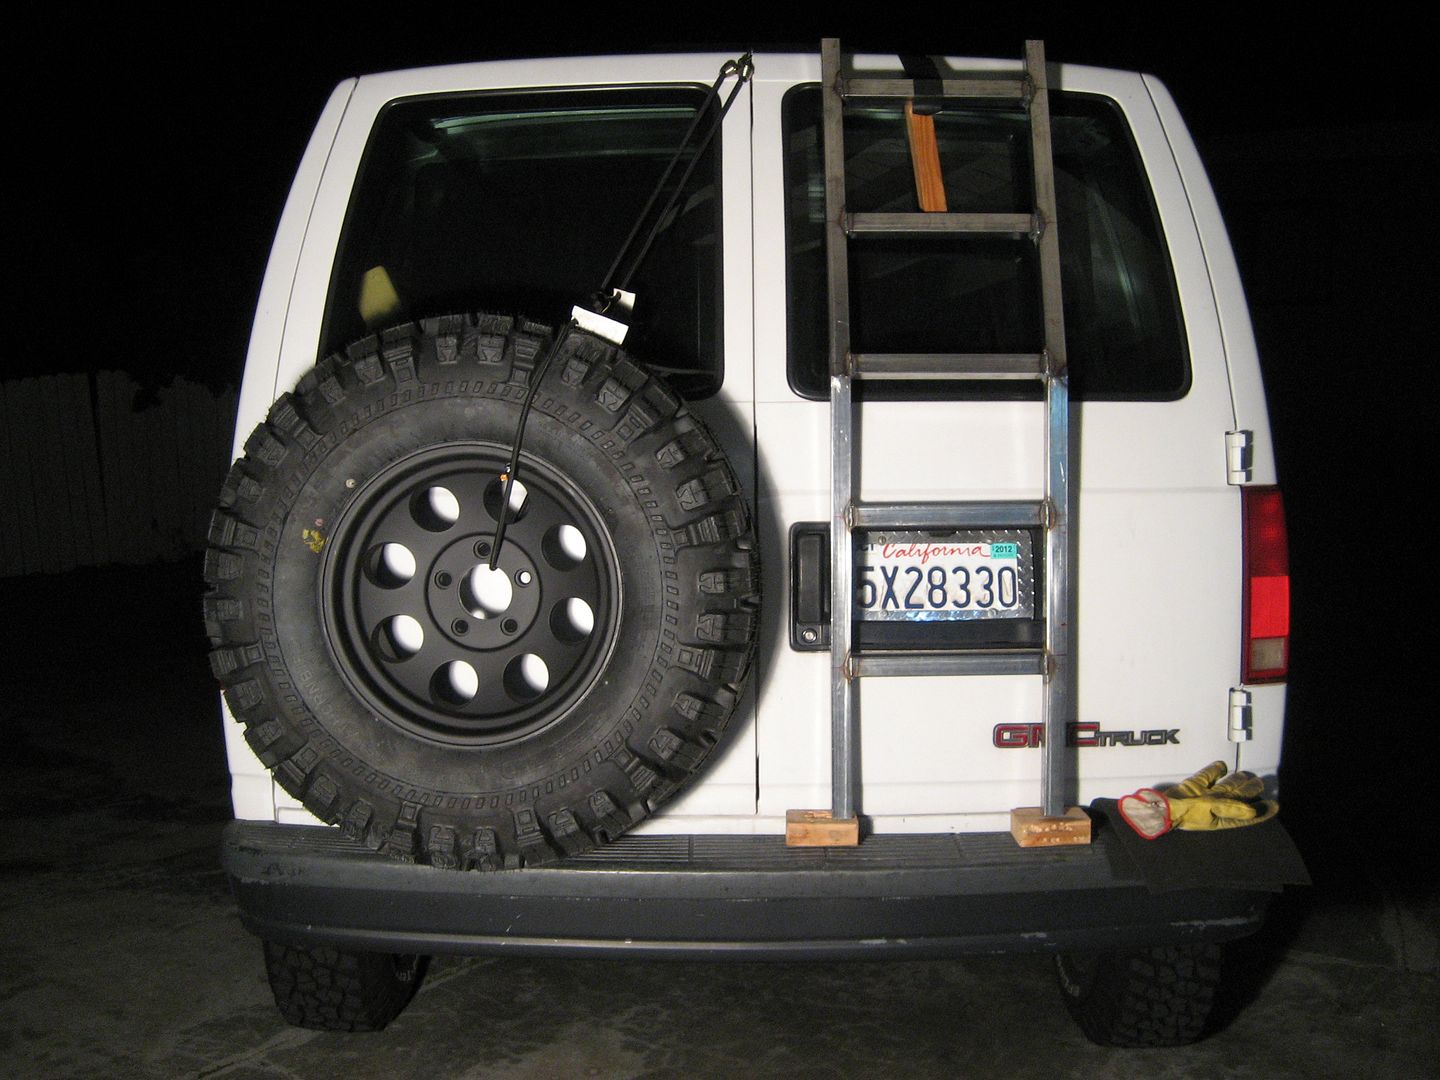
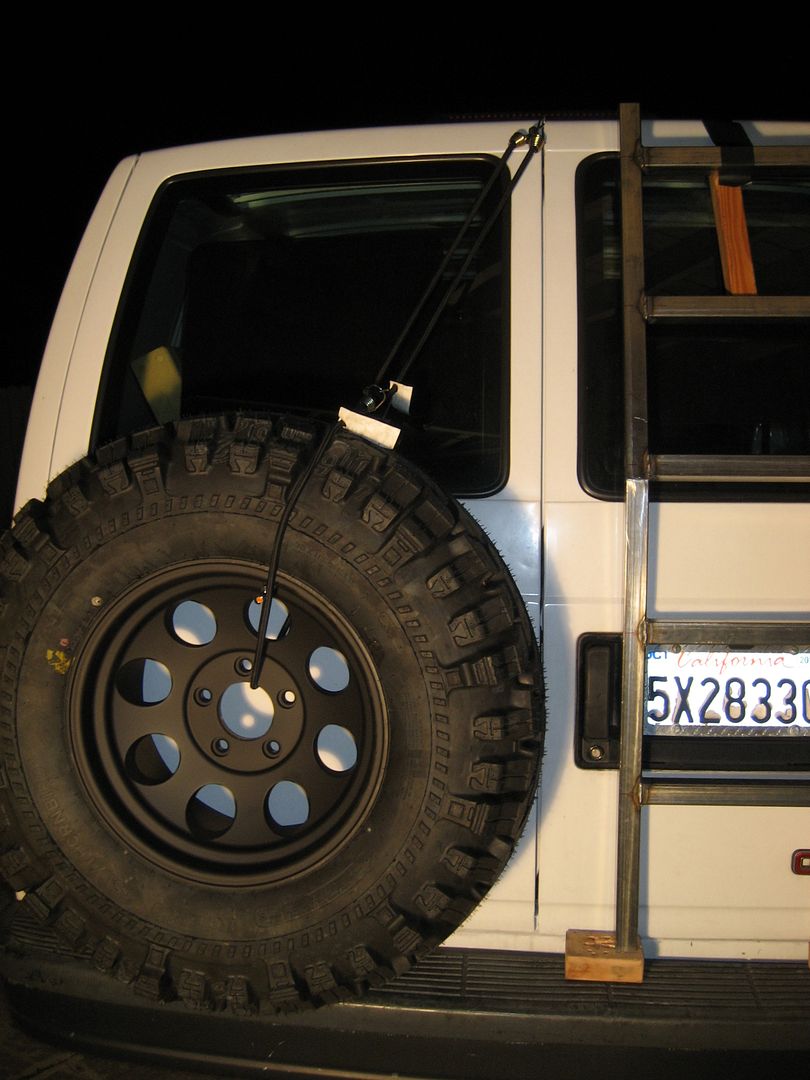
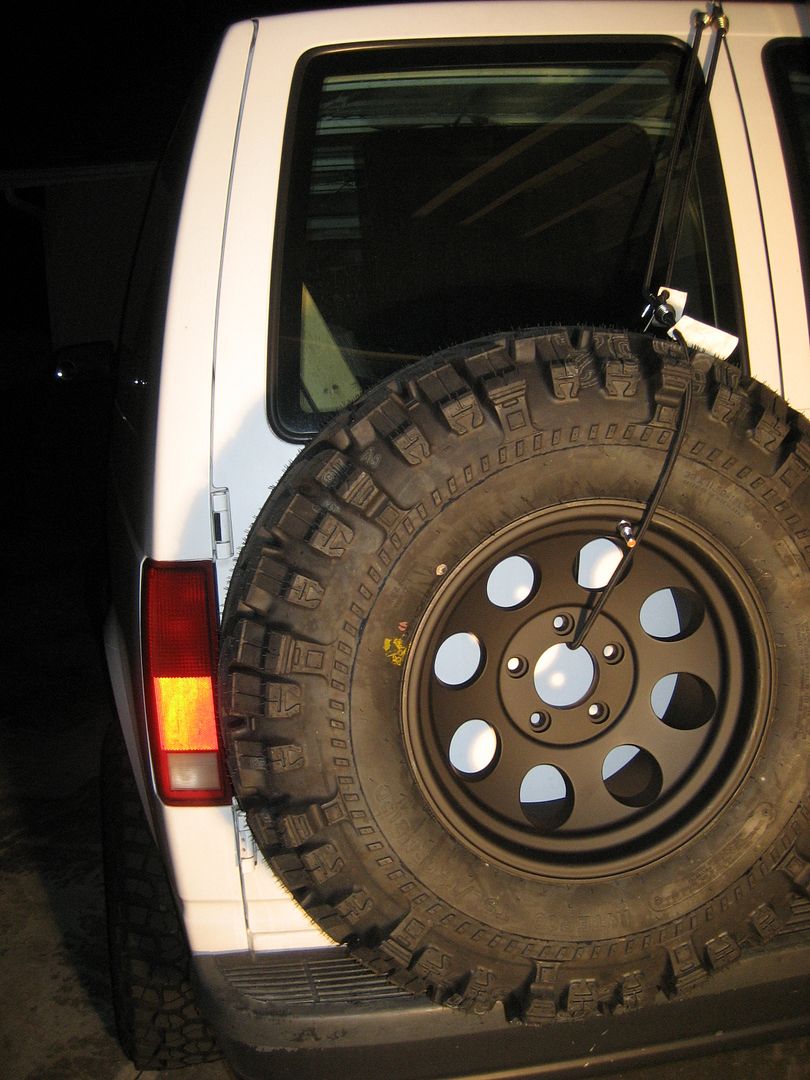
I did have some time to throw a tire up to see how it would fit. The tire will go on a custom swing out carrier but this is roughly where I want it. It looks like I should be able to open the right side door and still have the left brake light exposed:
I will also do some extra turn and brake lights in the bumper just to be safe.
I had a thought. Instead of having the ladder stick out 4" from the door I could weld short extensions onto the rungs. It won't help the stress on the door much but it will give more surface area to the rungs for better footing and the ladder won't look as weird separated so far from the body. Steel diamond plate would be cool.
It's gonna need a full frame built inside. The ladder will have to be a good 4" away from the door in order to get a decent foothold on the rungs. That is a whole lot of torque on the sheet metal and hinges. No big deal. I should even be able to work around the license plate holder.
There is a sizeable gap underneath the door. Roughly 3/8". I was able to almost fully close the door with this spacer under it. So I will bolt a spacer to the bottomside of the door and make a full frame. The combo should be more than sufficient.
Are the door hinges glued on or what? I don't see any welds or bolts just some hard crap that looks like it was definitely a liquid at one time.
I did have some time to throw a tire up to see how it would fit. The tire will go on a custom swing out carrier but this is roughly where I want it. It looks like I should be able to open the right side door and still have the left brake light exposed:
I will also do some extra turn and brake lights in the bumper just to be safe.
I had a thought. Instead of having the ladder stick out 4" from the door I could weld short extensions onto the rungs. It won't help the stress on the door much but it will give more surface area to the rungs for better footing and the ladder won't look as weird separated so far from the body. Steel diamond plate would be cool.
1997 SAFARI 2WD CARGO

"I do not think there is any thrill that can go through the human heart like that felt by the inventor as he sees some creation of the brain unfolding to success... Such emotions make a man forget food, sleep, friends, love, everything." Nikola Tesla
"I do not think there is any thrill that can go through the human heart like that felt by the inventor as he sees some creation of the brain unfolding to success... Such emotions make a man forget food, sleep, friends, love, everything." Nikola Tesla
-
 MountainManJoe
- I have my van tatooed on my cheeks
- Posts: 3128
- Joined: Fri Aug 08, 2008 12:55 pm
- Location: The Pacific North Wet
- Has thanked: 47 times
- Been thanked: 25 times
Re: Homebrew Con-Ferr Style Porthole Roof Rack Build
Yup, welded, sealed and painted. Nobody will ever need to adjust the hinges, right? ](./images/smilies/eusa_wall.gif "Banging my head")
-
WoodButcher
- ASV Supporter
- Posts: 418
- Joined: Wed Apr 06, 2011 7:01 pm
- Location: Woodbury, CT.
- Has thanked: 1 time
- Been thanked: 18 times
Re: Homebrew Con-Ferr Style Porthole Roof Rack Build
Maybe sprung hinges for ladder supports? lifts tight to the body on rubber stops to store, when weight is applied it drops to the bumper 4" out.
'93 Safari shorty, 350 swap
'05 Astro AWD, lifted, 6 liter, cammed, ported and programmed for fast.
'93 cargo, work in progress
'05 Astro AWD, lifted, 6 liter, cammed, ported and programmed for fast.
'93 cargo, work in progress
-
97CargoCrawler
Topic author - I sleep in my van
- Posts: 754
- Joined: Thu Jan 24, 2008 11:50 pm
- Location: Near Los Angeles, CA
- Contact:
Re: Homebrew Con-Ferr Style Porthole Roof Rack Build
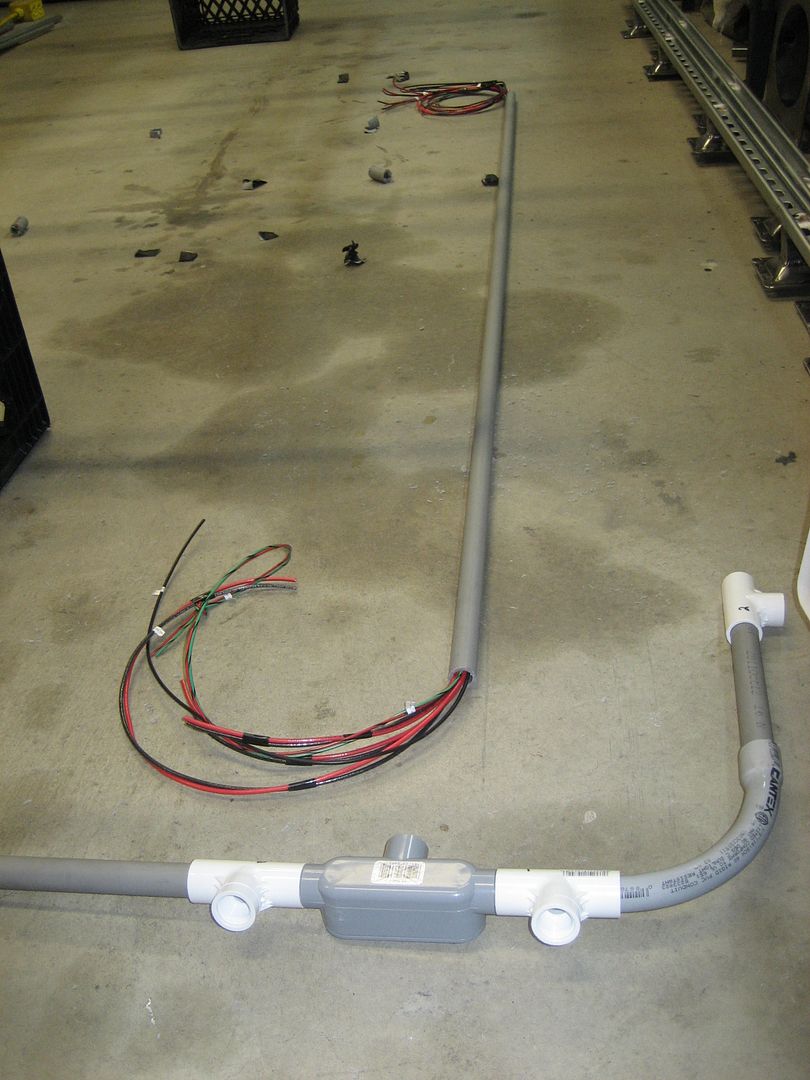
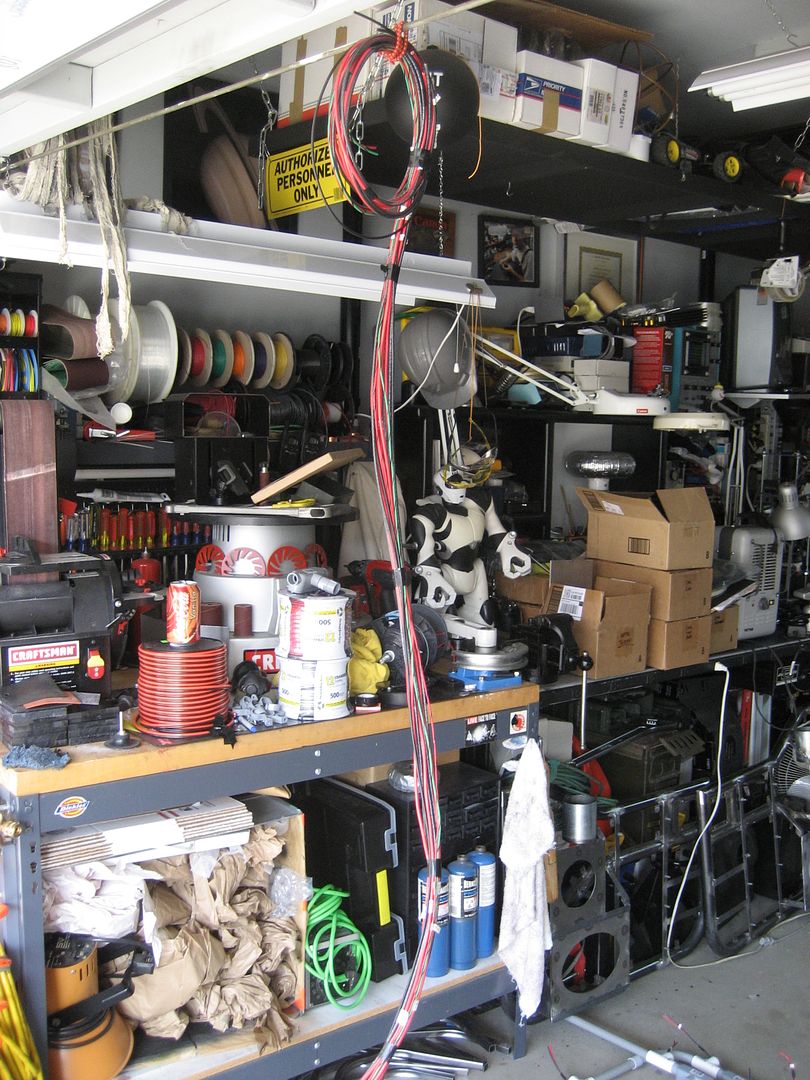
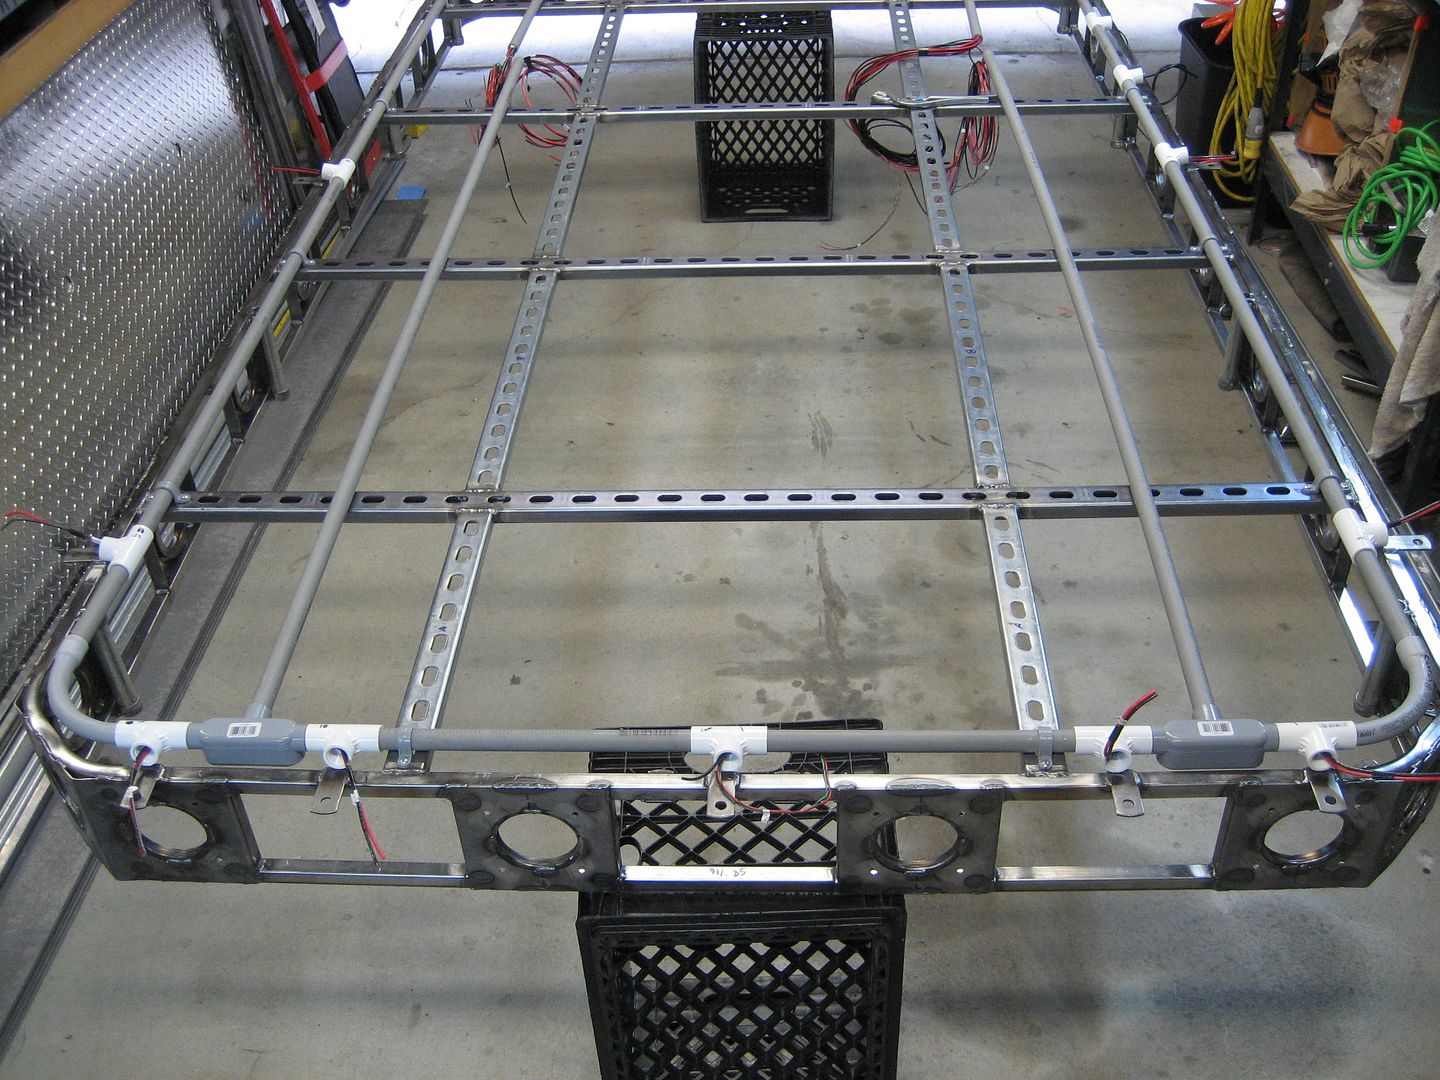
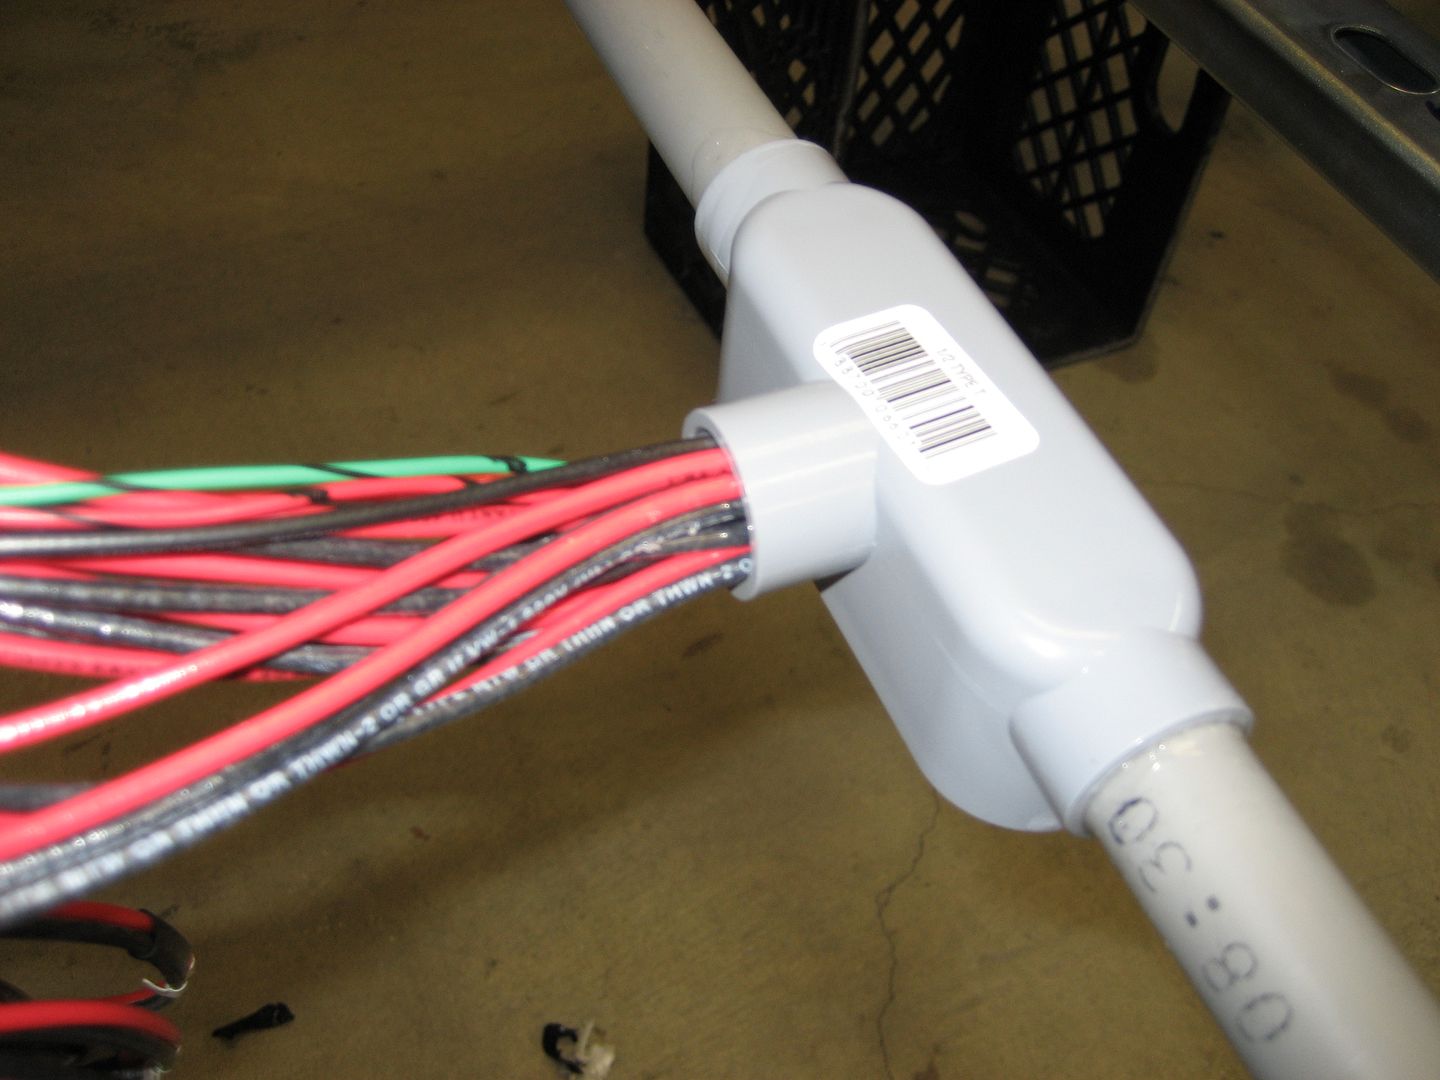
Tonight I started on this nightmare. On the right side, which is the drivers side since the rack is upside down, I am adding two more tees. One will be for the CB antenna feed and the other for the scanner antenna:
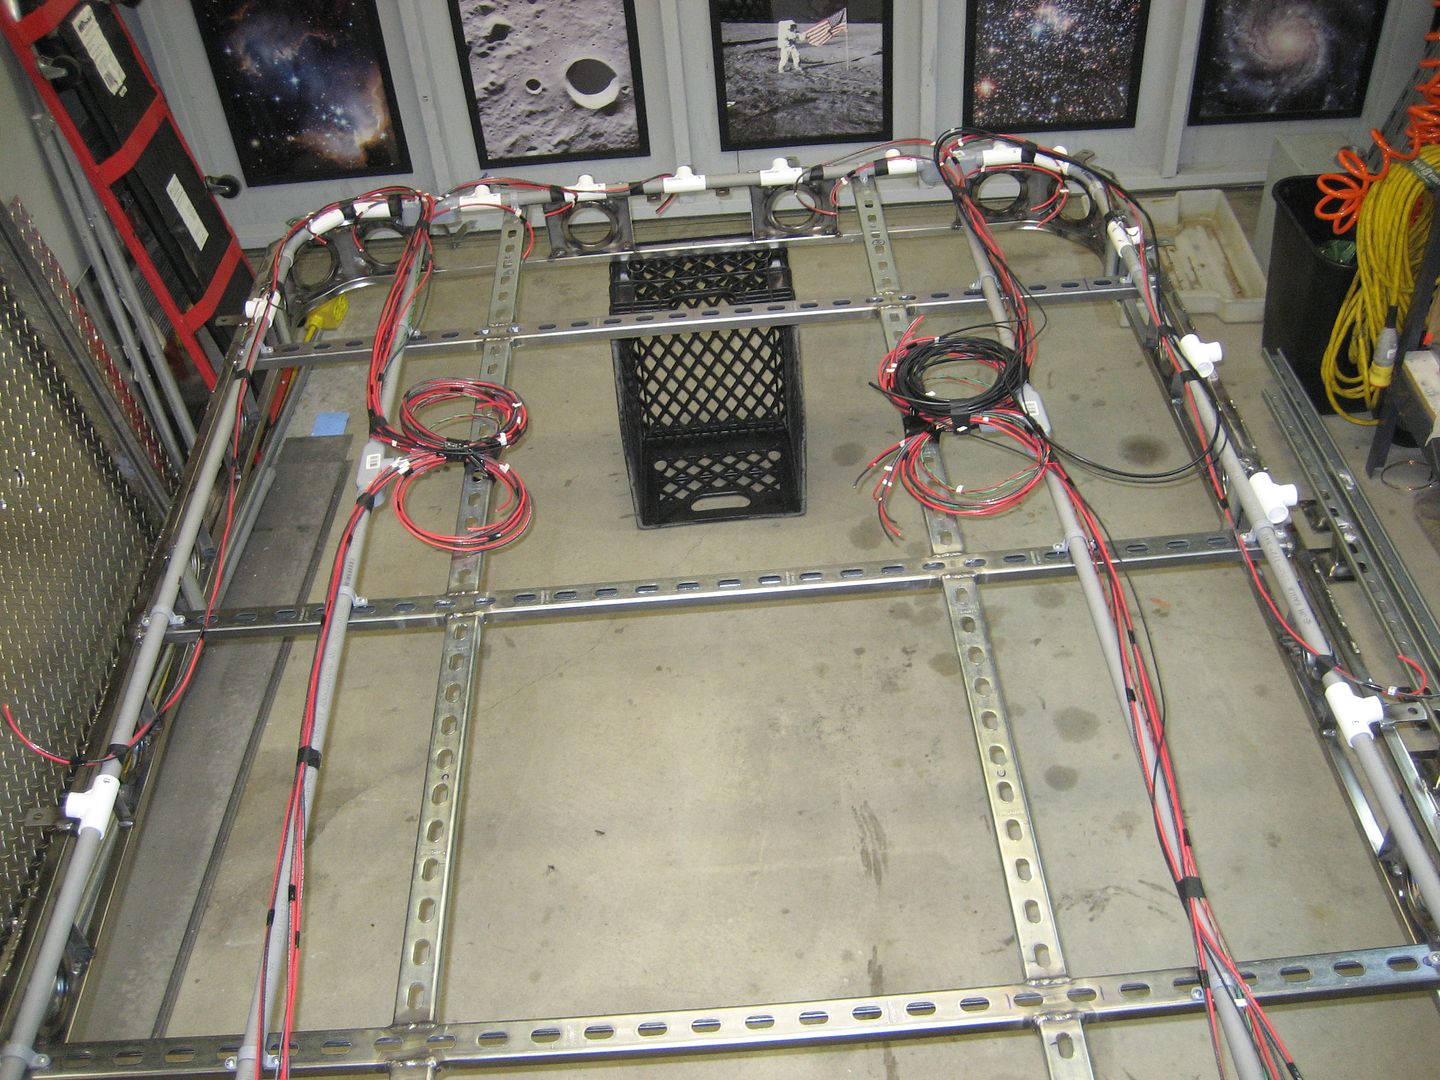
I'm halfway done pulling the wire through the conduit. There are two pipe sections that contain the majority of the wire. Those being the ones closest to the roof feed thru. As the wire continues down the pipeline it branches off to the various tees. So the wire density decreases after each tee.
The high density sections are so packed with wire it would be impossible to add a single strand more. I had a very difficult time pulling it through:
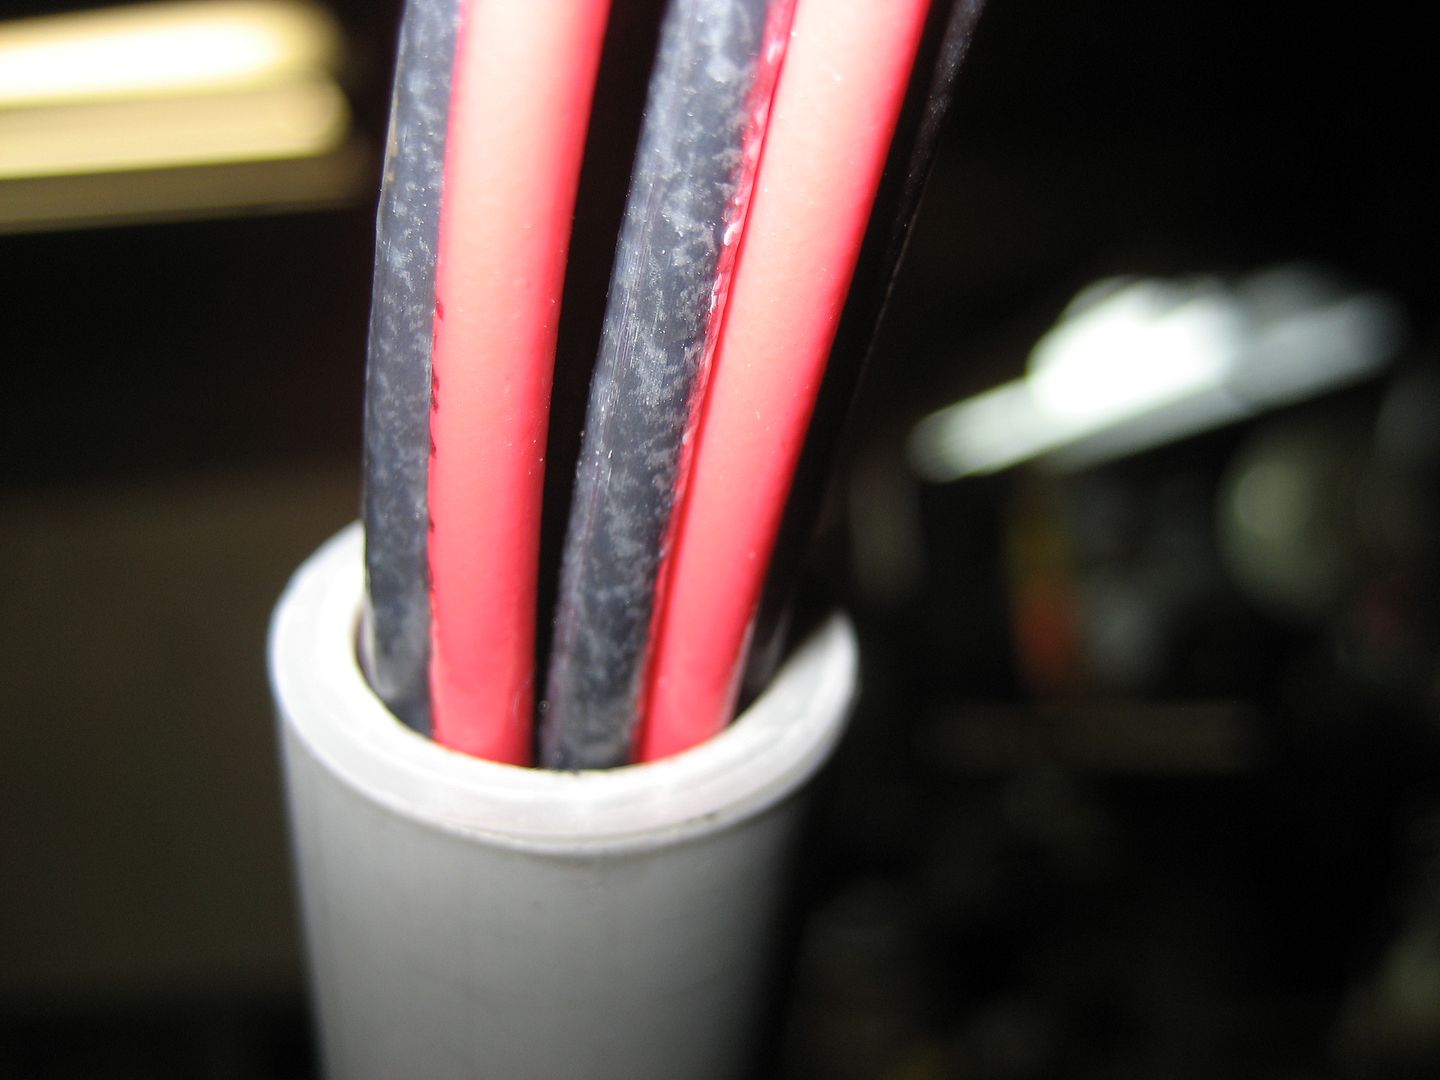
There's a lot of wire to stuff in there:
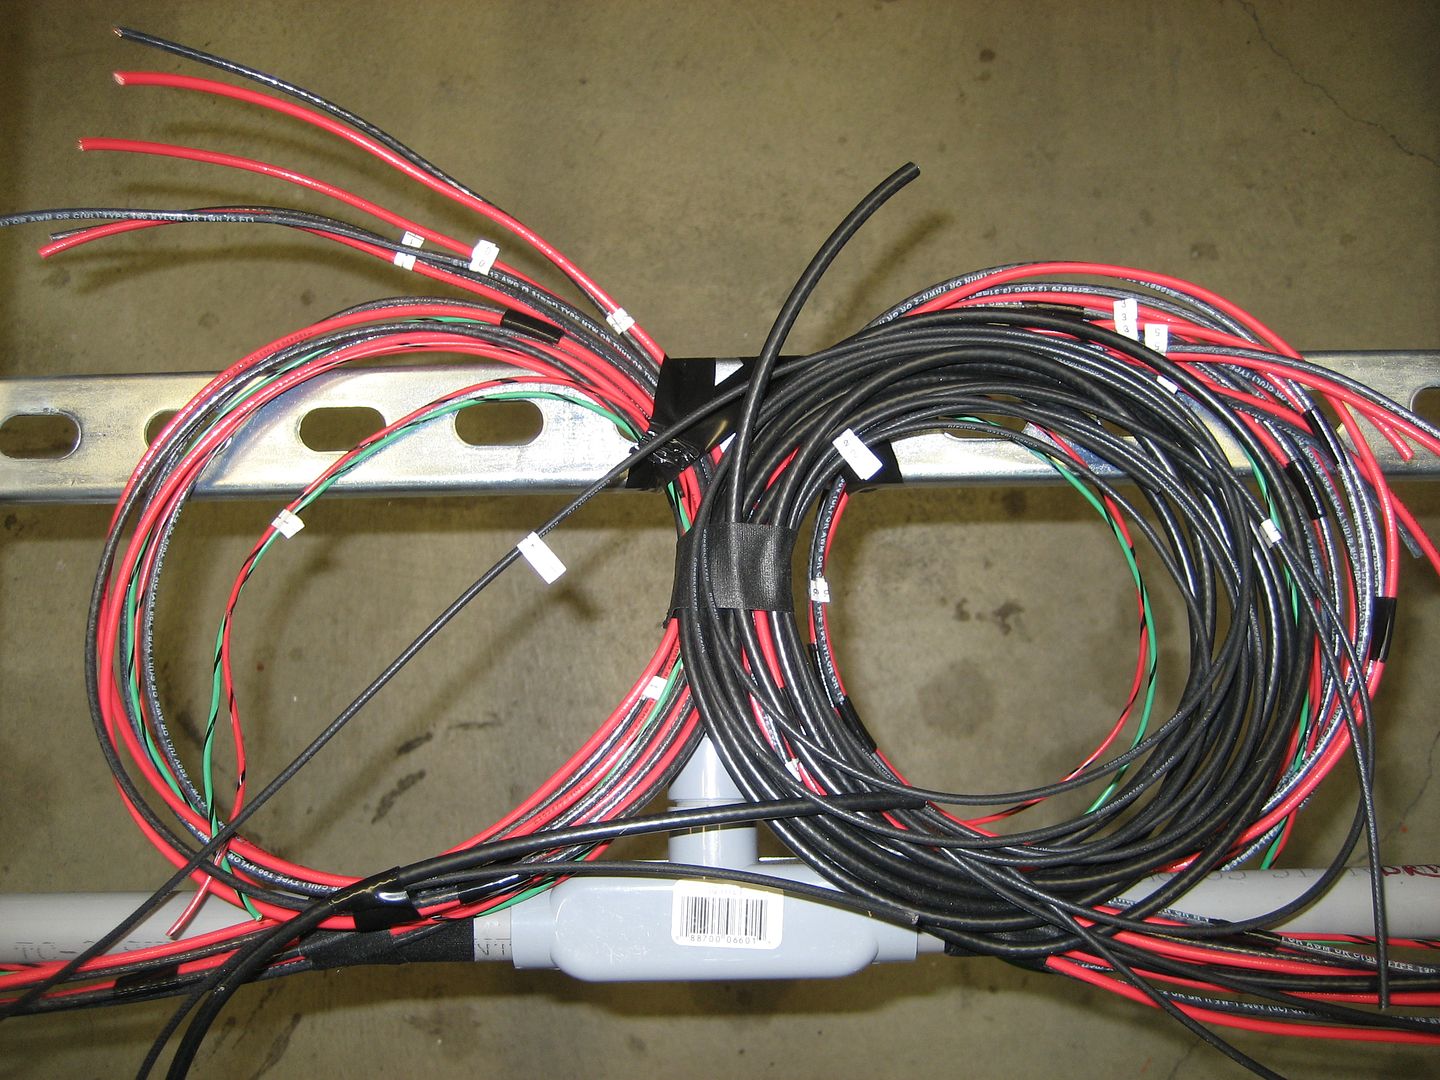
Everything is being done in sections:
I think the order this should be completed in is as follows: glue the pipe sections together, trim up the wiring, solder the connectors on and then pull any slack back into the junction boxes.
I need the wire slack in order to separate the pipes enough to apply the cement. After the cement is applied I will trim the wires down to about 1" outside the tees which should give me just enough to work with while soldering on the connectors. Then I will pull the remaining slack from each tee back into the junction boxes. That should seat each connector down in the tee.
I hope to complete the wiring tomorrow and then get to painting on Sunday and Monday, weather permitting.
I'm halfway done pulling the wire through the conduit. There are two pipe sections that contain the majority of the wire. Those being the ones closest to the roof feed thru. As the wire continues down the pipeline it branches off to the various tees. So the wire density decreases after each tee.
The high density sections are so packed with wire it would be impossible to add a single strand more. I had a very difficult time pulling it through:
There's a lot of wire to stuff in there:
Everything is being done in sections:
I think the order this should be completed in is as follows: glue the pipe sections together, trim up the wiring, solder the connectors on and then pull any slack back into the junction boxes.
I need the wire slack in order to separate the pipes enough to apply the cement. After the cement is applied I will trim the wires down to about 1" outside the tees which should give me just enough to work with while soldering on the connectors. Then I will pull the remaining slack from each tee back into the junction boxes. That should seat each connector down in the tee.
I hope to complete the wiring tomorrow and then get to painting on Sunday and Monday, weather permitting.
1997 SAFARI 2WD CARGO
"I do not think there is any thrill that can go through the human heart like that felt by the inventor as he sees some creation of the brain unfolding to success... Such emotions make a man forget food, sleep, friends, love, everything." Nikola Tesla
"I do not think there is any thrill that can go through the human heart like that felt by the inventor as he sees some creation of the brain unfolding to success... Such emotions make a man forget food, sleep, friends, love, everything." Nikola Tesla
Re: Homebrew Con-Ferr Style Porthole Roof Rack Build
What a mess...
Kinda looks like the innerds of an F16.
Good Job, Jim
Kinda looks like the innerds of an F16.
Good Job, Jim
-
LiftedAWDAstro
- I have my van tatooed on my cheeks
- Posts: 4379
- Joined: Sat Sep 09, 2006 3:35 pm
- Location: New Haven, NY
Re: Homebrew Con-Ferr Style Porthole Roof Rack Build
Looking good so far. To pull the wires easier, apply a little dish soap for lube.
Current rides:
2013 Toyota Tundra DC 4x4
2008 Dodge Nitro 4x4
2005 Nissan Sentra 1.8S Special Edition
Mileage spreadsheet
Vans owned:
1986 Safari 2.5L 4 speed manual - scrapped
1995 Astro 2WD conversion 4.11 posi, shift kit, DHC rock rails - sold to Skippy
1998 Astro 4x4 D44, D60, NP231, full hydraulic system with 9k# Milemarker winch and snow plow - sold to Lockdoc
2003 Astro AWD all stock - traded for a 3/4 ton truck
2005 AWD, 4.10's - sold to skippy
-
97CargoCrawler
Topic author - I sleep in my van
- Posts: 754
- Joined: Thu Jan 24, 2008 11:50 pm
- Location: Near Los Angeles, CA
- Contact:
Re: Homebrew Con-Ferr Style Porthole Roof Rack Build
I'm just really thankful there wasn't a potato bug living in the conduit this time. I found this little (BIG) guy living inside some other conduit I have laying here. This is the 4th potato bug I have found inside my shop in the last 5 years. Considering they live underground in the dirt, how the hell is that even possible? I don't have anything with soil inside my shop. I don't think I saw 4 of these my whole life up until the last few years. They are sooooo creepy. For about an hour I tried to find the scraping noise in the shop....turns out it was this guy crawling through the pipe. Imagine my surprise when I looked down inside and saw this:
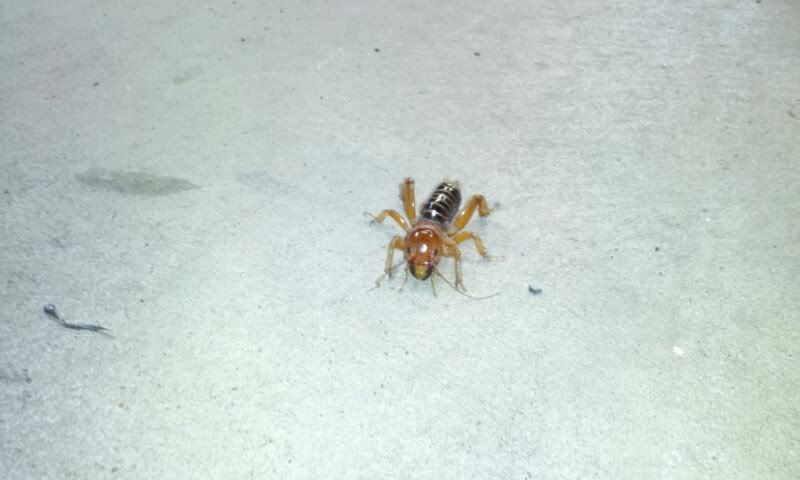
I smashed one on the concrete floor a year ago and his juices ate into the floor.
I smashed one on the concrete floor a year ago and his juices ate into the floor.
-
97CargoCrawler
Topic author - I sleep in my van
- Posts: 754
- Joined: Thu Jan 24, 2008 11:50 pm
- Location: Near Los Angeles, CA
- Contact:
Re: Homebrew Con-Ferr Style Porthole Roof Rack Build
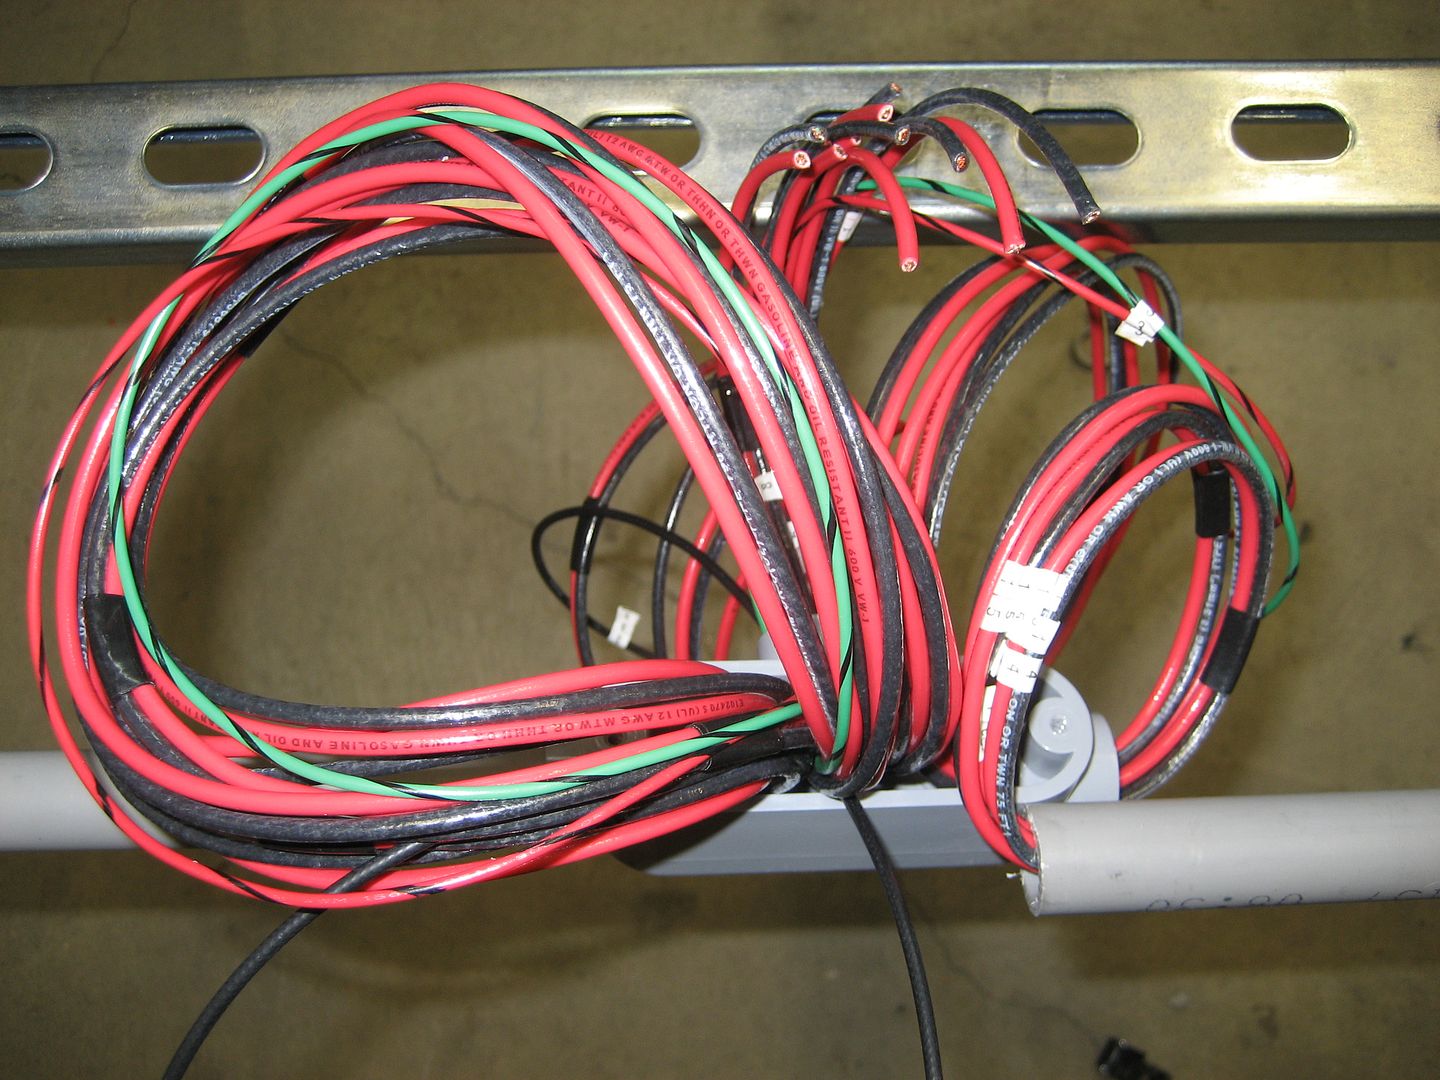
OMG what a PITFA! I didn't even get to soldering today. I spent about 8 hours just pulling cable and cementing.
I hung up the wire and tried to arrange it into a tight and straight bundle before feeding it into the conduit:
Then I sponged it with some soapy water and started pushing it in:
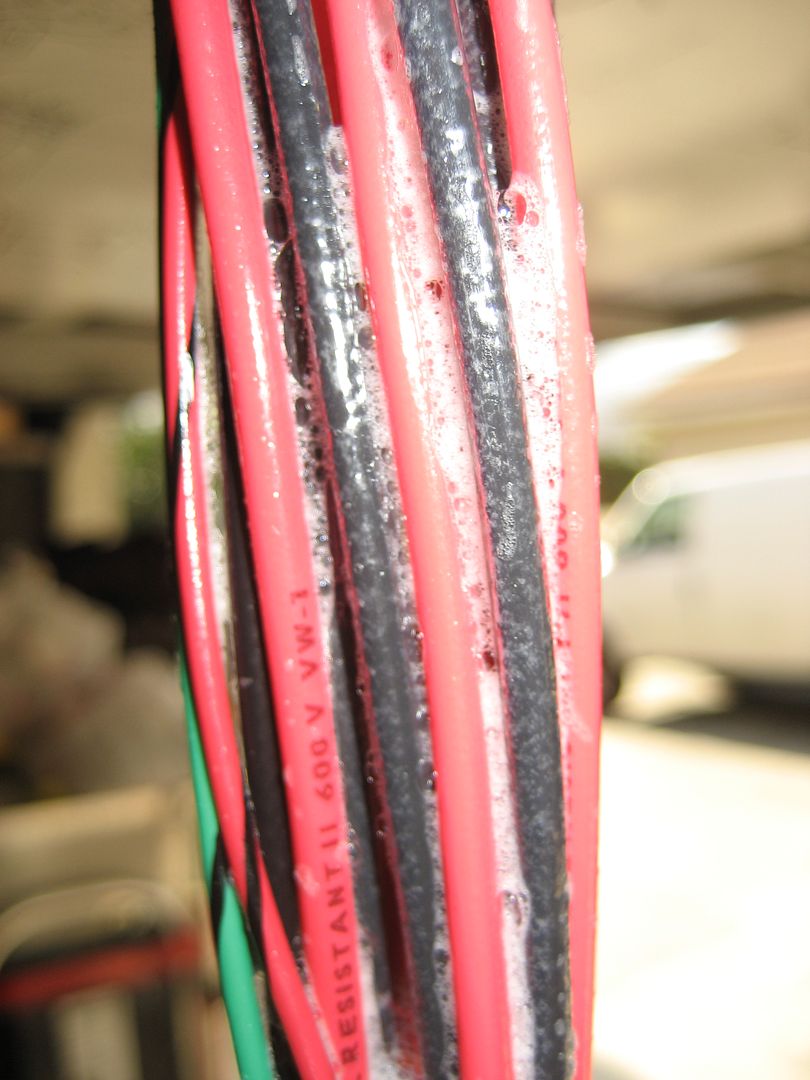
MAXIMUM CAPACITY!
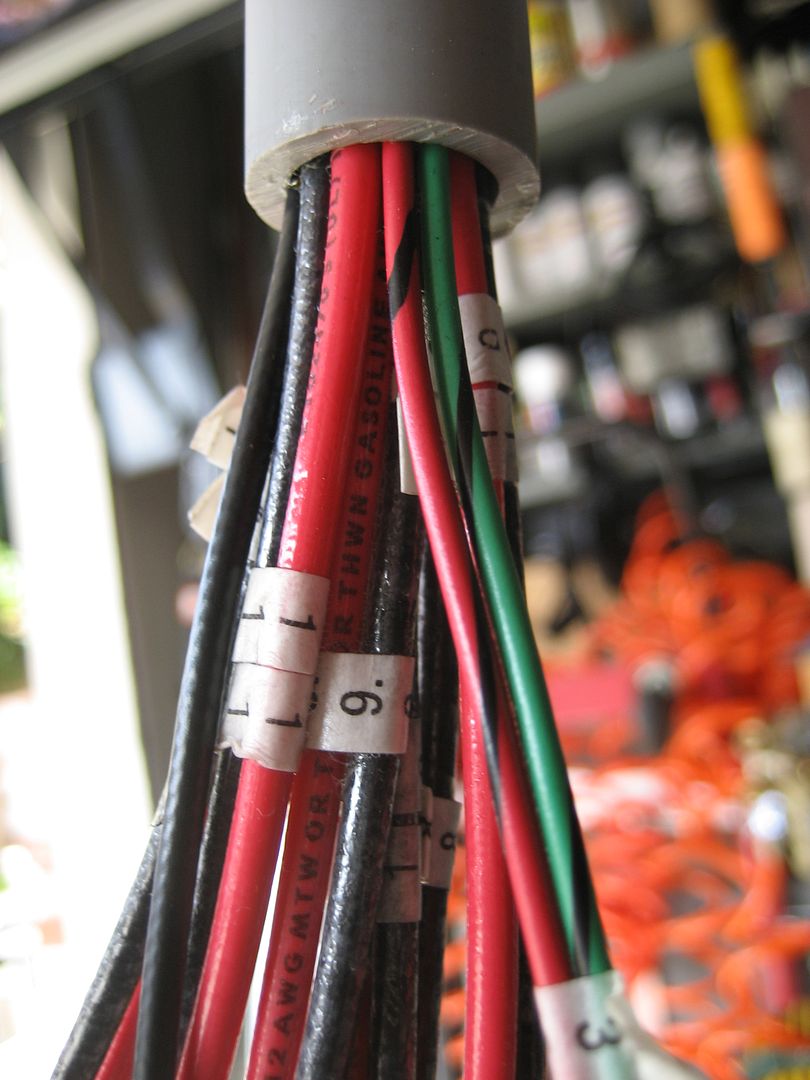
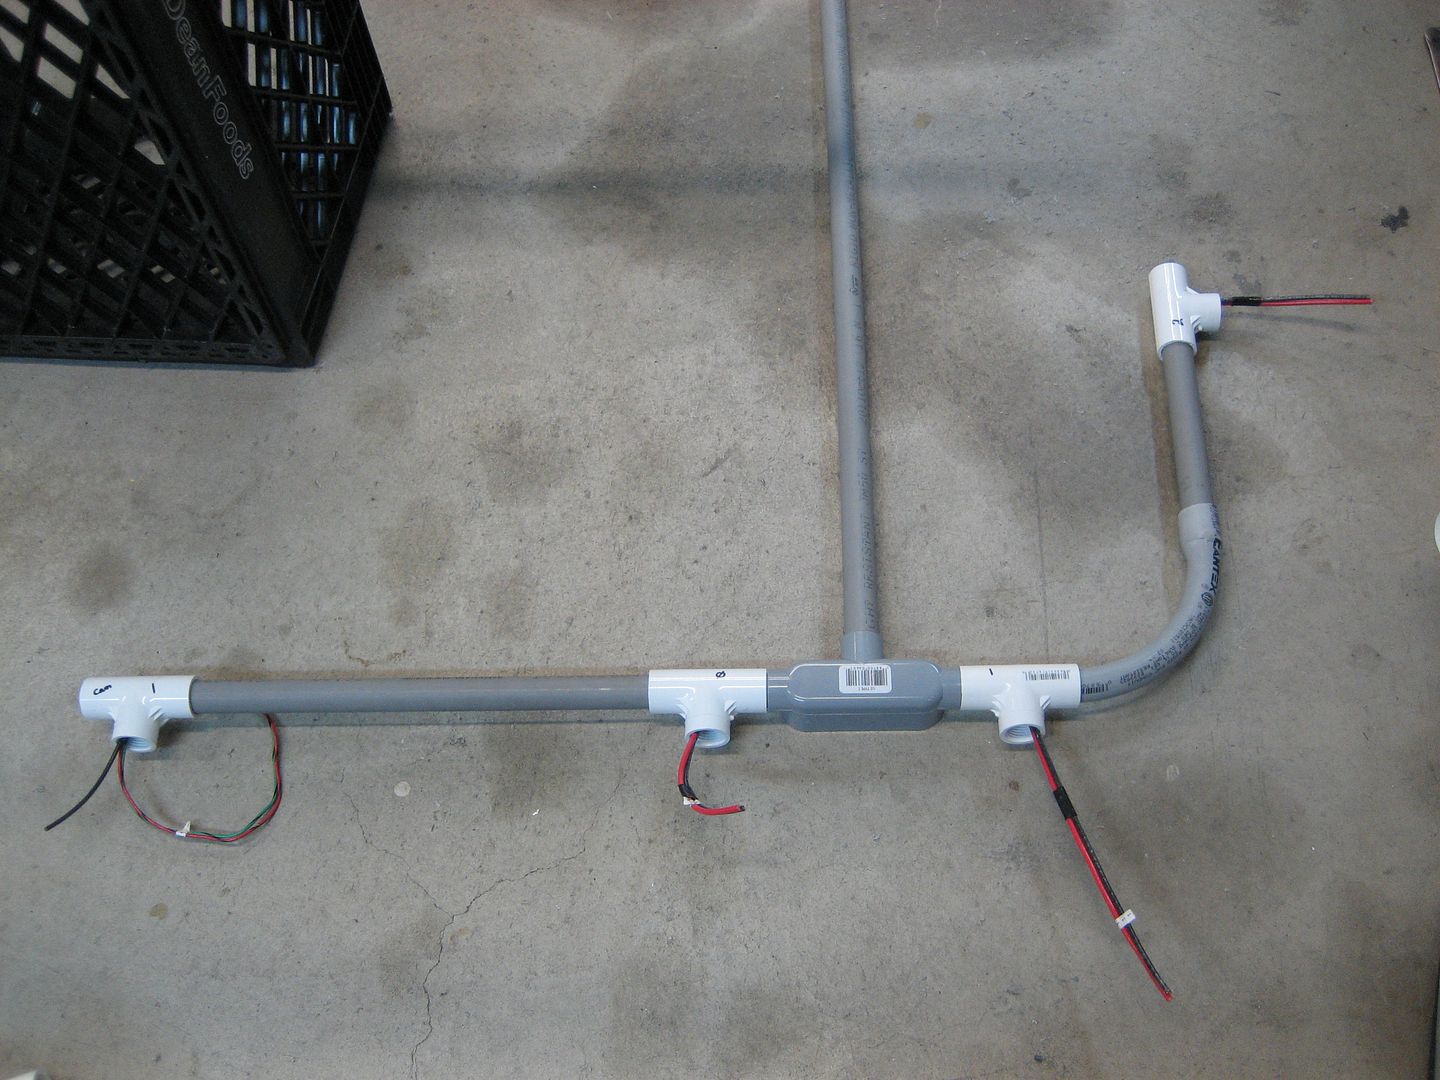
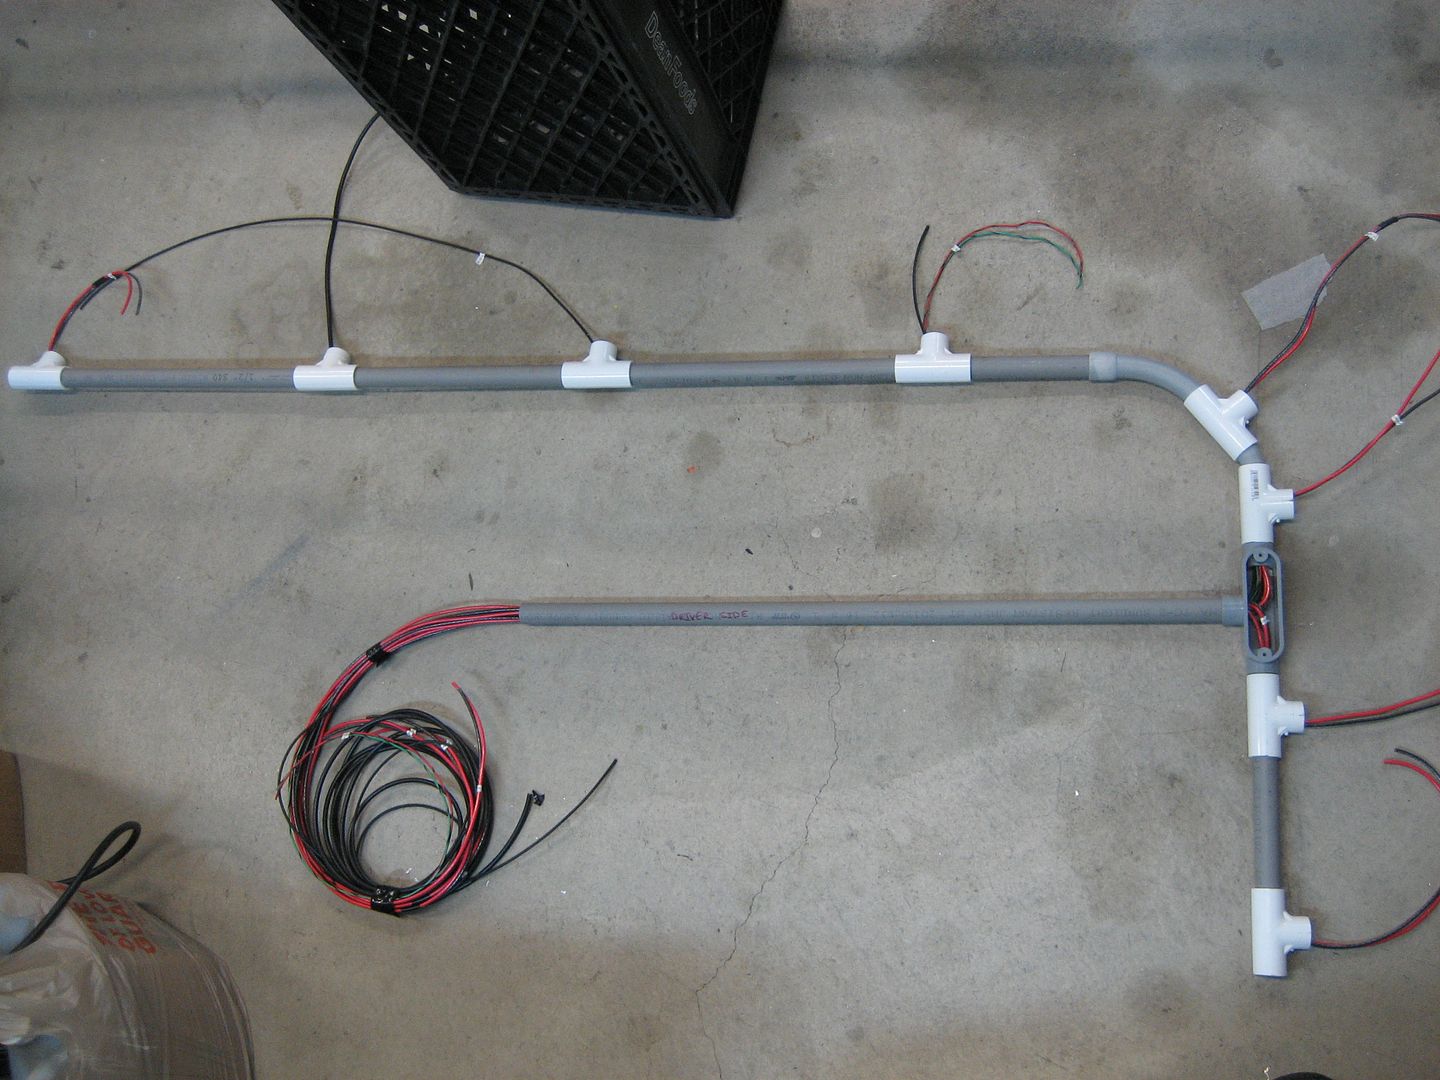
Once everything was pulled in sections I reassembled the system so I could get the pipe spacing and placement correct for cementing:
I spent a few hours aligning the tees and cementing them in place.
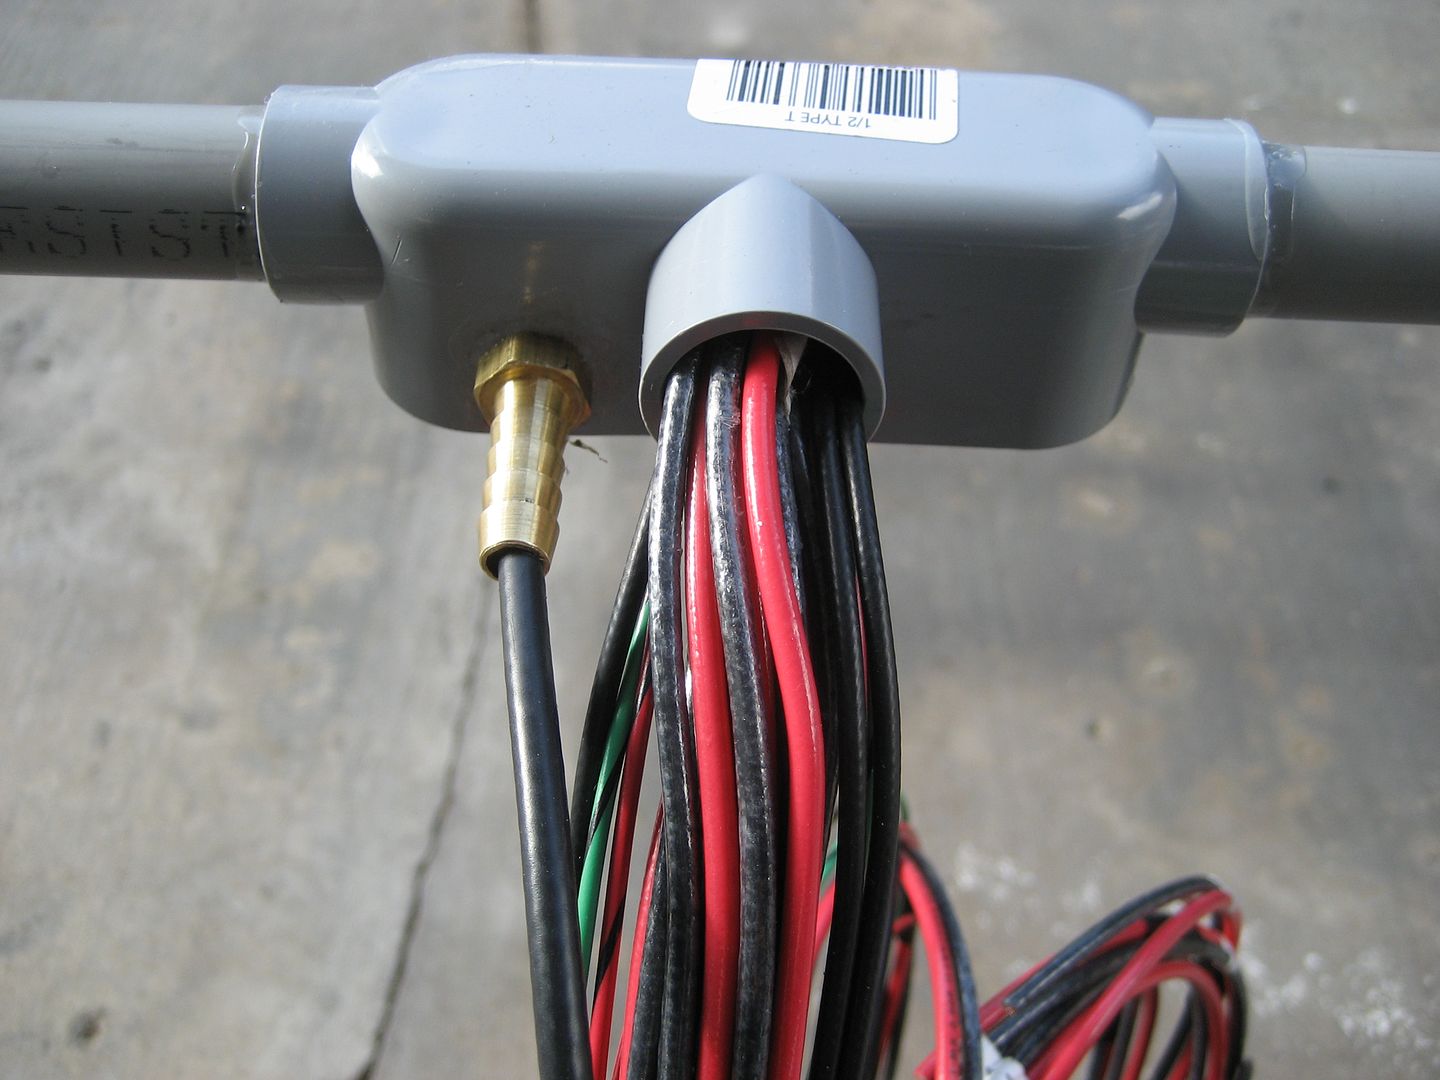
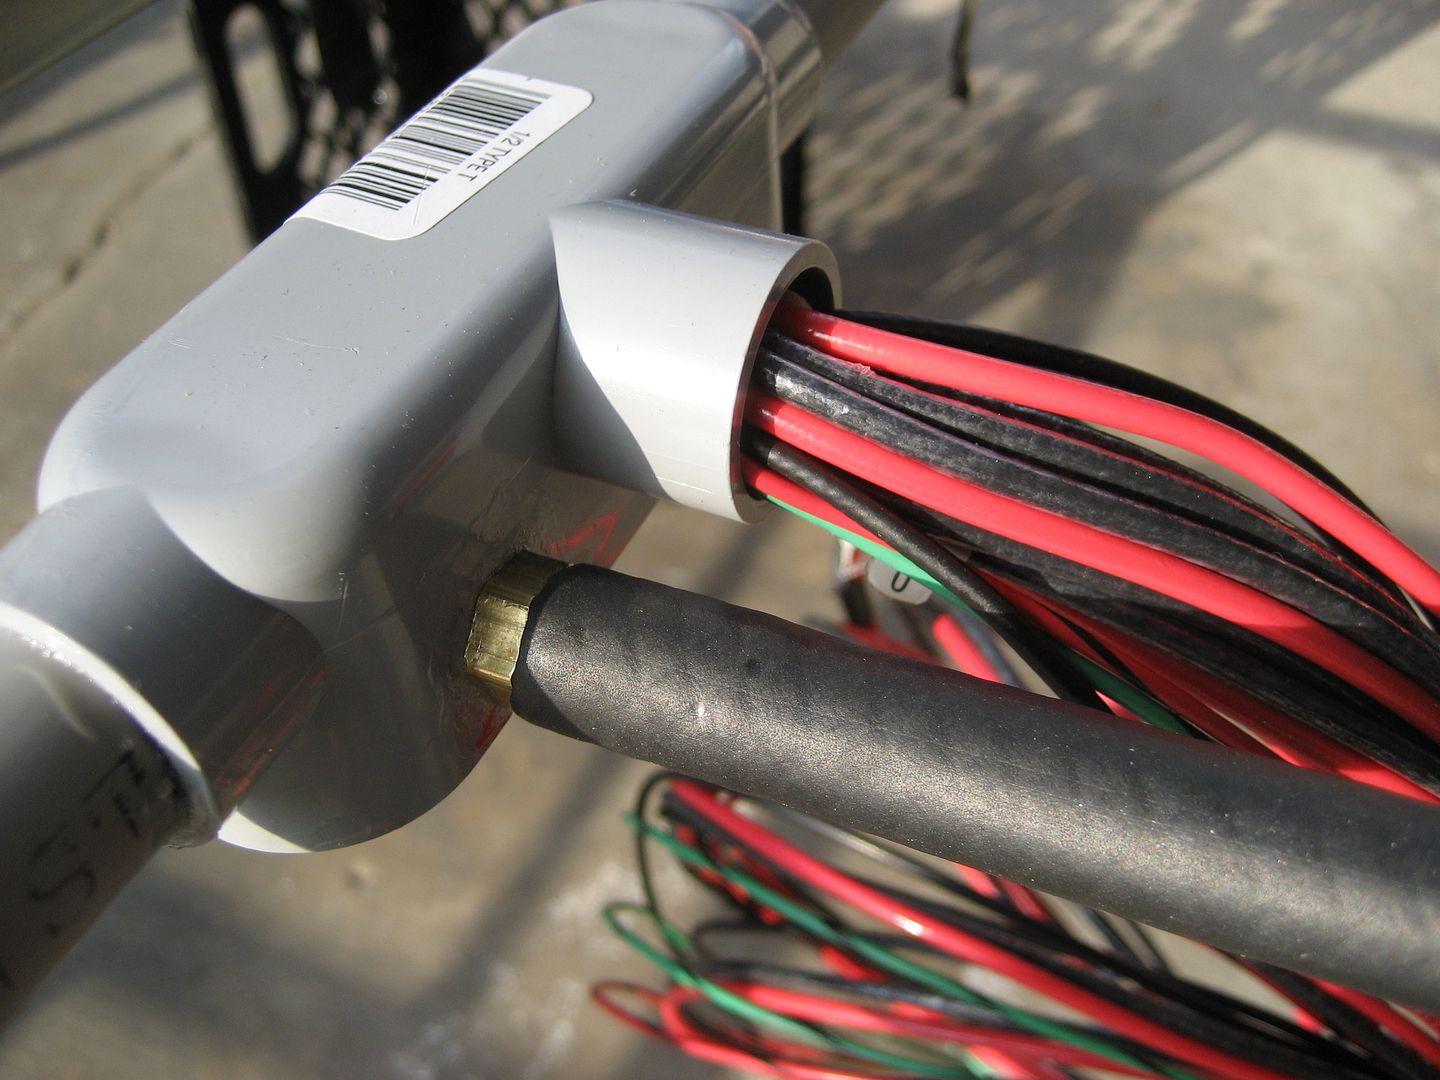
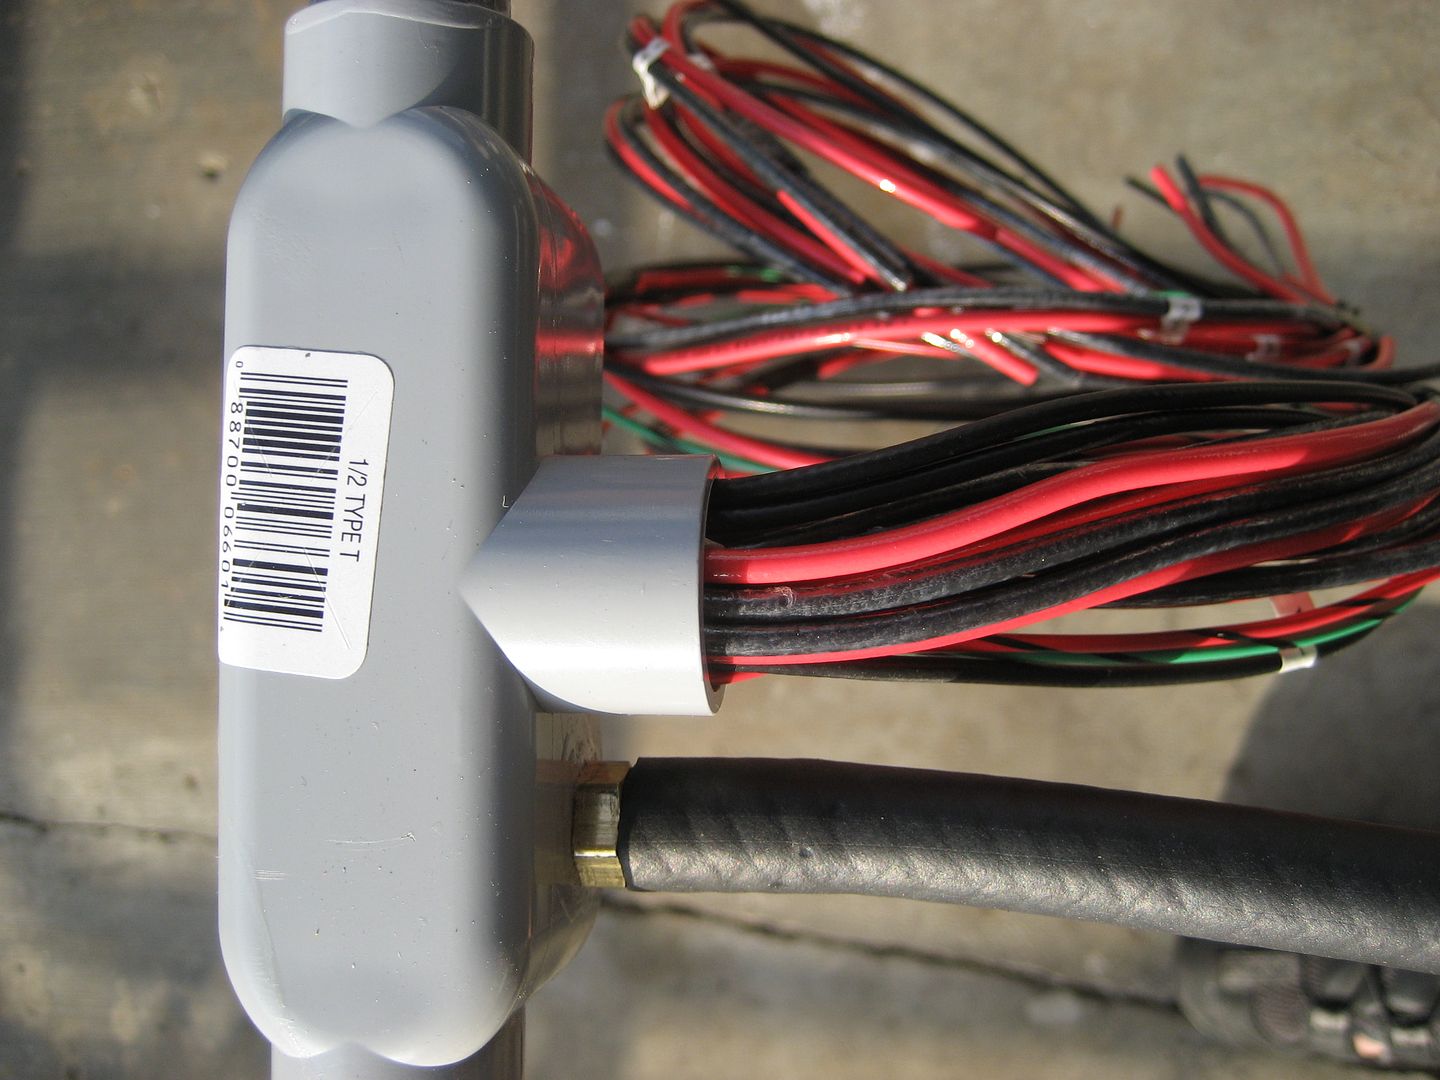
As you've seen from the previous photos the 1/2" conduit is completely full. So that poses a bit of a problem considering two pieces of conduit will come together into a final tee junction box before the wires branch out into a rubber hose headed for the roof feed thru. I could have used a larger box but I liked that the 1/2" boxes would fit right underneath the diamond plate floor. 3/4" boxes are MUCH larger and would have either required an offset or a cutout in the floor. A cutout and a box sticking up from the floor would have been insanely stupid and I'm not sure there would have been enough room for an offset and a box hanging in between the roof and the rack. The distance between the rack and roof is maybe 2-3" in the center so I ruled that out. Luckily I discovered that the 1/2" junction box outlets have a 3/4" pipe sticking out! Whoever designed this box was a genius. You can either slide a 1/2" pipe inside it or put a 3/4" female fitting over it. Awesome!
I knew 3/4" would fit all of the combined wire that needed to come out of the box:
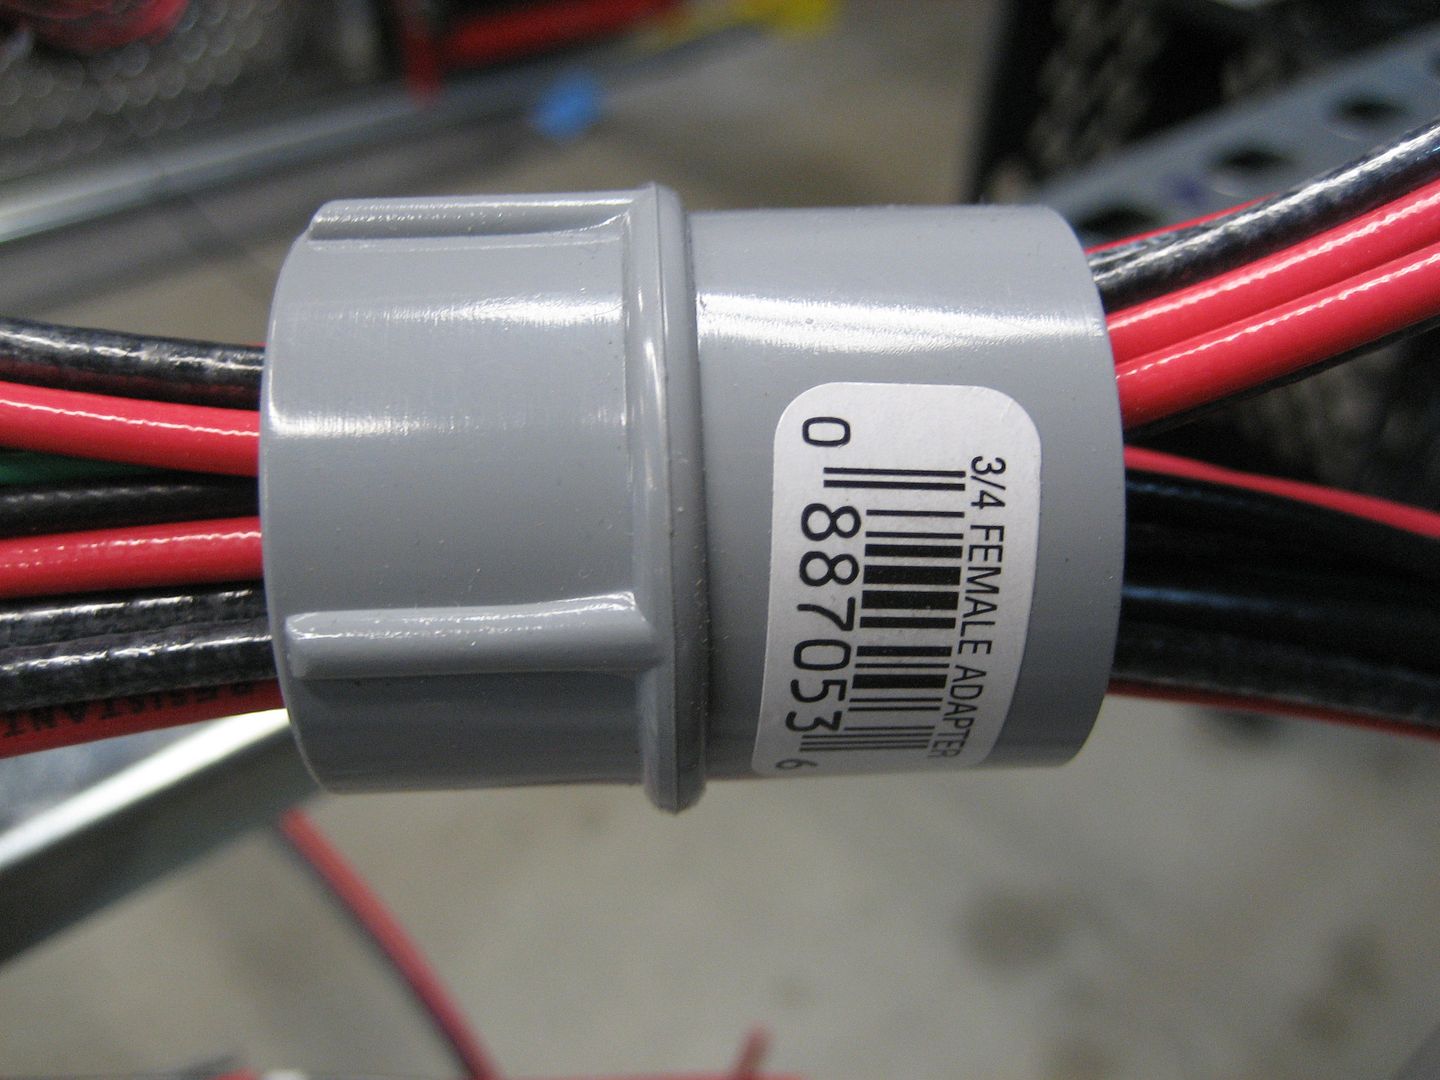
The inside of the box had a flange to keep the 1/2" pipe from sliding in too far. I needed that extra space so I used a Dremel to cut that flange out which gave me the inside diameter of a 3/4" pipe:
Flange removed:
Then it was just a matter of getting all the wire routed through the box:
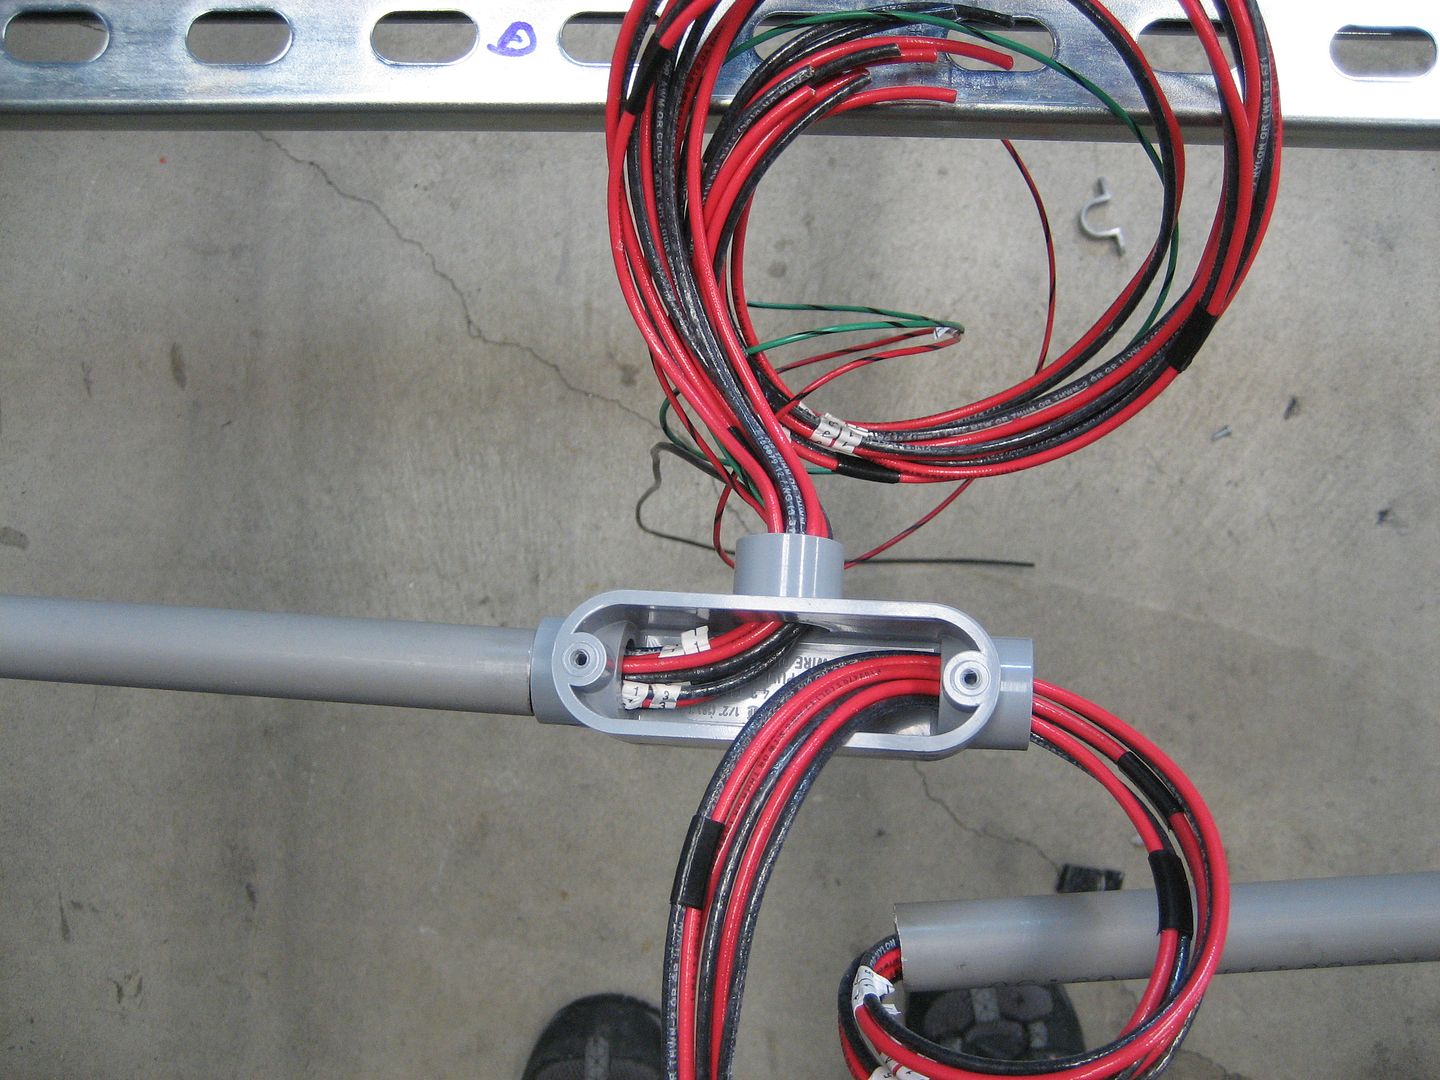
After I had already screamed out every single cuss word I had in my vocabulary I started making up new ones. You can not possibly imagine what a PITFA it was to get all of that stiff 12ga. wire through those holes. Seriously, the chains of new cuss words would have left anyone with their jaw on the floor. But I got'er done:
and then the next chain of words flew:
All done:
If I could do it all over again would I have used larger diameter pipe or boxes? NOPE! I think anything bigger would just look stupid. The only thing I would do differently is subtract one light from each side of the rack. Then I would only have wires for 15 lamps instead of 17! I routed wire for 17 lights using 12ga. wire, wiring for 3 cameras with 18ga. wire and a RG-174 micro coax cable. Then there is another RG-174 micro coax for the scanner antenna and some RG-58 coax for the CB radio antenna. CRAZY!
I still have to pull the wiring for the drivers side through the final junction box. I know it won't fit. It has all the wires pictured in the box above PLUS an RG-58 coax wire that is about 1/4" in diameter. I might be able to pull it through but I'm certain I will end up crushing the dialectric in the cable. That is just foolish. I don't want to go through all this trouble just to receive a crappy signal on the CB. Instead I will cut a small hole in the junction box and route the RG-58 cable out of it's own hole. I will use some sort of ribbed pipe fitting and cover the entire cable in fuel hose or something similar to keep the cable safe from weather. I will use a 50 ohm BNC chassis feed thru to get it into the cab. I actually like that idea because it allows me to disconnect the antenna at the roof and use an alternate if I like. The RG-58 coax in the pipe is going to a spring mount bolted to the rack that will hold a 102" antenna. Clearly I will only want to use that when I'm out in the middle of nowhere. For around town I can use a smaller detachable antenna and plug into the chassis connector on the roof. Sorry, I know that's confusing without pix.
Tomorrow I'm soldering. I'm sure that's gonna be just as much fun with this super stiff cable.

I hung up the wire and tried to arrange it into a tight and straight bundle before feeding it into the conduit:
Then I sponged it with some soapy water and started pushing it in:
MAXIMUM CAPACITY!
Once everything was pulled in sections I reassembled the system so I could get the pipe spacing and placement correct for cementing:
I spent a few hours aligning the tees and cementing them in place.
As you've seen from the previous photos the 1/2" conduit is completely full. So that poses a bit of a problem considering two pieces of conduit will come together into a final tee junction box before the wires branch out into a rubber hose headed for the roof feed thru. I could have used a larger box but I liked that the 1/2" boxes would fit right underneath the diamond plate floor. 3/4" boxes are MUCH larger and would have either required an offset or a cutout in the floor. A cutout and a box sticking up from the floor would have been insanely stupid and I'm not sure there would have been enough room for an offset and a box hanging in between the roof and the rack. The distance between the rack and roof is maybe 2-3" in the center so I ruled that out. Luckily I discovered that the 1/2" junction box outlets have a 3/4" pipe sticking out! Whoever designed this box was a genius. You can either slide a 1/2" pipe inside it or put a 3/4" female fitting over it. Awesome!
I knew 3/4" would fit all of the combined wire that needed to come out of the box:
The inside of the box had a flange to keep the 1/2" pipe from sliding in too far. I needed that extra space so I used a Dremel to cut that flange out which gave me the inside diameter of a 3/4" pipe:
Flange removed:
Then it was just a matter of getting all the wire routed through the box:
After I had already screamed out every single cuss word I had in my vocabulary I started making up new ones. You can not possibly imagine what a PITFA it was to get all of that stiff 12ga. wire through those holes. Seriously, the chains of new cuss words would have left anyone with their jaw on the floor. But I got'er done:
and then the next chain of words flew:
All done:
If I could do it all over again would I have used larger diameter pipe or boxes? NOPE! I think anything bigger would just look stupid. The only thing I would do differently is subtract one light from each side of the rack. Then I would only have wires for 15 lamps instead of 17! I routed wire for 17 lights using 12ga. wire, wiring for 3 cameras with 18ga. wire and a RG-174 micro coax cable. Then there is another RG-174 micro coax for the scanner antenna and some RG-58 coax for the CB radio antenna. CRAZY!
I still have to pull the wiring for the drivers side through the final junction box. I know it won't fit. It has all the wires pictured in the box above PLUS an RG-58 coax wire that is about 1/4" in diameter. I might be able to pull it through but I'm certain I will end up crushing the dialectric in the cable. That is just foolish. I don't want to go through all this trouble just to receive a crappy signal on the CB. Instead I will cut a small hole in the junction box and route the RG-58 cable out of it's own hole. I will use some sort of ribbed pipe fitting and cover the entire cable in fuel hose or something similar to keep the cable safe from weather. I will use a 50 ohm BNC chassis feed thru to get it into the cab. I actually like that idea because it allows me to disconnect the antenna at the roof and use an alternate if I like. The RG-58 coax in the pipe is going to a spring mount bolted to the rack that will hold a 102" antenna. Clearly I will only want to use that when I'm out in the middle of nowhere. For around town I can use a smaller detachable antenna and plug into the chassis connector on the roof. Sorry, I know that's confusing without pix.
Tomorrow I'm soldering. I'm sure that's gonna be just as much fun with this super stiff cable.
1997 SAFARI 2WD CARGO
"I do not think there is any thrill that can go through the human heart like that felt by the inventor as he sees some creation of the brain unfolding to success... Such emotions make a man forget food, sleep, friends, love, everything." Nikola Tesla
"I do not think there is any thrill that can go through the human heart like that felt by the inventor as he sees some creation of the brain unfolding to success... Such emotions make a man forget food, sleep, friends, love, everything." Nikola Tesla
-
 krsowles
- I finally get the smurf thing
- Posts: 158
- Joined: Mon Aug 15, 2011 4:11 am
- Location: Colchester, VT
Re: Homebrew Con-Ferr Style Porthole Roof Rack Build
I'm not sure why I'm responding. Your fab work and documentation are amazing! I just feel a little sad that my van will never know anything so well made or thought out!

Keep it coming!
Keep it coming!
Sometimes, I realize that I'm clueless...Man, I hate those moments!

"S.S. Dark HoMutt"
1999 Chevy Astro AWD
1991 Chevy Astro AWD(retired)
"S.S. Dark HoMutt"
1999 Chevy Astro AWD
1991 Chevy Astro AWD(retired)
-
97CargoCrawler
Topic author - I sleep in my van
- Posts: 754
- Joined: Thu Jan 24, 2008 11:50 pm
- Location: Near Los Angeles, CA
- Contact:
Re: Homebrew Con-Ferr Style Porthole Roof Rack Build
Compliments help fuel my projects! Thank you, I appreciate you speaking up. Sometimes it seems like nobody is watching and all my efforts posting this stuff is just a waste of time!
So today I woke up and there is no power on just my block. Mylar balloons took out a transformer. Of course, not like I was going to need any electricity today to solder or anything. If I find out who's balloon that was I'm gonna put it on their head and fill it back up with helium. I have heard that is a very pleasant way to enter the afterlife. I did get some electrical work done and I have some pix of the silicone hose and couplings as well as the ribbed coupling for the coax feed from the junction box. If I ever get power back at least I can post that. This message is sent from my phone :(
So today I woke up and there is no power on just my block. Mylar balloons took out a transformer. Of course, not like I was going to need any electricity today to solder or anything. If I find out who's balloon that was I'm gonna put it on their head and fill it back up with helium. I have heard that is a very pleasant way to enter the afterlife. I did get some electrical work done and I have some pix of the silicone hose and couplings as well as the ribbed coupling for the coax feed from the junction box. If I ever get power back at least I can post that. This message is sent from my phone :(
1997 SAFARI 2WD CARGO
"I do not think there is any thrill that can go through the human heart like that felt by the inventor as he sees some creation of the brain unfolding to success... Such emotions make a man forget food, sleep, friends, love, everything." Nikola Tesla
"I do not think there is any thrill that can go through the human heart like that felt by the inventor as he sees some creation of the brain unfolding to success... Such emotions make a man forget food, sleep, friends, love, everything." Nikola Tesla
-
MountainManJoe
- I have my van tatooed on my cheeks
- Posts: 3128
- Joined: Fri Aug 08, 2008 12:55 pm
- Location: The Pacific North Wet
- Has thanked: 47 times
- Been thanked: 25 times
Re: Homebrew Con-Ferr Style Porthole Roof Rack Build
Sheesh, can't I just read quietly? 
Here, I'll stroke your ego since that's what you need to keep going...
Here, I'll stroke your ego since that's what you need to keep going...
-
97CargoCrawler
Topic author - I sleep in my van
- Posts: 754
- Joined: Thu Jan 24, 2008 11:50 pm
- Location: Near Los Angeles, CA
- Contact:
Re: Homebrew Con-Ferr Style Porthole Roof Rack Build
Edison has once again graced me with his inefficient AC power. I suspect if my bill was payable to the Tesla Electric Company I wouldn't have so many power disruptions. And all of my tools would be cordless.
Here's some breadcrumbs...
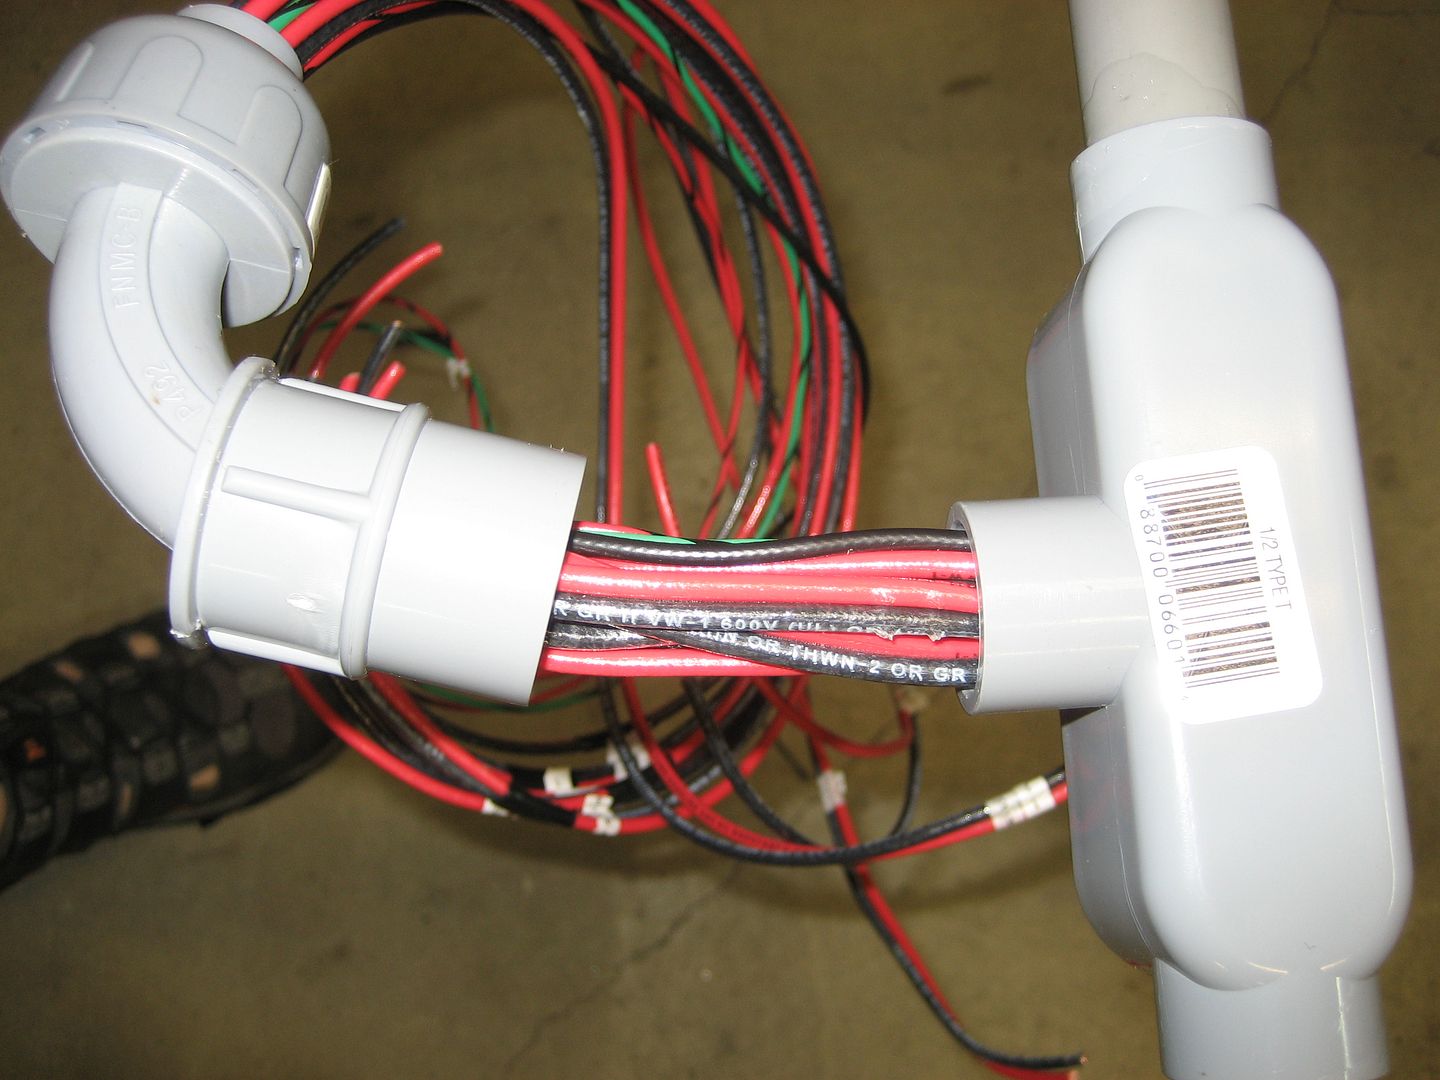
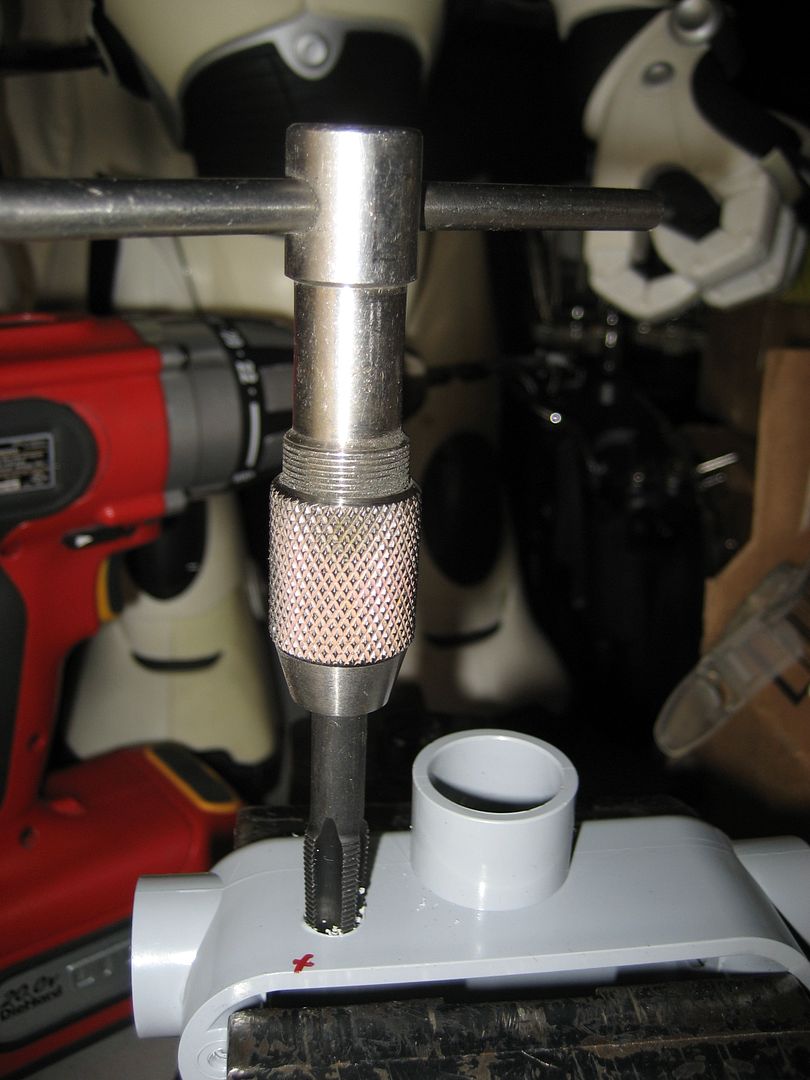
Tapping the 1/8" NPT threads for the barbed fitting:
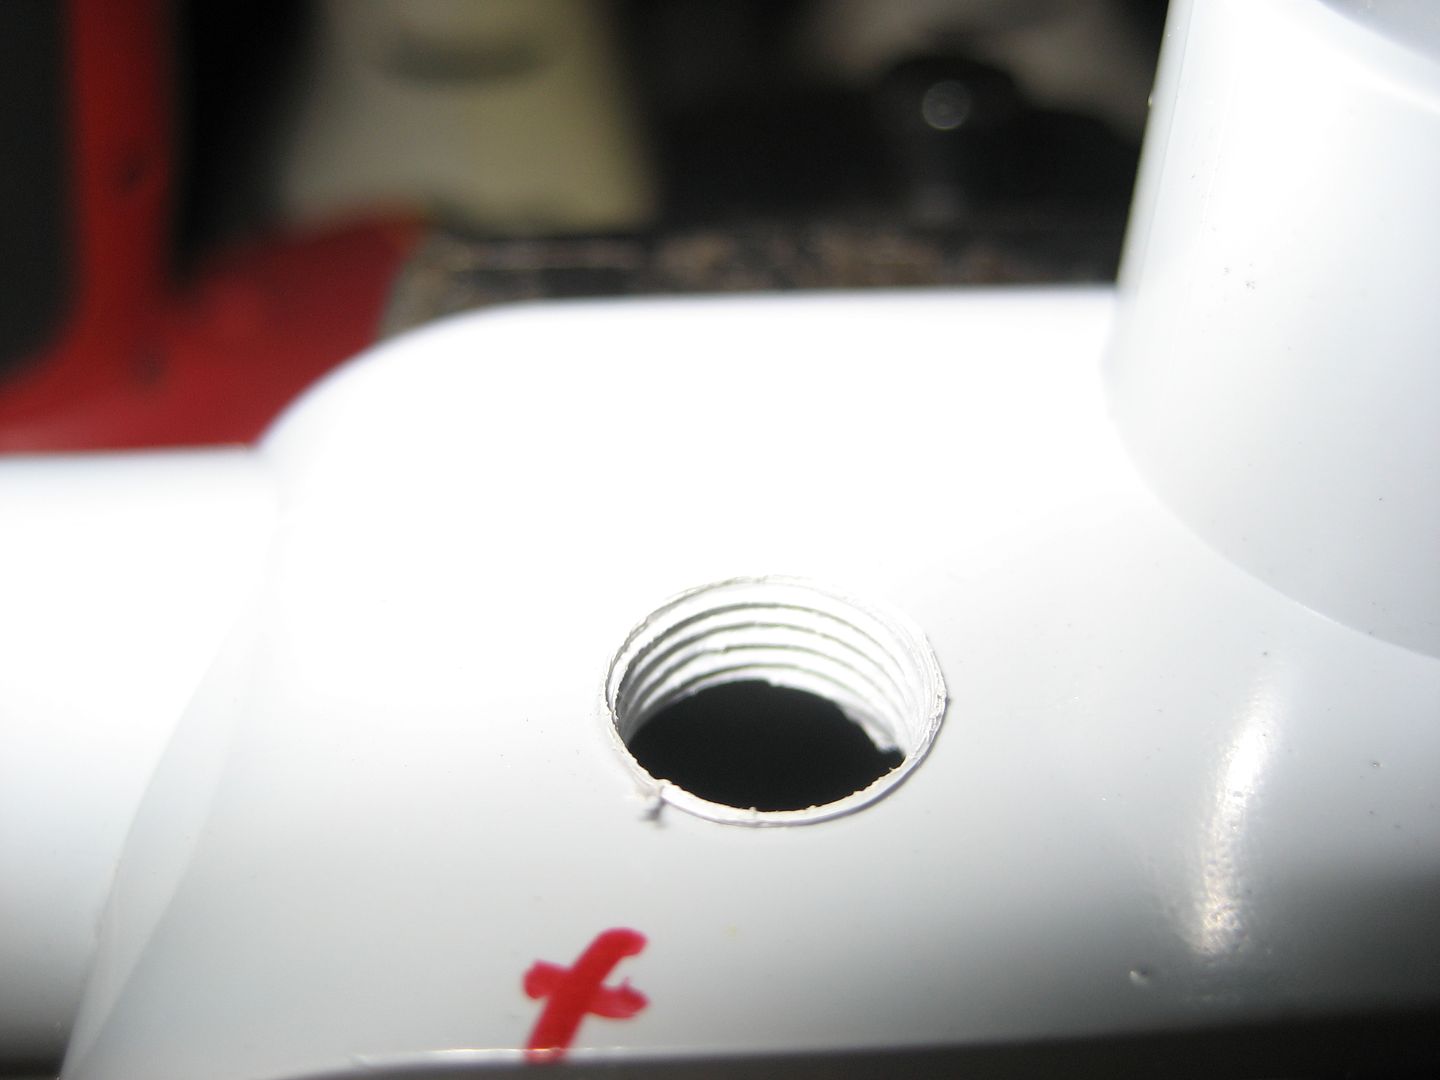
I added some of the PVC pipe cement just to make sure it's water tight:

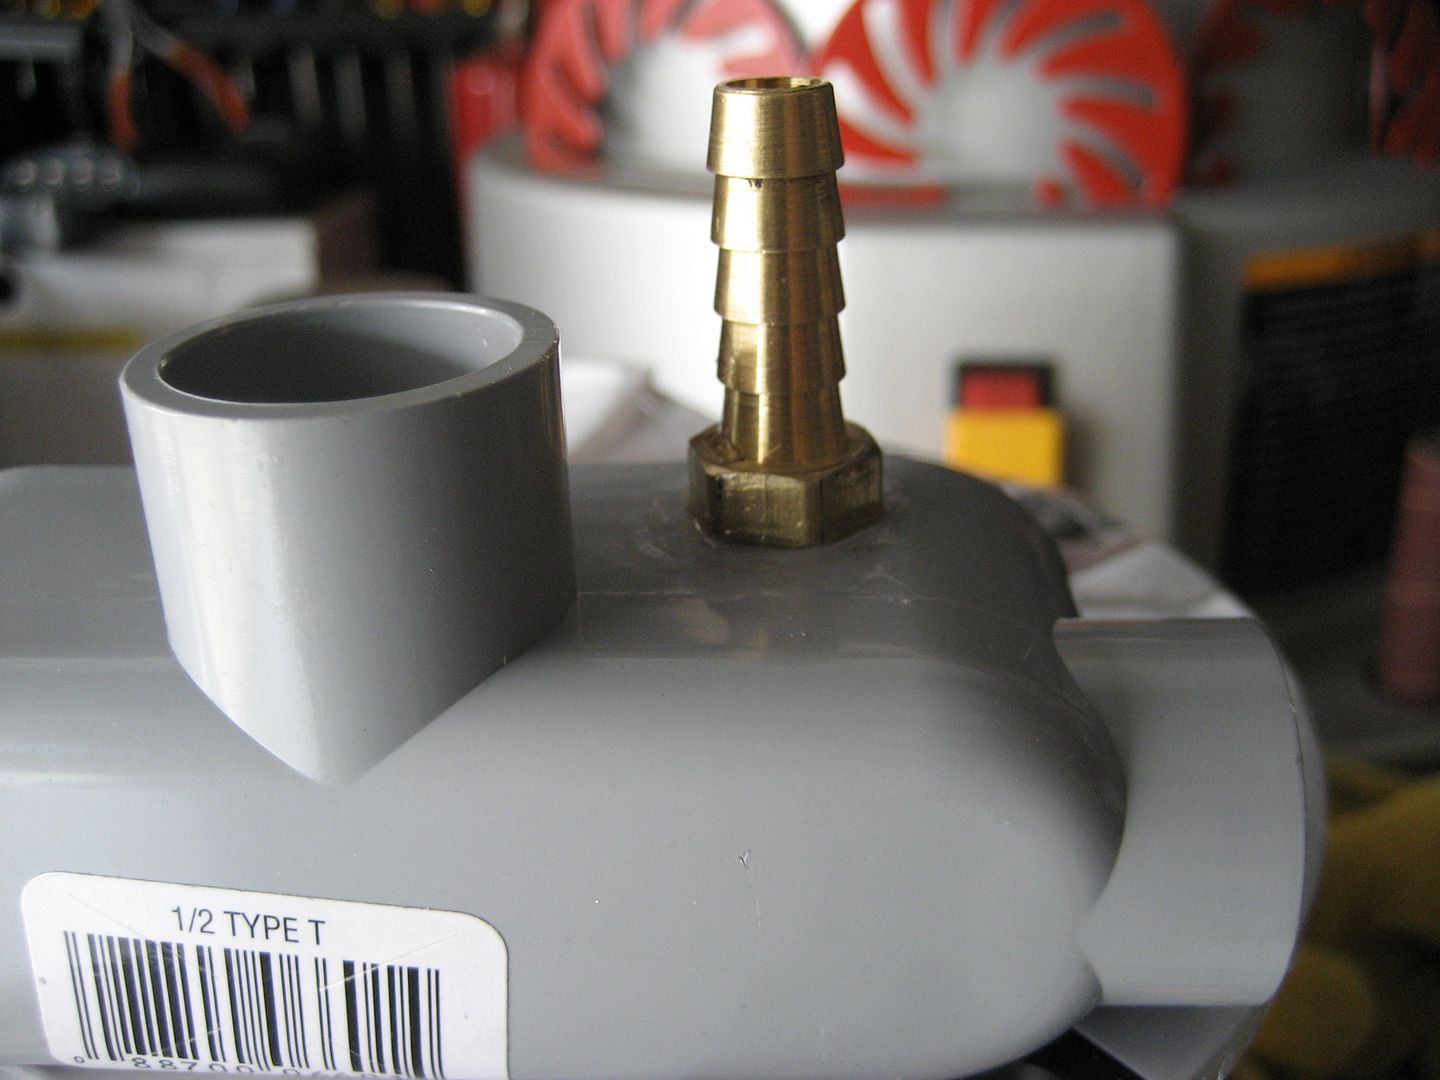
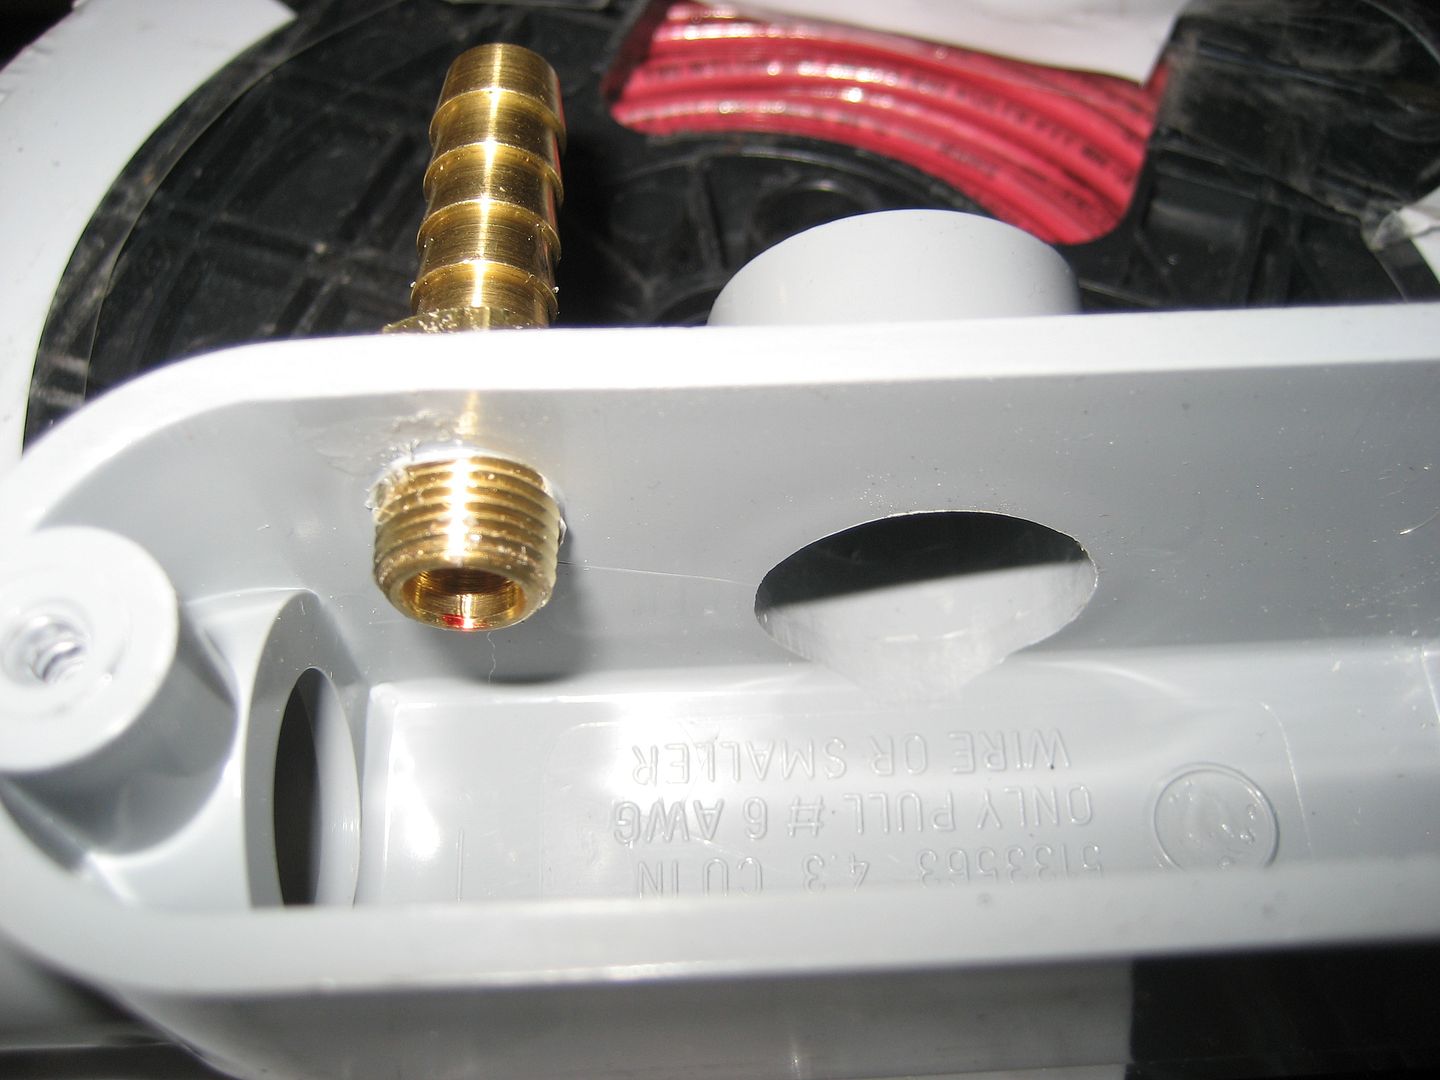
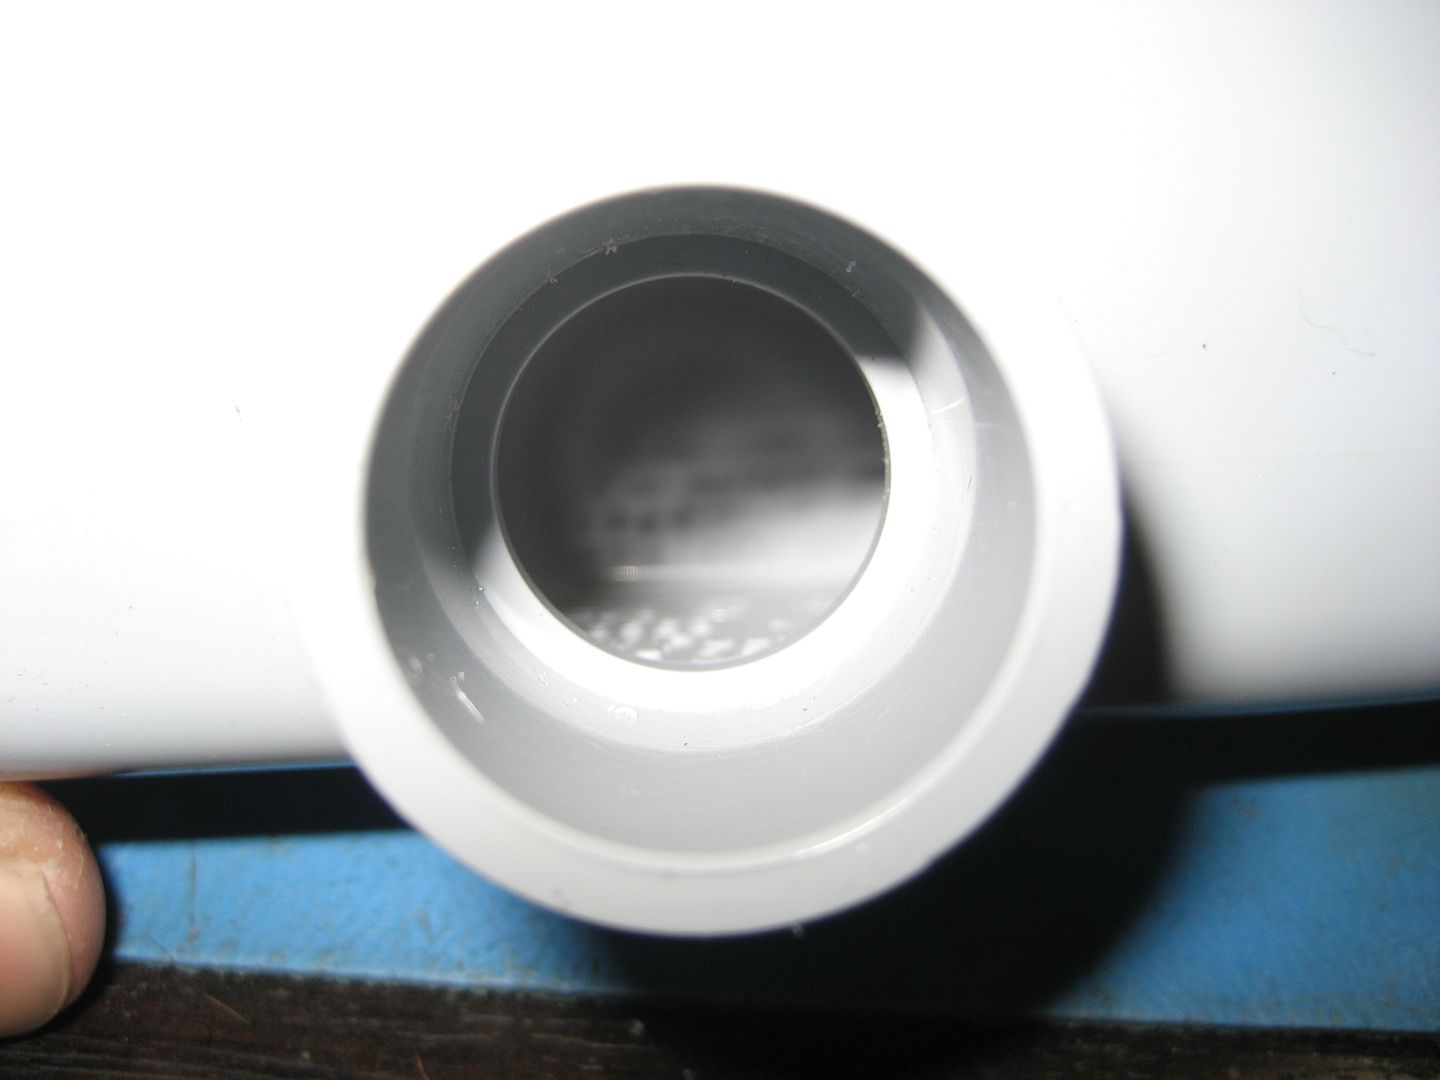
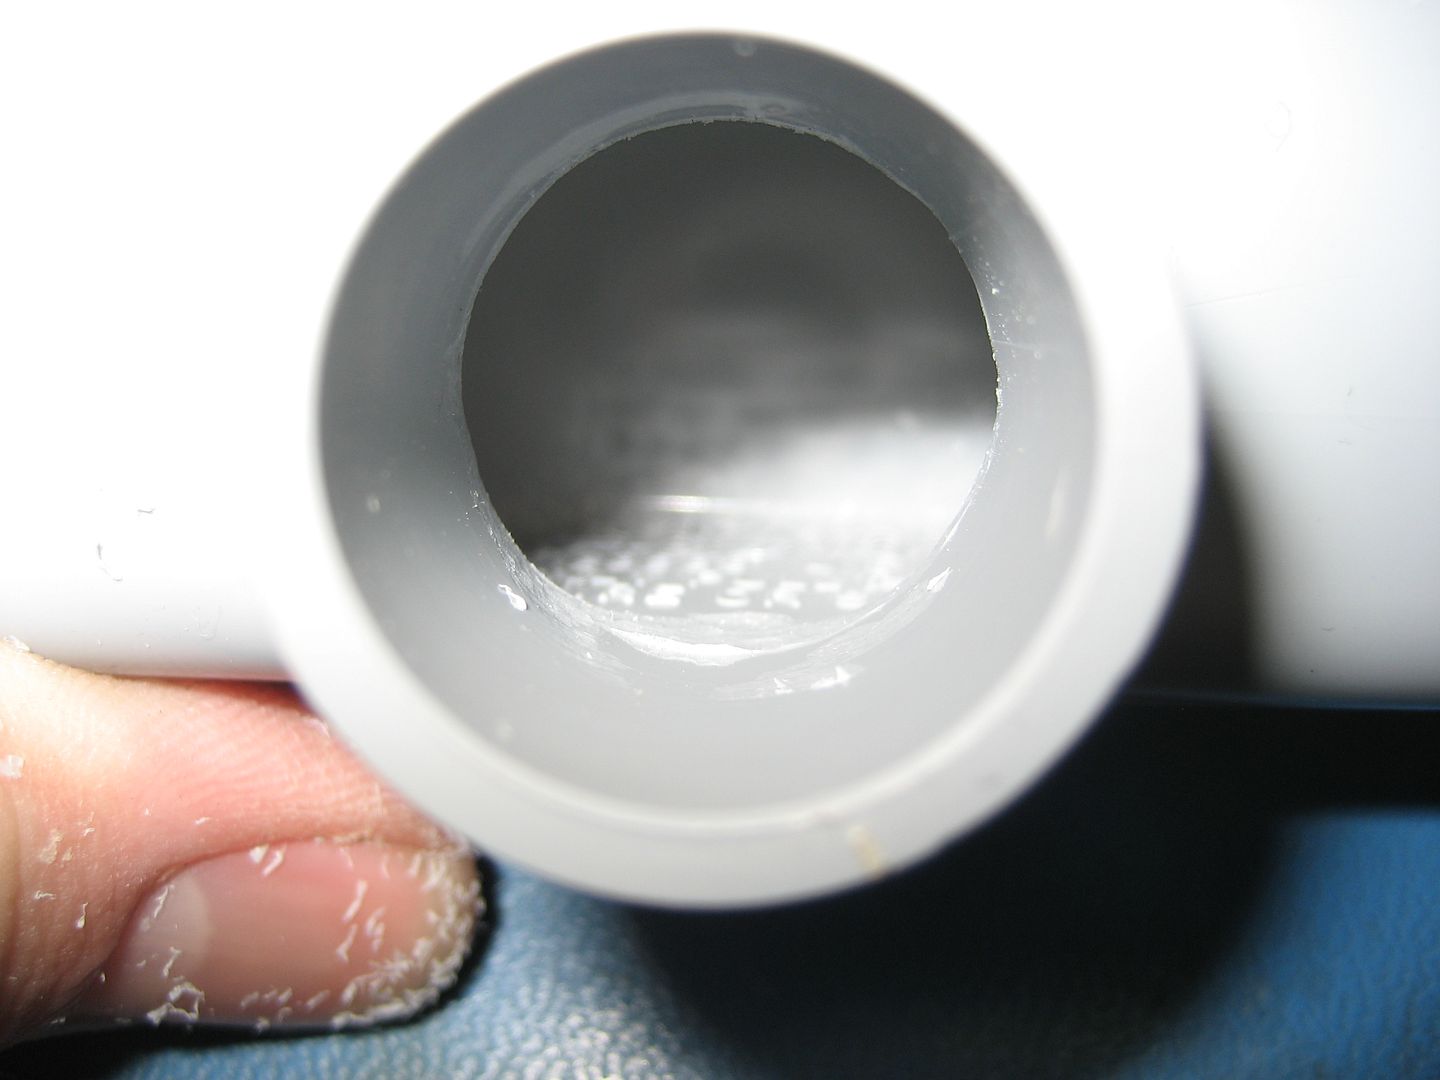
I still need to put the 3/4" coupling and elbow on. Home Depot here I come.
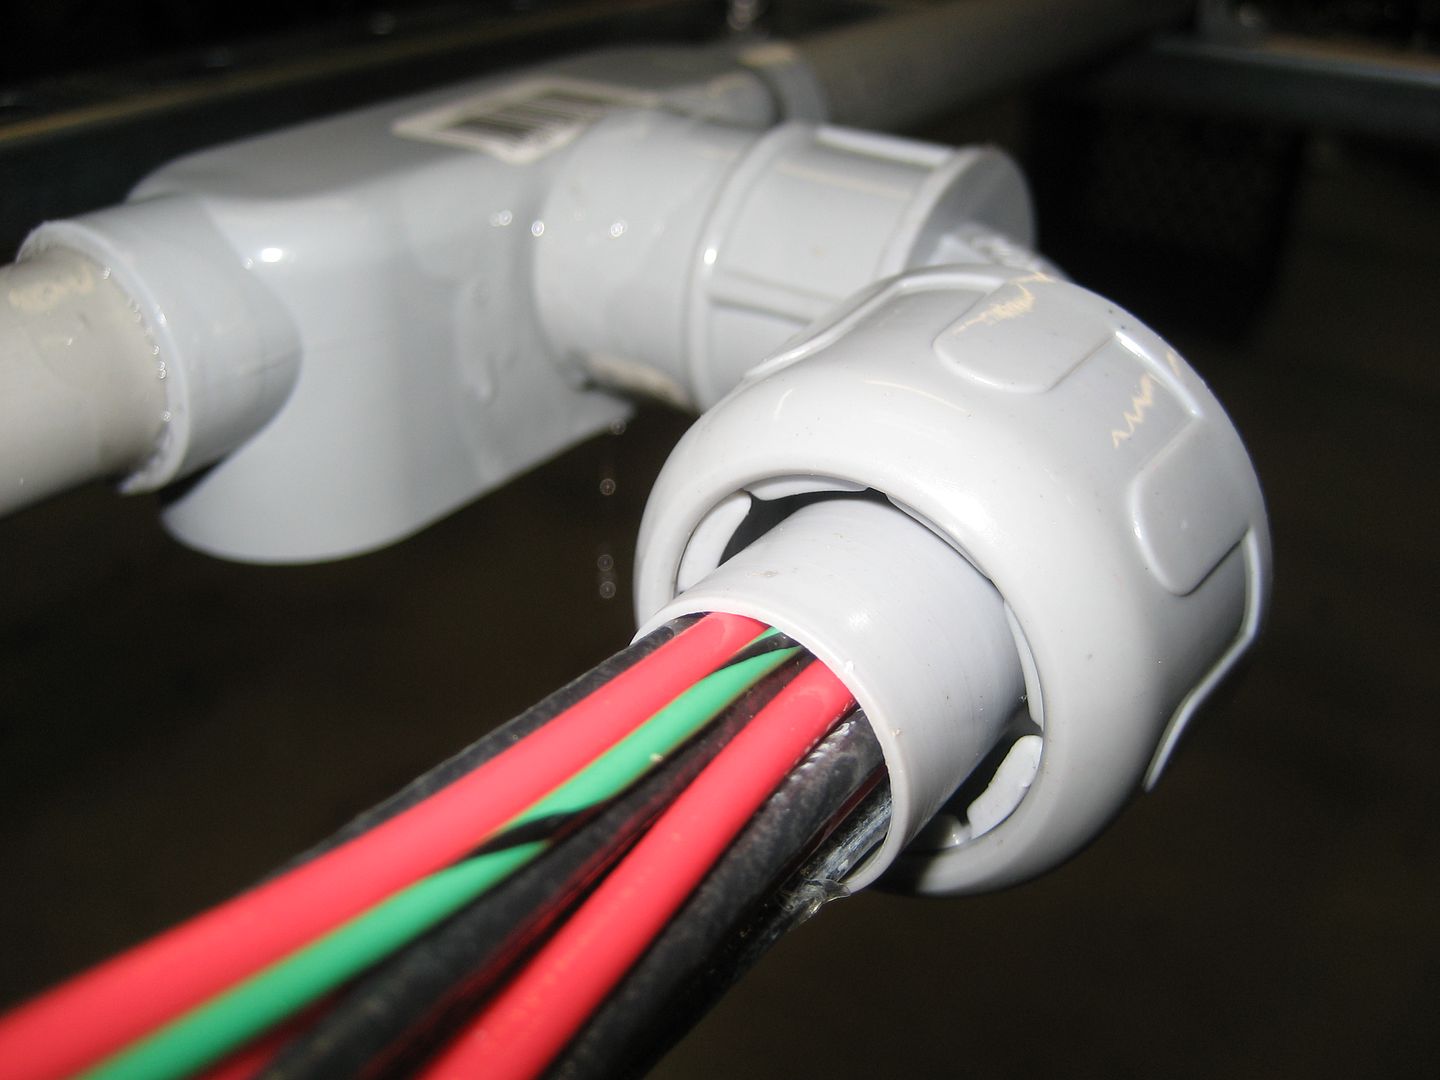
The idea of running all of this wire in pipe is to keep it protected from weather and make it look tidy. I wanted a flexible lead coming from the rack into the roof. Not sure why, but it just seemed to make sense. Liquid tight electrical conduit is too stiff so I decided I would use silicone heater hose. It costs a small fortune but seems perfect for this application. The hose will stretch onto the fittings and then the collet claws in the fittings will cinch down on the hose and keep it from sliding off.
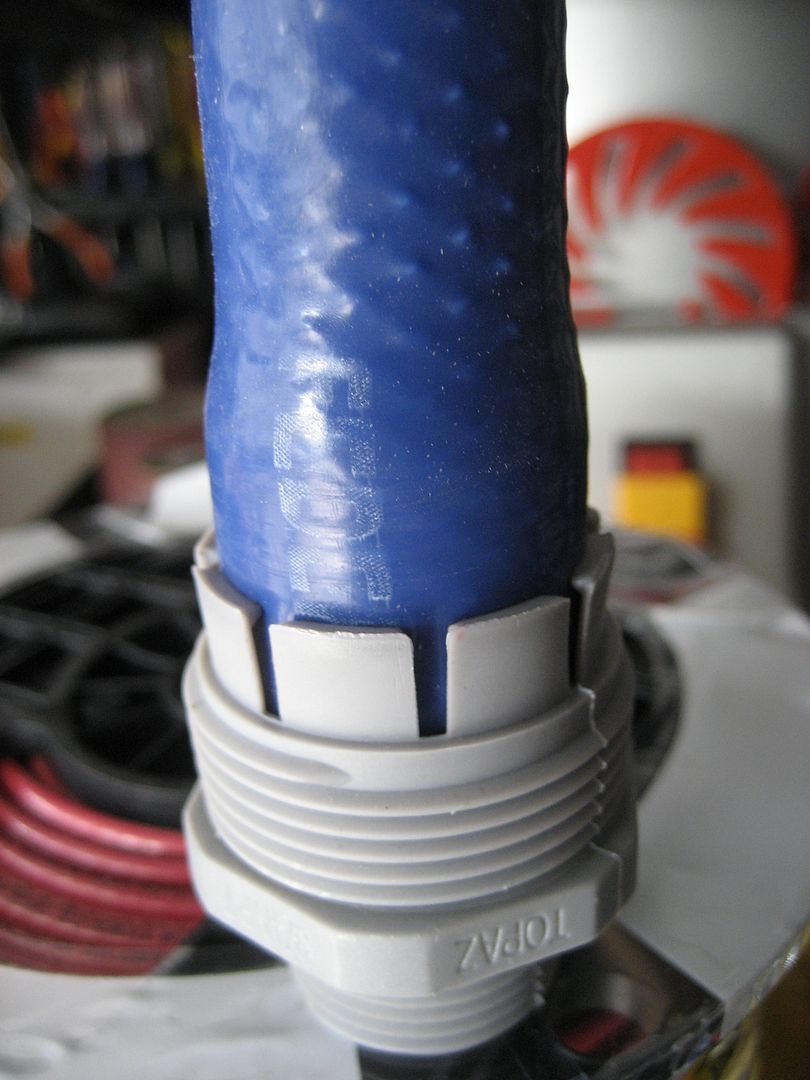
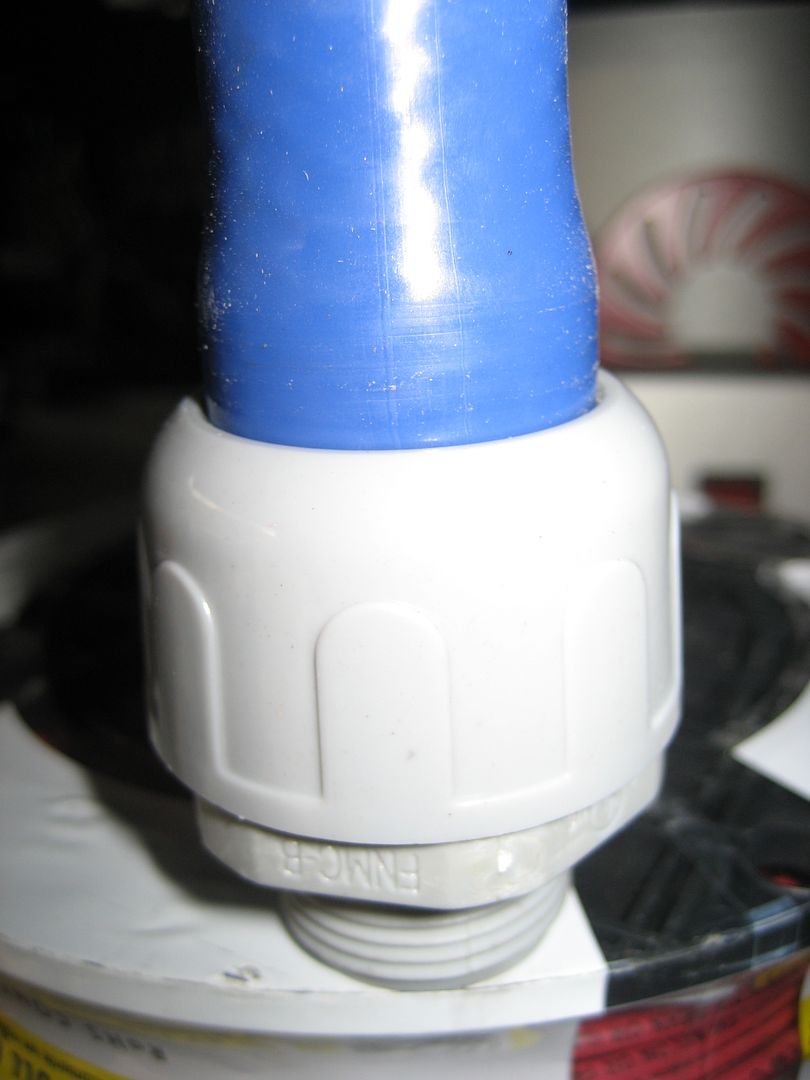
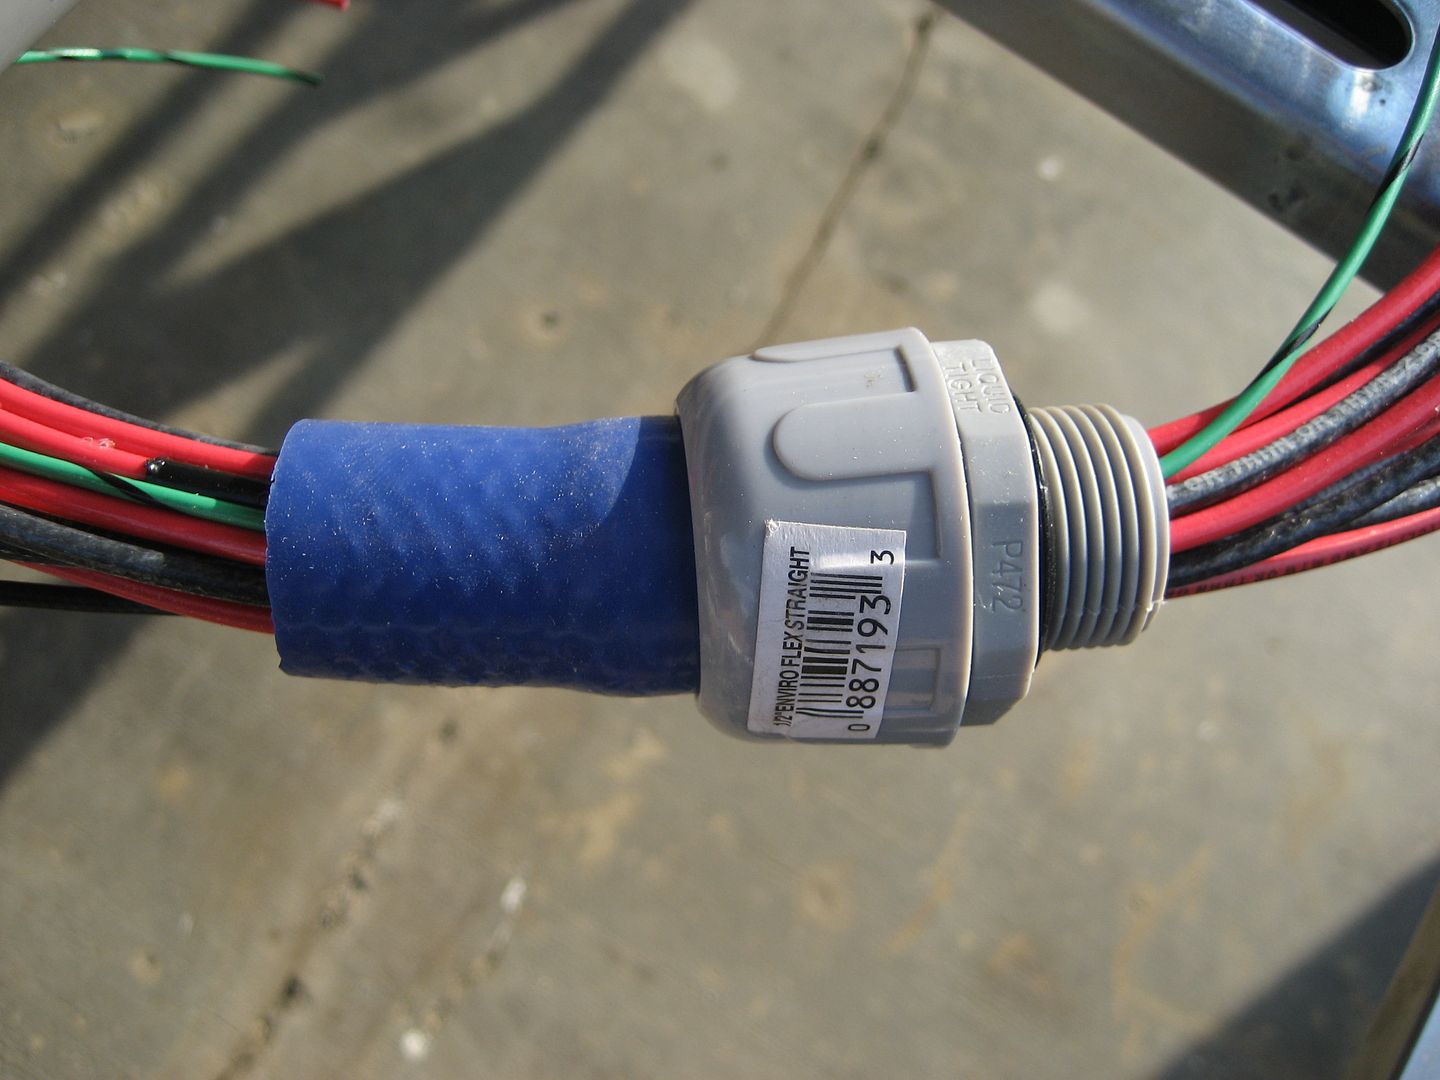
The hose lead will probably be about 8-12" long and will connect to a similar fitting bolted to the roof. All electrical connections will terminate on a fuse block inside the van. To remove the rack and electrical I will have to disconnect the wires from the fuse block and unbolt the fitting from the roof. It's not as convenient as I'd like but any other method would have either left loose wires dangling on the roof or a big electrical box on the top of the van. At least this way all I need to do is bolt a plate over the hole in the roof whenever I want to remove the rack.
I will use 5/16" fuel hose to protect the RG-58 coax from weather. The sun will eventually harden the jacket on the cable if I don't shield it.
Now that the power is back on I'm gonna try to get some soldering done.
Here's some breadcrumbs...
Tapping the 1/8" NPT threads for the barbed fitting:
I added some of the PVC pipe cement just to make sure it's water tight:
I still need to put the 3/4" coupling and elbow on. Home Depot here I come.
The idea of running all of this wire in pipe is to keep it protected from weather and make it look tidy. I wanted a flexible lead coming from the rack into the roof. Not sure why, but it just seemed to make sense. Liquid tight electrical conduit is too stiff so I decided I would use silicone heater hose. It costs a small fortune but seems perfect for this application. The hose will stretch onto the fittings and then the collet claws in the fittings will cinch down on the hose and keep it from sliding off.
The hose lead will probably be about 8-12" long and will connect to a similar fitting bolted to the roof. All electrical connections will terminate on a fuse block inside the van. To remove the rack and electrical I will have to disconnect the wires from the fuse block and unbolt the fitting from the roof. It's not as convenient as I'd like but any other method would have either left loose wires dangling on the roof or a big electrical box on the top of the van. At least this way all I need to do is bolt a plate over the hole in the roof whenever I want to remove the rack.
I will use 5/16" fuel hose to protect the RG-58 coax from weather. The sun will eventually harden the jacket on the cable if I don't shield it.
Now that the power is back on I'm gonna try to get some soldering done.
1997 SAFARI 2WD CARGO
"I do not think there is any thrill that can go through the human heart like that felt by the inventor as he sees some creation of the brain unfolding to success... Such emotions make a man forget food, sleep, friends, love, everything." Nikola Tesla
"I do not think there is any thrill that can go through the human heart like that felt by the inventor as he sees some creation of the brain unfolding to success... Such emotions make a man forget food, sleep, friends, love, everything." Nikola Tesla